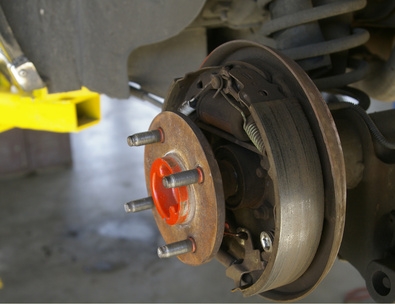
Replacing brakes is a common maintenance job for any type of vehicle. The brakes of the Chevrolet 1997-2003 Malibus in particular have a tendency to wear out quickly. The brakes contain two major parts that will likely have to be changed at some point throughout the vehicle's life. These are the pads and the rotor (also known as the disc). This job can be done at home with only a few basic tools that can be bought at most auto parts stores.
Jack up the car by using a car jack to raise the wheel you will be working on. Place a jack stand underneath the vehicle and lower the jack until the vehicle is resting on the jack stand after the wheel has been raised enough for you to work on. Place wheel chocks underneath the other wheels still on the ground to ensure that the vehicle will not roll if anything should go wrong.
Remove the wheel. You may or may not have to remove the hub cap to access the wheel's lug nuts. Use a torque wrench to remove the lug nuts from the wheel and then remove the wheel. Place the lug nuts somewhere safe so they do not get lost.
Remove the brake caliper. There are two bolts that must be removed before the brake caliper will come off. These bolts are located at the top and bottom of the caliper, facing the inside of the vehicle. The bolts may be rusted and hard to remove. If so, spray rust remover on them to make them easier to remove.
Place the brake caliper on top of the wheel hub after the bolts have been removed. Do not let the caliper hang from the brake line as this could damage the brake system. Use a wire coat hanger or bungee cord to fasten the caliper so that it does not fall.
Remove the caliper from its bracket now that the bolts are out.
Remove the old brake pads and disc by sliding them out of the caliper bracket. The old brake disc should also slide off. The brake calliper is what holds it in place. If the brake disc does not slide off, it may be rusted. Spray rust remover and use a rubber mallet to hit the disc and loosen it.
Install the new brake pads and disc. There is a film coating that comes on new brake discs that must be removed before installation. Therefore, you must clean the new brake disc with brake cleaner spray before installing. Spray the new disc with the brake cleaner and wipe it off with a paper towel.
Slide the new brake disc into place and apply brake lubricant to the backs of the new brake pads.
Slide the new brake pads into the caliper bracket. The brake pad that has a wear indicator on it that goes on the side of the caliper bracket facing the inside of the vehicle. Use a C-clamp to push the piston in slightly so that the caliper will fit over the new rotor and pads. If you need to push the piston in a lot, then you may need to remove some of the vehicle's brake fluid first by syphoning it out of the reservoir under the hood. Pushing in the piston too much will make the brake fluid level rise about the maximum level.
Put the brake caliper and wheel back on. Once the brake caliper is put back in place, use a torque wrench to replace the bolts that were removed. The top bolt must be torqued to 80-foot pounds and the bottom one must be torqued to 23-foot pounds.
Put the wheel back on and tighten the lug nuts. The lug nuts must be torqued to 100-foot pounds. When tightening lug nuts, tighten them in a star pattern so that the wheel will be evenly tightened all around. For example, tighten the top left lug nut, then tighten the bottom right, then bottom left.
Lower the vehicle and repeat this process on the other side. Raise the vehicle slightly so that the jack stand can be removed. Remove the wheel chocks and lower the jack slowly until the vehicle is on the ground before you remove the jack. If you had to syphon brake fluid, replace it with new fluid after the other side of the vehicle has been finished.