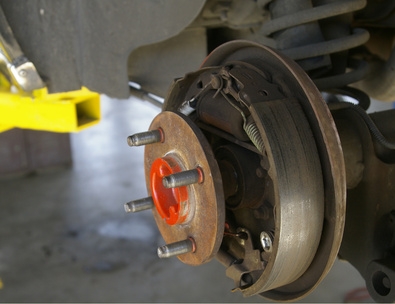
Kia Motors has been selling automobiles in the U.S. since the early 1990s. Many Kia vehicles have drum brakes on the rear wheels. While drum brakes are generally less effective than disc brakes, they have the advantage of being lighter and less expensive. It is also easy to incorporate the parking brake into a drum brake, eliminating the need for a separate parking brake mechanism. Kia owners can save themselves both time and money by learning how to service the drum brakes themselves.
Loosen the lug nuts on both rear wheels with a lug nut wrench. Jack up the rear of the car and set the car on jack stands. Remove the rear wheels.
Remove the four nuts that hold the drum. Pull the drum straight off the hub. If the drum is stuck, locate the two threaded jacking holes in the drum, thread two 8 mm bolts into these holes and tighten the bolts to jack the drum off of the brake assembly.
Detach the adjuster lever spring by using pliers to grip the spring end and unhook it from the adjuster lever. Remove the lower return spring in the same way.
Turn the adjuster star wheel to relieve the spring tension on the brake shoes. Remove the star wheel by moving it up from between the two brake shoes. Remove the upper return spring by gripping it with pliers and unhooking the spring ends from the brake shoes. Take care not to damage the dust cover on the brake cylinder.
Remove the two hold-down pins that hold each shoe to the backing plate. Use a large screwdriver to rotate each pin clockwise until it lines up with the groove in the hold-down pin clip then slide it straight out. Remove the hold-down pins by slipping them through the grooves in the clips then remove the hold-down pin clips.
Pull the primary brake shoe off of the backing plate then pull out the secondary brake shoe assembly. Remove the parking brake cable from the secondary shoe by removing the retaining clip with pliers then pulling the cable off. Use a large screwdriver to spread the control lever retaining clip then grasp the clip with pliers and pull it off. Pull the control lever off of the secondary brake shoe.
Measure the inside diameter of the brake drum with a drum micrometer. The drum should be round, meaning that the diameter should be the same, no matter which direction the diameter is measured. The interior surface of the drum should not have any deep grooves or cracks.
Clean the backing plate with sandpaper and brake cleaning fluid. Unscrew the halves of the star wheel, clean the parts with brake cleaning fluid and lubricate the threads with high-temperature brake grease before screwing the parts back together again. Also apply brake grease to the points where the brake shoes contact the backing plate.
Reassemble the brake with the new brake shoes by reversing the steps above. Use the wheel on the opposite side, as a reference, to help you remember where all the parts should go. Remount the wheel. Pump the brakes several times to set the self-adjusting mechanism. Repeat the procedure on the opposite wheel to complete the job then lower the vehicle.