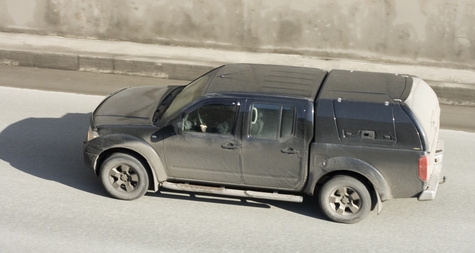
The idea of a pickup truck hails from a time well before anyone had ever thought of applying aerodynamics to an automobile, and shortly before a time that vehicles were capable of reaching a speed that made aero-efficiency relevant in any way. While an open bed is undoubtedly practical for hauling around cargo, the fact is that 90 percent of trucks on the road today spend more than 90 percent of their time with an empty or lightly-loaded bed. Tonneau covers are commercially available for many popular vehicles, but making your own aerodynamic tonneau can save you some big money up front and at the pump.
Cut a basic framework of 1-inch-by-4-inch pressure treated pine. Cut two lengths to sit on top of your truck's side bed rails and another two to fit on the front and the back. Clamp the lumber to the truck's bed-rails. You may wish to build corner supports from 1 by 4 lumber to tie the rectangular framework together; if so, leave a 2-inch-by-2-inch square free at the corners.
Build a framework of 2-inch-by-2-inch lumber extending upward from the front of your truck bed to the roof line. The basic shape will be a trapezoid, which is a pyramid with the top cut off. Secure all of the lumber together with adhesive and use brad nails to hold the assembly together while the glue dries. You may need to place a second 2-inch-by-2-inch lumber atop the top support. Use a jigsaw to trim the top piece of lumber to that it matches the contour of the roof.
Cut a length of 2 by 2 to extend from the corners of your vertical frame down to the base 1 by 4 on your tailgate. This can require a bit of creativity in terms of adjusting the angles at the front and rear of the extensions where they meet the vertical support and 1 by 4 on the tailgate. Rather than extending the struts straight backward to the corners of the bed, angle them toward the center of the truck. Measure to about one foot on either side of the center of the tailgate, and set your supports at that location. The end product should look like a right triangle from the side and an inverted trapezoid from the back.
Trim the corners of your supports with a router, and install 90-degree shelving brackets on the inside corners of your 1 by 4 base plates. Remove the clamps and have an assistant help you to carefully remove the framework from the truck.
Cut a piece of polyester fleece to roughly the size of your trapezoidal front vertical support. Spray the front surface of your framework down with spray adhesive. Lay your fleece on the ground, lift the front of the framework up and set it on the bottom edge of the fleece. Pick the fleece up and stretch it tightly over the framework; stick it in place with the adhesive, and hold it in place with staples.
Repeat step five with the sides and top section, stretching the fleece over the framework and holding it in place with staples placed about every inch. Mix a quart of fiberglass resin according to the package instructions. Dip a paint brush into the resin and paint it onto the fleece. Coat the entire tonneau cover with resin and allow it to harden for approximately an hour.
Flip the tonneau cover over. Cut segments of fiberglass mat out to cover the entire inner surface of the tonneau cover, including all of the wood struts. The idea here is to form an inner shell over the entire inner surface. Apply resin to the mat, thoroughly saturating it and sticking it to the inside of the fleece and the wooden supports. Allow the resin to harden and apply another coat of fiberglass; allow the resin to harden.
Sand the outside of the tonneau cover with 80-grit sandpaper, being very careful not to create low points in the cover. Mix your body filler according to package directions and apply it to the entire surface of your tonneau cover. Sand the high spots down with 80-grit sandpaper, apply another coat of filler, re-sand with 80-grit sandpaper and again with 180-grit paper.
Spray the outside of the tonneau cover down with 2X gap-filling primer, allow to dry and hand-sand the cover with 180-grit paper. Coat the under-side of the tonneau cover and the bottoms of the 1 by 4 base flanges with a thin layer truck bed coating; you can use spray-on or roll-on coating. Allow the coating to dry. Take the tonneau cover to your local auto-body shop and have it painted to match the truck.