If your engine has started to become excessively noisy, you may need to adjust your valves. Over time, valves wear and lose their original dimensions and they need to be adjusted to keep your engine performing at its best. You can adjust your valves with relative ease, but you must have the exact clearance specifications for your car and it must be done when the engine is cold to prevent you from getting a false reading with your feeler gauges.
Disconnect the negative battery cable.
Remove the bolts holding the valve covers in place and remove both covers.
Locate the crankshaft pulley on the front of your engine block. Using a box wrench, turn the pulley counter-clockwise. If you are turning the correct pulley you will see the valves move. Turn the crankshaft until the timing mark on the pulley lines up with the timing plate on the engine.
Rock the crankshaft slightly and pay attention to which valves are moving. If the set on the driver's side is moving then you will be working on the exhaust valves. If the set on the passenger side is moving then you can work on the intake valves.
Look at your valve specifications for your vehicle and identify the moving valves as "exhaust" or "intake" on both sides, you can adjust the valves that are the same as the exhaust or intake side that you identified. So if your exhaust side is moving, identify the individual exhaust valves.
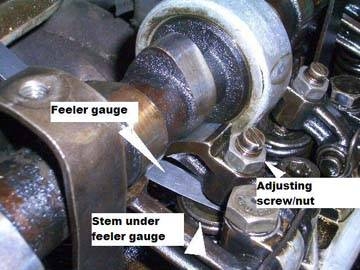
Select a feeler gauge according to the gap specifications for your vehicle. Pull the feeler gauge across the top of the valve (which looks like a spring) between the rocker head and the top. You should feel a slight drag as you pull. Using a box wrench, tighten or loosen the nut above the valve on the rocker arm until the gap is correctly set.
Rotate the crankshaft until the opposite side of valves are moving. If you just adjusted the exhaust valves, you will want to rotate the crankshaft until the timing mark is aligned and the passenger side set of valves is moving. Repeat the adjusting steps and you are done.