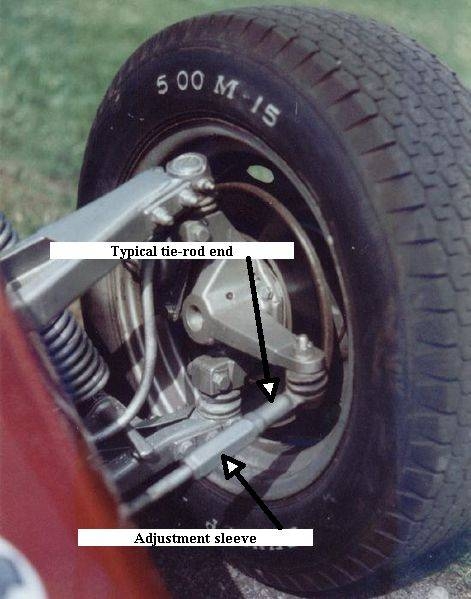
The tie-rod ends on your Dodge Dakota 4x4 have a sturdy construction and are very reliable for the most part. However, as any other component after years of service, they become weak and lose their grip on the wheel assembly, causing loss of wheel steering control. However, you can remove the damaged tie-rod end on your vehicle following these simple steps. Before you begin though, make sure you have the right components for your particular model and necessary tools.
Park your Dodge vehicle in a safe place with a level surface. Set the transmission to Park (automatic) or Reverse (manual) and apply the emergency brake.
Loosen the wheel lugs and raise the front of the vehicle using a floor jack. If you are replacing both tie-rod ends, support the front of the vehicle using two jack stands. Otherwise just raise and support the wheel assembly with the bad component.
Remove the tire and the cotter pin off the tie-rod end stud connected to the steering knuckle behind the wheel assembly. The cotter pin holds the castle nut in place to secure the tie-rod end to the steering knuckle. Remove the pin using nose pliers.
Loosen the castle nut to the edge of the tie-rod end stud using a wrench but do not remove it yet. Force the tie-rod end off the steering knuckle mounting hole using a steering knuckle puller-read the Tip section at the bottom for more information.
Mark the threads on the inner tie-rod end as they join the jam nut against the outer tie-rod end. Use whiteout correcting fluid or other suitable marker. This match mark will help you mount the new tie-rod end in place and keep wheel alignment as close as possible.
Loosen the mounting nuts on the tie-rod sleeve using a wrench or ratchet and socket. Back off the jam nut one turn using a wrench. Remove the castle nut, pull the outer tie-rod end off the steering knuckle and remove the outer tie-rod end off the inner tie-rod end.
Thread the new outer tie-rod end in place. Turn the jam nut one turn forward in line with the match mark and tighten the tie-rod end against the jam nut, adjusting as necessary to set the outer tie-rod end in mounting position. Then tighten the jam nut. Tighten the tie-rod sleeve nuts.
Install the outer tie-rod end stud into the steering knuckle mounting hole and install a new castle nut on the tie-rod end stud. Tighten the castle nut and install a new cotter pin. Some after market tie-rod ends units come equipped with a grease valve. You need to fill the outer tie-rod end with the manufacturer recommended grease using a grease gun.
Install the tire, lower the vehicle and finish tightening the wheel lugs. Install the other outer tie-rod end following steps 3 through 8 and have wheel alignment inspected if necessary.