 John Cappa
Former Editor, Four Wheeler
Flatfender Power Steering
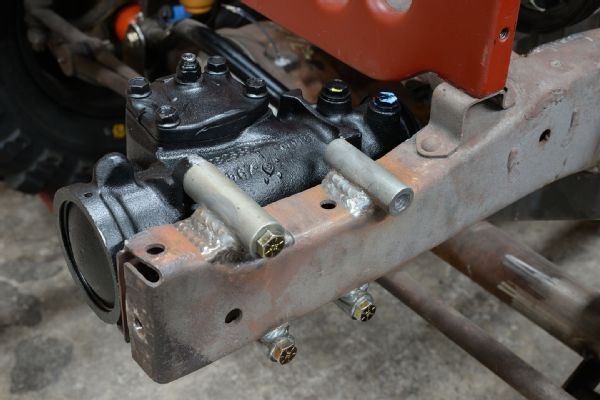
Do you have any detailed pics of how you mounted the steering box on the Garage Project GPW flatfender? Did you completely remove the front crossmember located under the radiator?
I have been running a Toyota Land Cruiser steering box, but after making some mods to the ride height, I needed to switch to a Saginaw box. I've never really liked the look or idea of the steering box out front and vulnerable. Thanks for any help or hints.
Josh Wilkins
Via facebook.com/JohnCappa4x4
The Saginaw power steering conversion has been done on early Jeeps for many decades. The relatively compact and durable steering box mounts to the inside of the frame, just behind the bumper. It allows plenty of room for the axle and steering linkages, if it’s located properly. This can be quite a task on a flatfender Jeep. You don’t have a lot of space to work with. Moving the steering box even 1/4-inch in the wrong direction can lead to fitment issues. Because of the tight constraints on a flattie, I often joke that something as simple as an incorrect steering box location can alter where your rear axle needs to be located. Take your time, cycle the suspension, check for clearance all around the steering box, and map out the steering shaft routing before permanently welding anything to your frame.
The Saginaw steering boxes used for this conversion are extremely common. They can be found on many ’60s, ’70s, and ’80s GM cars, as well as fullsize Jeeps, among other applications. The steering ratio will vary depending on the application. Some boxes will provide a quick 2 1/2 turns lock-to-lock and others, like the FSJ boxes, will be closer to 4 turns lock-to-lock. If you prefer a slow-ratio box, look to the larger GM cars and FSJs.
Don’t be too concerned about the steering box being vulnerable on the front of your Jeep. They are very sturdy and can handle being banged around a bit. For more abusive rocky applications, you can easily fabricate a small skidplate that extends back from the front bumper.
Advance Adapters (advanceadapters.com) offers a complete power steering swap kit for early Jeeps, but you won’t be able to use most of the parts if you have swapped out the factory front axle and steering linkage. The Advance Adapters weld-on four-bolt Saginaw steering box mount is available separately for those applications under PN 716838.
If you don’t like the steering box way out front like on a Saginaw box application, Herm the Overdrive Guy (hermtheoverdriveguy.com) offers a really innovative power steering conversion kit for early CJs. The kit places a reverse-rotation Ford steering box on the inside of the framerail between the motor mount and radiator. Space will be at a premium in this area, and the conversion will not work with the stock four-cylinder engine. Exhaust clearance around the steering shaft will be tight but still manageable on V-6 and V-8 engine swaps. A low-slung suspension may cause clearance issues because the steering box is essentially placed right over the front axle.
On the Garage Project GPW, I simply used heavy-wall DOM boss tubing for mounts. I welded the bosses directly to the frame with three passes on each joint, which is certainly overkill. I've also done this in the past on taller frames by using a hole saw to pierce the framerail for the DOM bosses to pass through before fully welding them in place. It’s a little more difficult to mock up than using the Advance Adapters mount, but it’s likely the strongest way to attach a steering box to your frame because it distributes the load.
In the past, I have completely removed the large factory tubular CJ front crossmember and replaced it with a smaller diameter tube. This time around, I left it in place and notched it for steering shaft clearance. On the very forward upper boss, you'll need a 3/16-inch-thick spacer. There was a bit of a gap under this forward mount and I didn’t want to fill it with weld, so I simply welded in a small 1.75x2-inch piece of strap steel to the frame prior to welding the bosses in place. You may or may not need to do this depending on how you locate your steering box.
U-Joint Jumble
I’ve got a random obscure tech question for you: When the Dana 25/27 axles switched from the Rzeppa joint to a more modern U-joint, do you remember what U-joint was used? Isn't it the 260 like the early Dana 30 axles? I don't expect you to have the answer, but I figure maybe the old closed-knuckle Dana 44 from your J-truck might have used the same U-joint. I have factory service manuals from 1941 through 2003, but I’m missing a big gap from the ’50s through the ’70s, and that's the timeframe I need.
Josh Biggs
Via facebook.com/JohnCappa4x4
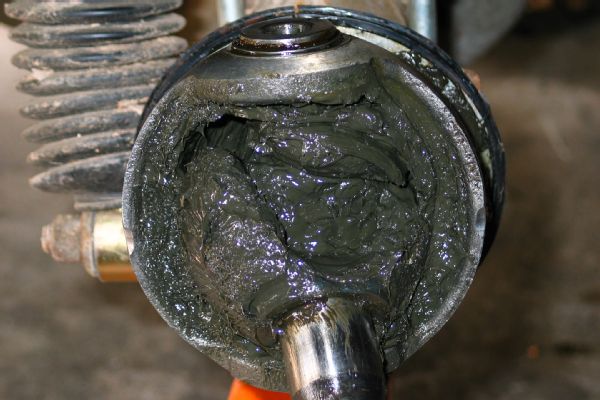
The closed-knuckle Dana 25, 27, and 44 front axles used in early Jeeps are all very similar. Along with the center sections and widths, there are only a few changes that were made to the steering knuckles, brakes, and wheel hubs. Almost all of the parts can be interchanged. There were actually four different steering joints used over the years. These joints include the Tracta joint, Rzeppa (pronounced “cheppa”), Bendix, and Spicer U-joint. The Spicer-style ’shafts are considered the most durable and maintenance-free, especially for off-road use with bigger tires and a locking differential. They are the Spicer 260-sized joints (Spicer PN 5-260X). Because it’s a closed knuckle application, some of the U-joints in the early axles I’ve seen don’t have the seals installed. They’re completely submerged in grease inside the knuckle so the seals are not needed. The 260 joints are pretty durable, considering their small size. In most cases, the 10-spline inner axleshafts of the Dana 25 and 27 are the weak point. The closed-knuckle ’73-older FSJ Dana 44 has much more durable 30-spline inner axleshafts that neck down to the 260 U-joint. I suspect the weak point of this assembly is the 10-spline outer stub axle. This version of the Dana 44 uses the same stub axle and locking hubs as the Dana 25 and 27. Somehow, I’ve managed to keep the closed-knuckle Dana 44 front axle in my ’73 J-truck alive, despite the 37-inch tires, AMC 360 V-8, and T-18 manual transmission. I think the success can be attributed to the fact that I am running an open differential. A locking differential with this combination of direct torque and leverage would surely result in catastrophic failure of the 10-spline stub and 260 U-joint.
Spicer 18 Interest
I’m building a flatfender and still debating on going with an intermediate CJ-5 frame for the longer leaves. I made my own motor mounts for a Ford V-8. They are similar to the Advance Adapters mounts. Everyone tells me to run a large-hole Spicer 18 with a 1 1/4-inch intermediate shaft. I noticed you were using the small-hole Spicer 18 with a 1 1/8-inch intermediate shaft on the Garage Project GPW. The only thing keeping me from running the 1 1/8-inch transfer case that I already have is not being able to run a Tera Low gear set in it. I'm not really building a full crawler like you are, but it will be an on- and off-road hot rod. I'll be running a flanged offset Dana 44 rear axle from a ’70 CJ-5 and a Dana 30 up front. I plan on running 3.73:1 ratio axle gears for now. Later on, I'll go with 5.38 gears when I can afford an overdrive unit.
Dan Yoder
Via facebook.com/JohnCappa4x4
Sounds like a solid plan. Make sure you have plenty of room for the radiator before burning in the motor mounts.
The CJ-5 frame is a bit longer than the flattie frames. It can be chopped down to work, or you can leave part of it hanging off the back. The longer springs will ride a little better than the stock flattie springs.
I'm not a huge fan of running the low gear sets in the Spicer 18 and Dana 20 transfer cases. Even though these cast iron transfer cases are extremely durable for their size, they can crack when modified and used beyond their capability. The additional low range gearing can create a lot more stress. Tri-County Gear (tricountygear.com) used to offer a girdle kit to help reinforce and strengthen the Spicer 18 and Dana 20 transfer cases. If you decide to go with the lower gearing, I would recommend a gusset kit.
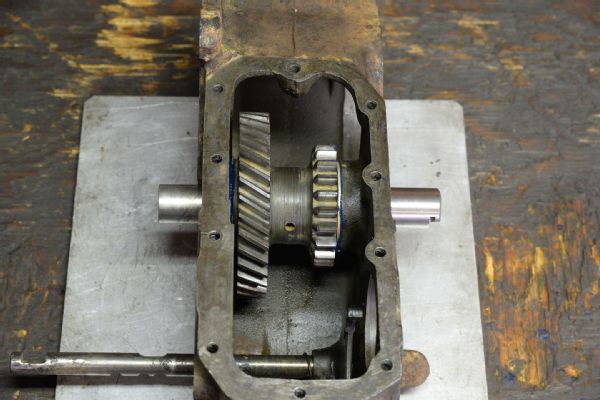
Of course the 1 1/4-inch version of the Spicer 18 is more desirable. You can also use a Dana 20 case with Spicer 18 guts and other bits to build a 1 1/4-inch large-bore Spicer 18. However, both the 1 1/8-inch and 1 1/4-inch versions of the Spicer 18 are still wear-prone. There is no way around it. Because of the offset rear output design, the intermediate gear and bearings are always spinning under load. Ultimately, it's not really an issue of strength. The shafts don't break, they simply wear out. The 1 1/4-inch version has a little more material and better bearings, so it’s marginally better than the 1 1/8-inch version.
If you plan on making a lot of long highway trips, you might want to consider the Advance Adapters (advanceadapters.com) tapered roller bearing kit for the Spicer 18 intermediate gear. This kit eliminates the small factory bearings and shaft and replaces them with a more durable tapered bearing design. The conversion will help the Spicer 18 run quieter and cooler. It requires machining of the intermediate gear bore so the new bearings can be pressed in. The kit is available for both 1 1/8-inch and 1 1/4-inch versions of the Spicer 18. The other option is to simply replace the intermediate shaft and bearings every few years. It’s a relatively simple process that can be done with the transfer case still in the Jeep. There is no need to fully disassemble the transfer case. The intermediate gear and bearings can be dropped out through the removable oil pan. Quality intermediate rebuild kits with properly hardened shafts are available from Herm the Overdrive Guy (hermtheoverdriveguy.com), among other companies.
XJ Steering Reinforcement
First of all, I love your magazine. I have every issue since Sept. ’01, and I still look forward to reading it every month.
In the June ’15 issue, Harry Wagner wrote an article called “Trickle Down Tech.” In the section called Top 10 Tips for a Fast Jeep, he said that the Jeepspeed 1700 class guys brace their steering boxes (since hydro-assist is not allowed). I’ve seen some steering box braces from many Jeep part vendors, but I wonder if the Jeepspeed guys have any unique bracing methods.
Dave Rebbin
York, PA
Some of the competitive Jeepspeed racers go to extremes when reinforcing the Unitbody of the XJ. Many racers will start with a bare chassis and then remove the paint, undercoating, and seam glue, and then fully weld all the stamped seams—and that’s just the beginning. A bumper-to-bumper cage adds an incredible amount of rigidity to the chassis. Controlling the flex of the entire chassis helps stop cracking in the Unitbody, allows the vehicle to handle better over rough terrain and ensures that the Jeep won’t literally blow apart at the seams. However, a full cage takes up a lot of space in a daily driver and can make seating much less comfortable, especially for taller and wider occupants. There are many different bolt-on aftermarket steering reinforcements available for the XJ. Which one is right for you will depend on how abusively you plan to drive and how big the tires are you plan to run. For tires that are bigger than 33-35 inches, you may want to consider a ram-assist. A ram-assist steering system allows for easier turning in the rocks and takes a lot of stress off of the steering box and mount.
One of the issues we often see is the front Unitbody framerails spreading apart. This can lead to other issues. It’s generally a result of abusive high-speed driving over rough terrain. It’s caused by the track bar pushing the driver-side Unitbody rail outward. If you have aftermarket rigid motor mounts, the stress can be enough to cause the inline-six block to crack, or at the very least you can bust the motor mount bolts. You want to try and keep these front rails together. One of the more impressive steering reinforcement kits we have seen that helps with this and reinforces the steering sector shaft is the Boostwerks Engineering (boostwerksengineering.com) Ultimate XJ Steering Brace. This brace kit will be more than enough for most recreational off-roading. For more abusive and racing applications, you’ll want to strip the frame, plate it in the critical areas, and add a well-designed bumper-to-bumper cage.
JK Lock or Not
I own a stock ’10 JK Sport with a six-speed manual transmission and factory axles. The Jeep has 3.21 axle gears and Rubicon tires and wheels. I would like to upgrade the axles with lockers, but the Internet experts have told me that I will destroy my axles if I do this. I know that there are no guarantees in life, but what is the realistic thought on this?
Bill Crozier
Via email
It’s really too bad that there aren’t more Internet police. A lot of misinformation can be spread online in a short period of time. Someone always has a cousin whose friend did XYZ and the result was horrendous. The reality is that the original axles in your Jeep are very durable considering the factory application. However, when tire size gets to 35 inches or larger, the axles can have some problems, depending on how and where you like to drive. If you plan to stick with the Rubicon-sized tires and drive sanely, you can very easily add lockers to the front and rear axles of your Jeep without any reliability issues whatsoever. If you plan to beat your Jeep within an inch of its life on the nastiest rocky trails you can find, you might have issues. The fact of the matter is that you can break anything. The key is driving within the capability of your vehicle.
You can decrease the potential wear and tear on your axles by installing selectable lockers and only using them when you need them. A selectable front locker should be disengaged when turning sharply. This will decrease axleshaft stress and allow you to turn sharper than if you leave the front locker engaged. Selectable lockers will also keep your Jeep’s stability control system happy on-road, where full-time mechanical lockers could cause the ABS and traction-control dash lights to flash in certain situations.