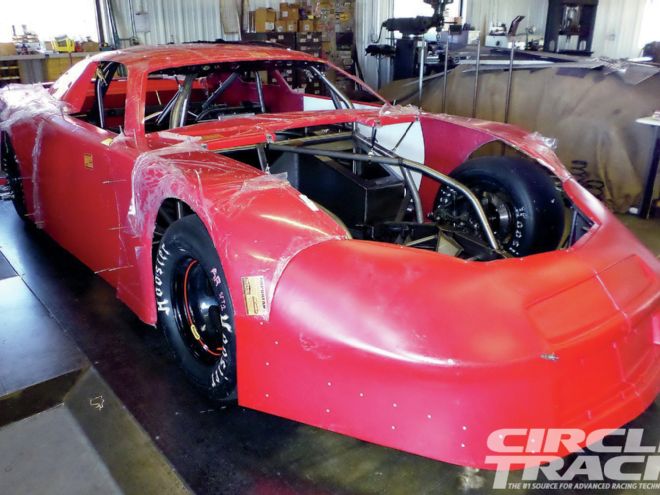
A rolling chassis is a major step in the creation of a new car, but you can't race a roller. Last month we documented the construction of a unique Super Late Model chassis with a truck arm rear suspension by our friends at Hess Racing Products. But just like eating only half of a peanut-butter-and-jelly sandwich, why stop when you've got a good thing going? So we hung around while body hanging specialist Jim Callard, owner of MetalMaster Custom Fabrication, and the Hess' crew hung the body and fabricated the interior tin.
Car owner Will Kimmel chose an ABC body kit from AR Bodies. The ABC formula is a template so that every make, even from different body manufacturers, will have similar aerodynamic characteristics to improve racing on the track. The Ford engine we're racing means we're using a nose and decals for a Ford Fusion, but AR Bodies also has an ABC-compliant Chevy Impala and Monte Carlo, a Dodge Charger and even a Toyota Camry. Because all the bodies from the different manufacturers have to race approximately the same, the real determining factor on which body you choose will be looks and ease of installation—as well as repair.
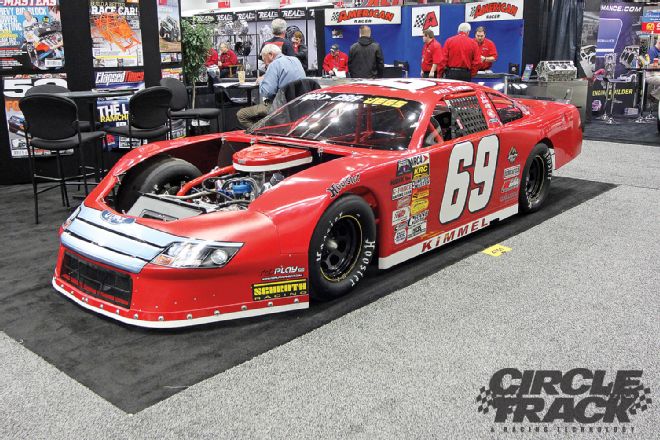 Here’s our completed Super Late Model that will be raced in the CRA Super Late Model Series on display at the PRI racing tradeshow. We think it looks pretty sharp with all the finishing touches in place.
We were particularly impressed with how well thought-out the body kit from AR Bodies is. AR sells a wide variety of accessories to aid installation. While none are mandatory in order to install a quality race car body, they all save time and energy by eliminating a lot of fabrication and really do help the final product look better.
"I thought the whole process of working with the AR Late Model body went really well," Callard says. "Nothing in the body kit really gave me any trouble, and the seams and flange fit was right on the money. Hanging a body can be tough because if you are new to it, it's almost like you have to work from all four corners at once, but everything on this project went smoothly. It was easy."
Following, we've documented some of the high points as Callard hung the body and the crew from Hess Racing Products finished the interior, the radiator box and other detail work. We think there are plenty of great tips here that should be helpful whether you are hanging an entire body or simply making repairs to your existing shell.
A special thank you to MetalMaster Custom Fabrication (704-737-3367).
1. Once the roller chassis was complete, Bill Hess, owner of Hess Racing Products, called in body hanging specialist Jim Callard to work his magic.">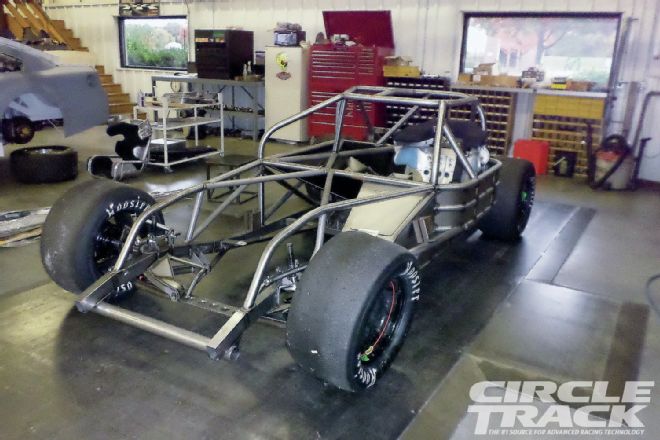 <strong>1</strong>. Once the roller chassis was complete, Bill Hess, owner of Hess Racing Products, called in body hanging specialist Jim Callard to work his magic.
2. All the work was done on a level surface plate, but Hess still supported the framerails on blocks to make sure that the ride height never changed with people climbing all over the car.">
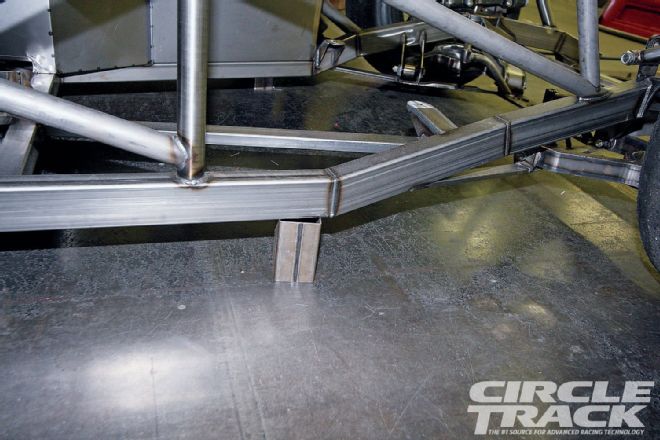 <strong>2</strong>. All the work was done on a level surface plate, but Hess still supported the framerails on blocks to make sure that the ride height never changed with people climbing all over the car.
3. Callard begins by pre-fitting the body to make sure there are no obvious problem areas and also to verify he has all the correct components. Notice how the AR Bodies kit makes the B-pillar and quarter window part of the rear fender. The seam is moved all the way up to the roof line.">
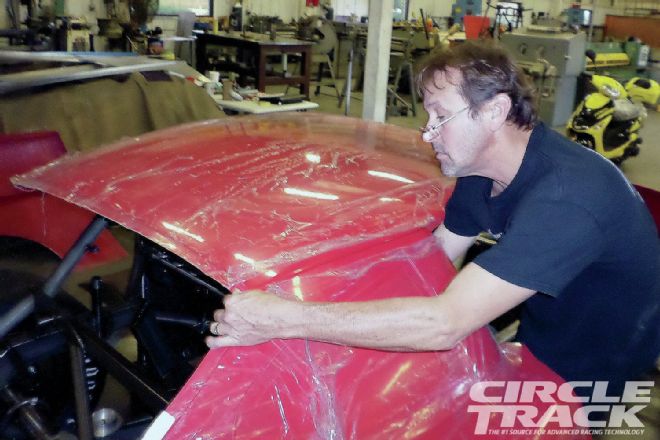 <strong>3</strong>. Callard begins by pre-fitting the body to make sure there are no obvious problem areas and also to verify he has all the correct components. Notice how the AR Bodies kit makes the B-pillar and quarter window part of the rear fender. The seam is moved all the way up to the roof line.
4. There’s plenty of lip here to use Vise-Grips to hold the panels together during the pre-fit stage. After the body is complete, you can cut the lip down if you like to clean up the interior, but it does help provide some extra rigidity.">
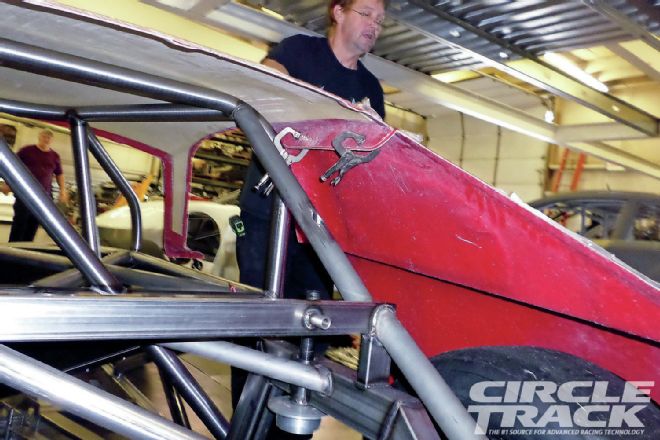 <strong>4</strong>. There’s plenty of lip here to use Vise-Grips to hold the panels together during the pre-fit stage. After the body is complete, you can cut the lip down if you like to clean up the interior, but it does help provide some extra rigidity.
5. With the upper portion of the deckled mocked up, you can see how the components create a frame for the rear window. We think the integrated package tray behind the window is a nice touch. AR Bodies offers pre-cut and pre-masked windows made from mar-resistant Lexan. The front window is 0.125-inch thick, and the rear is only 0.093 to cut a little weight.">
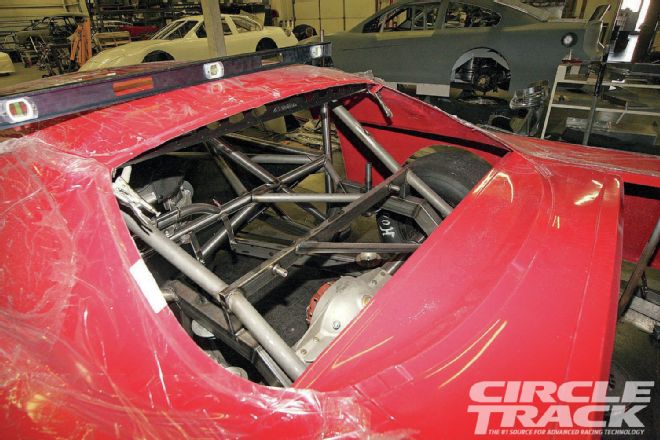 <strong>5</strong>. With the upper portion of the deckled mocked up, you can see how the components create a frame for the rear window. We think the integrated package tray behind the window is a nice touch. AR Bodies offers pre-cut and pre-masked windows made from mar-resistant Lexan. The front window is 0.125-inch thick, and the rear is only 0.093 to cut a little weight.
6. Callard begins locating the body at the rear bumper. The rulebook will dictate height and rear overhang. Stands like this with adjustable arms can help you set your heights without having to physically attach anything to the chassis until you are ready.">
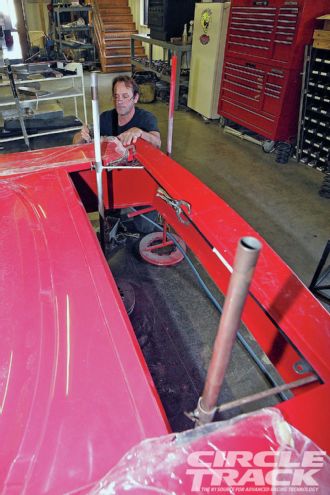 <strong>6</strong>. Callard begins locating the body at the rear bumper. The rulebook will dictate height and rear overhang. Stands like this with adjustable arms can help you set your heights without having to physically attach anything to the chassis until you are ready.
7. After that, Callard moves on to set the roof height. The rulebook will usually state the minimum height located in the center of the car just behind the windshield. A tall straightedge and a carpenter’s bubble level, like you see here, is a reliable and simple way to find this measurement. Callard will adjust the roof height until he just exceeds the minimum height.">
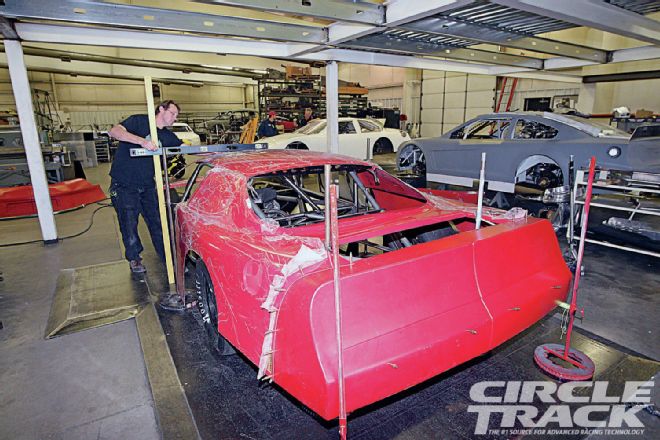 <strong>7</strong>. After that, Callard moves on to set the roof height. The rulebook will usually state the minimum height located in the center of the car just behind the windshield. A tall straightedge and a carpenter’s bubble level, like you see here, is a reliable and simple way to find this measurement. Callard will adjust the roof height until he just exceeds the minimum height.
8. With the roof height set, Callard checks the lower windshield height. This measurement is usually taken at the base of the A-pillar, which is easy at this point since the door skins aren’t on yet.">
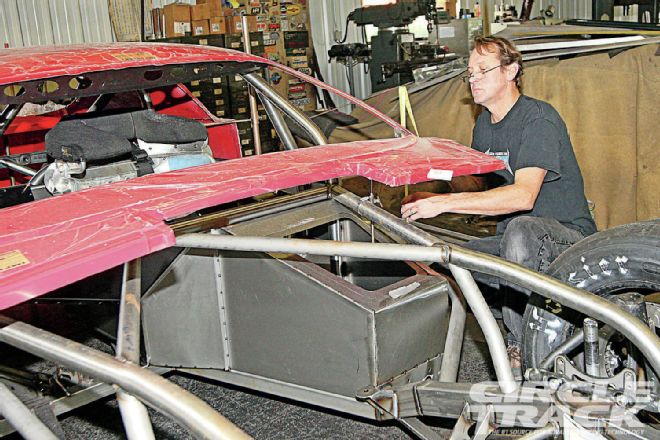 <strong>8</strong>. With the roof height set, Callard checks the lower windshield height. This measurement is usually taken at the base of the A-pillar, which is easy at this point since the door skins aren’t on yet.
9. For interior panels, Callard uses these sliding adjustors, which attach to the chassis tubing with hose clamps. After everything is set properly, they are easy to remove and replace with permanent braces.">
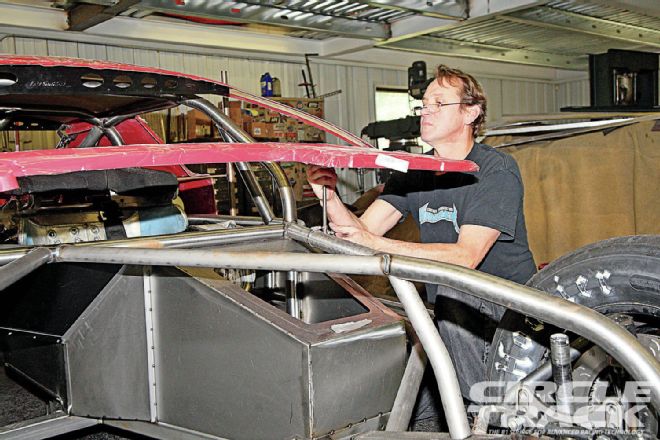 <strong>9</strong>. For interior panels, Callard uses these sliding adjustors, which attach to the chassis tubing with hose clamps. After everything is set properly, they are easy to remove and replace with permanent braces.
10. We did have interference between the top of the rollcage and the upper portion of the driver-side window opening. But a little trimming was all that was required to make everything work.">
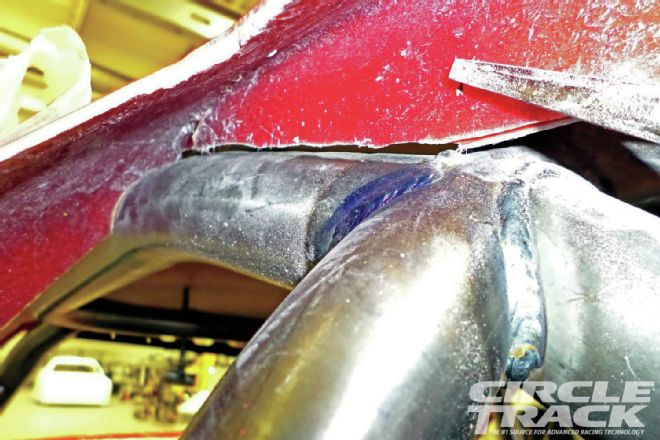 <strong>10</strong>. We did have interference between the top of the rollcage and the upper portion of the driver-side window opening. But a little trimming was all that was required to make everything work.
11. Generally, it is a bad idea to permanently mount any panel until the entire body has been finalized. Here, Callard uses Cleco fasteners to mount the rear bumper to the quarter panels because they hold securely yet still can easily be removed and replaced with more permanent rivets later.">
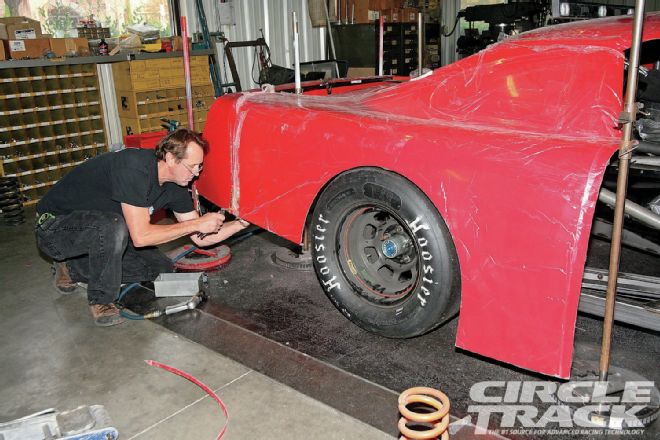 <strong>11</strong>. Generally, it is a bad idea to permanently mount any panel until the entire body has been finalized. Here, Callard uses Cleco fasteners to mount the rear bumper to the quarter panels because they hold securely yet still can easily be removed and replaced with more permanent rivets later.
12. The bumper bar is welded to the rear clip, but the upper brace is bolted in place thought slots that allow you to easily adjust the height.">
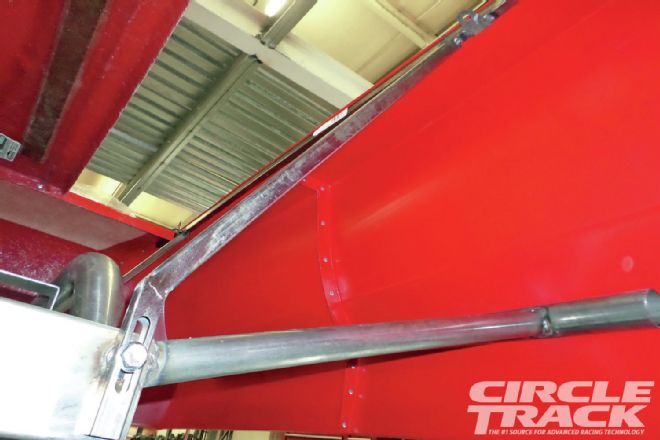 <strong>12</strong>. The bumper bar is welded to the rear clip, but the upper brace is bolted in place thought slots that allow you to easily adjust the height.
13. The bumper bar is drilled and the rear bumper cover will be held in place to it with rivets. Right now you can see the Cleco fasteners in place.">
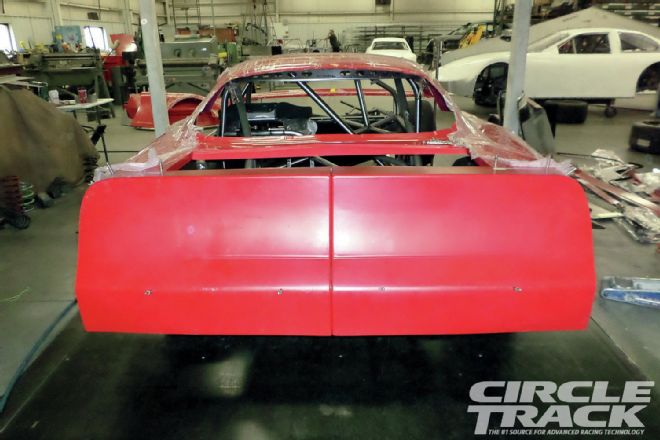 <strong>13</strong>. The bumper bar is drilled and the rear bumper cover will be held in place to it with rivets. Right now you can see the Cleco fasteners in place.
14. With a Super Late Model the frame is pulled way in on the right side, so a structure needs to be built to support the body. These plates have threaded inserts and are welded onto the chassis for mounting additional body supports.">
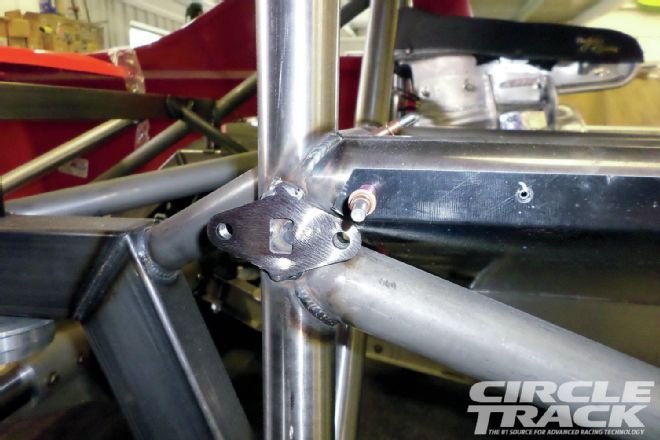 <strong>14</strong>. With a Super Late Model the frame is pulled way in on the right side, so a structure needs to be built to support the body. These plates have threaded inserts and are welded onto the chassis for mounting additional body supports.
15. In this shot you can see just how much bracing had to be built out to support the right-side of the body. But because it all bolts to the main chassis via the plates that we showed you in the previous photo, it can all be removed quickly and easily if it gets bent up.">
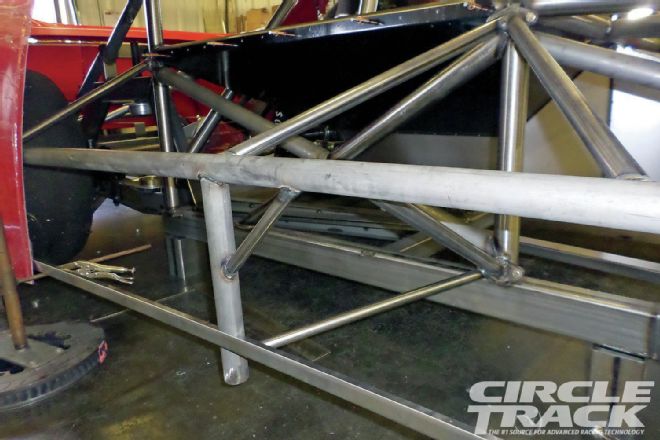 <strong>15</strong>. In this shot you can see just how much bracing had to be built out to support the right-side of the body. But because it all bolts to the main chassis via the plates that we showed you in the previous photo, it can all be removed quickly and easily if it gets bent up.
16. Here’s another shot of the right-side bracing with the lower rocker being mocked up.">
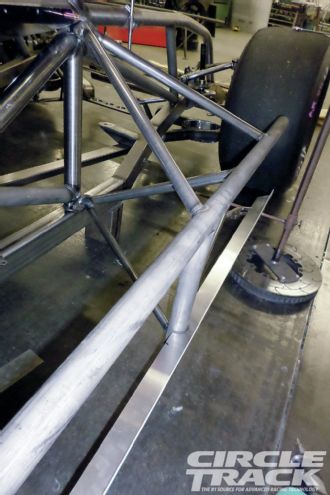 <strong>16</strong>. Here’s another shot of the right-side bracing with the lower rocker being mocked up.
17. Callard says that when hanging a body he always starts at the two ends and works to the middle. So after he sets the front overhang and gets the nose height right, he finally installs the door skins last.">
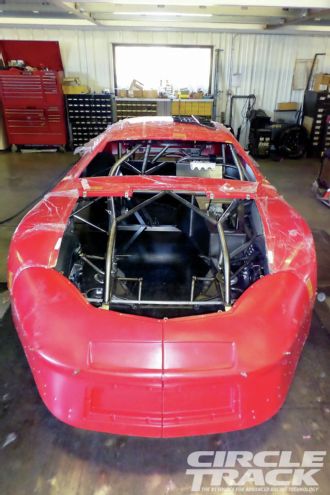 <strong>17</strong>. Callard says that when hanging a body he always starts at the two ends and works to the middle. So after he sets the front overhang and gets the nose height right, he finally installs the door skins last.
18. Here’s a shot showing how the nose is braced.">
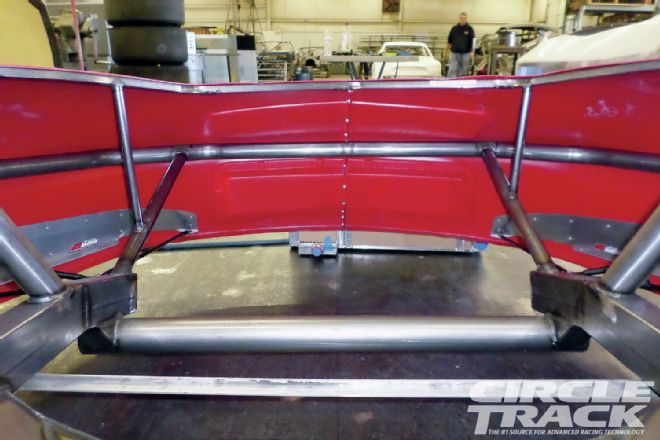 <strong>18</strong>. Here’s a shot showing how the nose is braced.
19. AR Bodies makes these cool aluminum lower nose supports specifically for their kits. The support not only makes installation easier, it also holds the sides of the nose steady to maximize front downforce.">
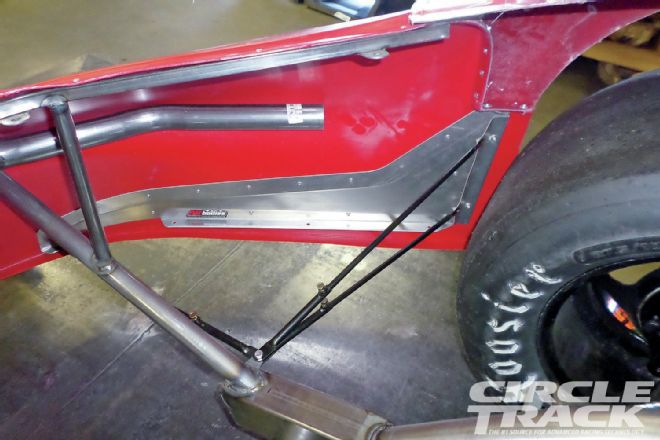 <strong>19</strong>. AR Bodies makes these cool aluminum lower nose supports specifically for their kits. The support not only makes installation easier, it also holds the sides of the nose steady to maximize front downforce.
20. Here’s how it looks with the nose and door skins mounted.">
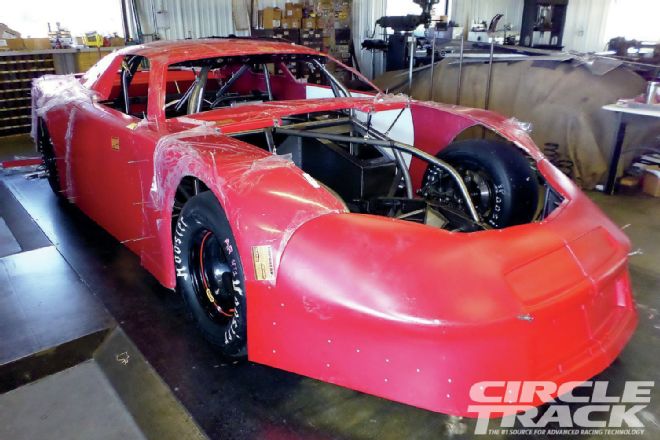 <strong>20</strong>. Here’s how it looks with the nose and door skins mounted.
21. By this point the body had been pulled back off the car and the chassis and rollcage powdercoated bright red. The body has been permanently mounted to the frame and Hess’ crew has taken over for the interior sheetmetal and detail work. All the black aluminum is hand formed to seal out the driver’s compartment.">
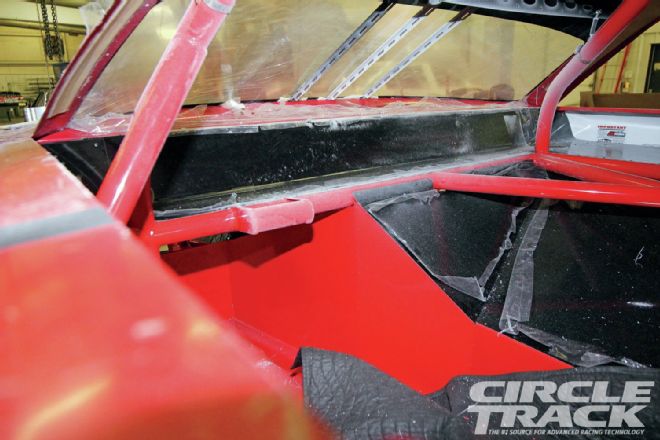 <strong>21</strong>. By this point the body had been pulled back off the car and the chassis and rollcage powdercoated bright red. The body has been permanently mounted to the frame and Hess’ crew has taken over for the interior sheetmetal and detail work. All the black aluminum is hand formed to seal out the driver’s compartment.
22. Here’s another cool gadget AR Bodies makes to go with their body kits. These body mounts don’t have to be welded to the chassis so they are easily moved. They also allow a wide range of adjustment but still lock down solid once you get everything where you want it.">
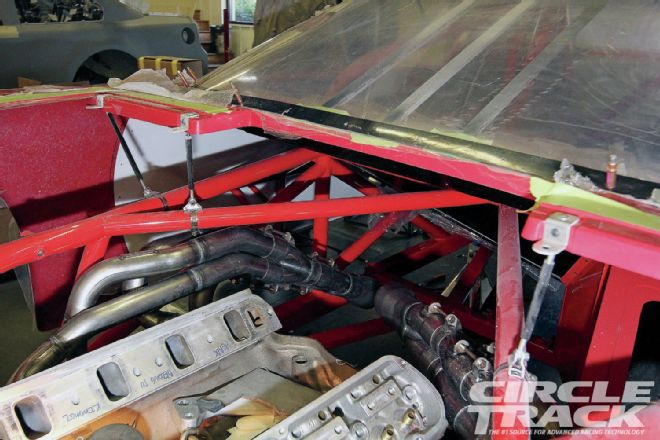 <strong>22</strong>. Here’s another cool gadget AR Bodies makes to go with their body kits. These body mounts don’t have to be welded to the chassis so they are easily moved. They also allow a wide range of adjustment but still lock down solid once you get everything where you want it.
23. Another shot of the interior sheetmetal. Notice the lightweight brace that helps support the roof just above the rear window.">
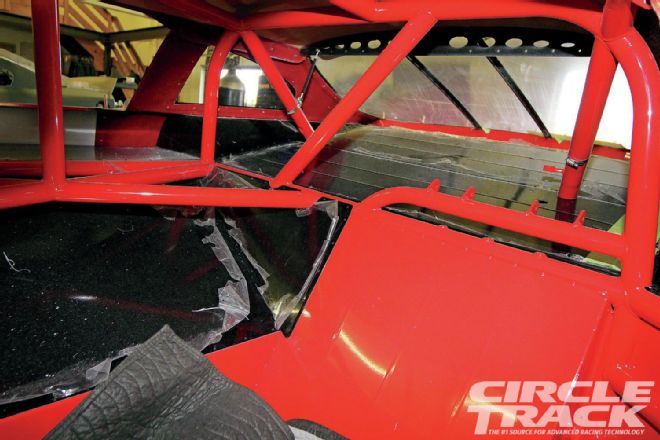 <strong>23</strong>. Another shot of the interior sheetmetal. Notice the lightweight brace that helps support the roof just above the rear window.
24. The rear glass came pre-cut and pre-masked directly from AR Bodies. It dropped right into place and all we had to do was drill the holes to keep it down.">
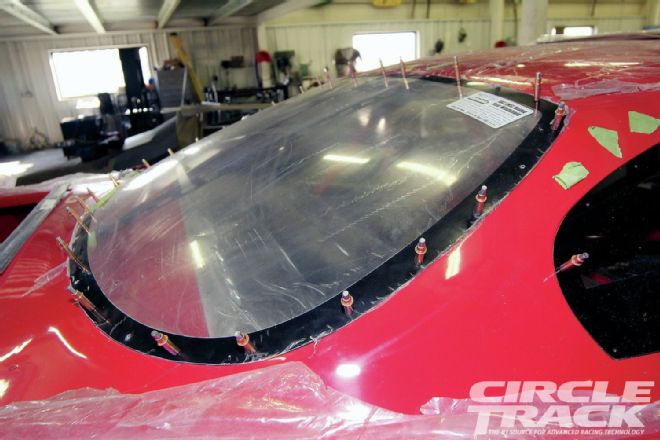 <strong>24</strong>. The rear glass came pre-cut and pre-masked directly from AR Bodies. It dropped right into place and all we had to do was drill the holes to keep it down.
25. Hess’ Chris Cornett measures up the lower side skirts before making any cuts.">
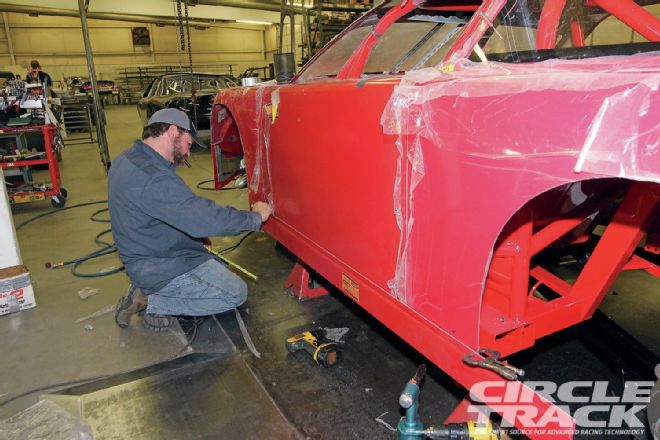 <strong>25</strong>. Hess’ Chris Cornett measures up the lower side skirts before making any cuts.
26. AR Bodies molds reliefs into the fenders to help line up the lower skirts.">
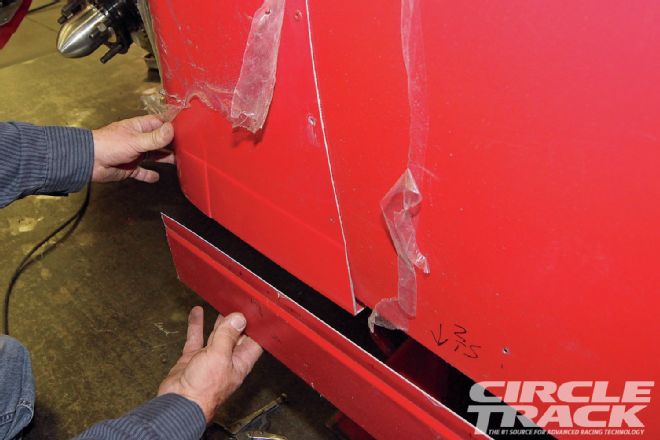 <strong>26</strong>. AR Bodies molds reliefs into the fenders to help line up the lower skirts.
27. On the inside, Cornett used these aluminum body braces to keep the lower skirts from flapping.">
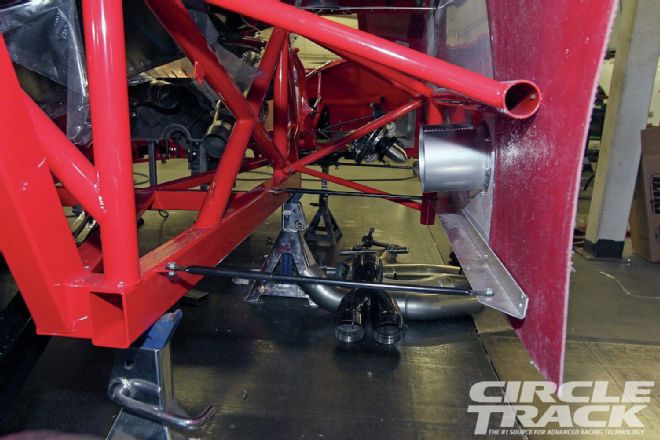 <strong>27</strong>. On the inside, Cornett used these aluminum body braces to keep the lower skirts from flapping.
28. Up front we’re using AR Bodies’ new EZ Max molded plastic radiator duct. Besides saving fabrication time, the two-piece duct is easy to install and will be easy to replace if the nose of the car gets smashed in at the racetrack.">
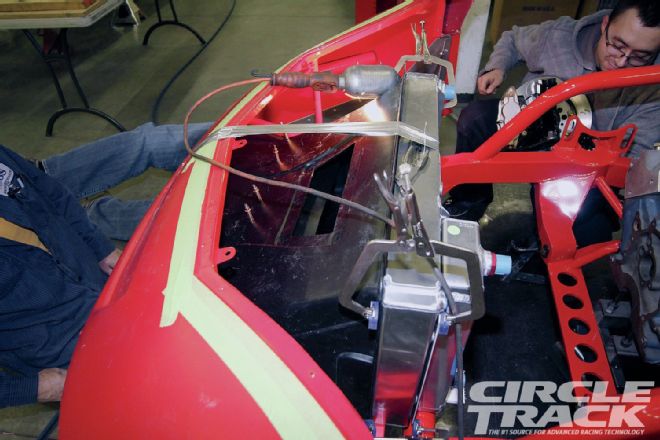 <strong>28</strong>. Up front we’re using AR Bodies’ new EZ Max molded plastic radiator duct. Besides saving fabrication time, the two-piece duct is easy to install and will be easy to replace if the nose of the car gets smashed in at the racetrack.
29. The duct is shaped to maximize the flow of clean air to the radiator.">
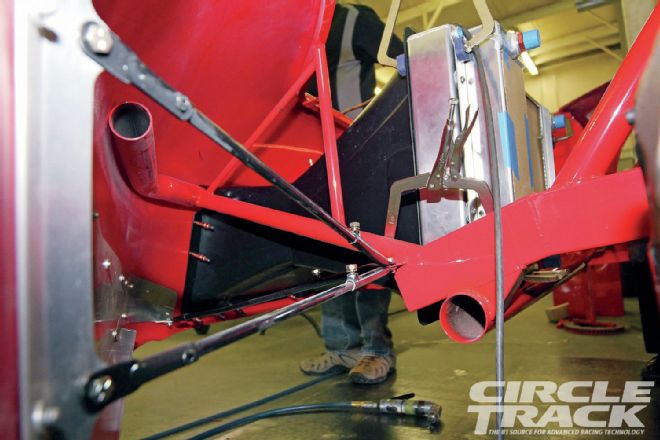 <strong>29</strong>. The duct is shaped to maximize the flow of clean air to the radiator.
30. The one-and-only Eddie Dickerson also helps out in Hess’ shop during the offseason, and he pitched in to help mount up the grille supports.">
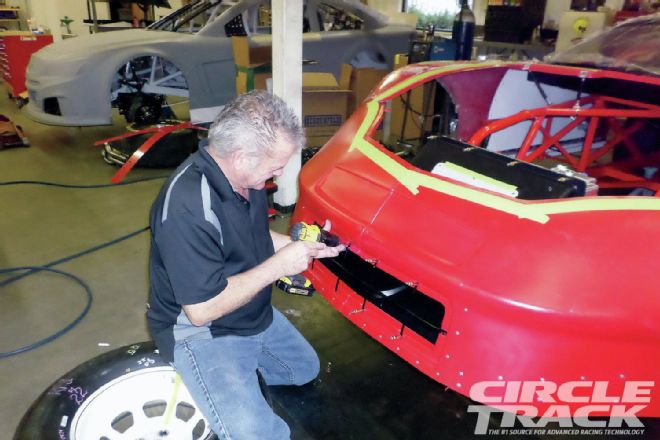 <strong>30</strong>. The one-and-only Eddie Dickerson also helps out in Hess’ shop during the offseason, and he pitched in to help mount up the grille supports.
31. This, obviously, doesn’t have much to do with body hanging, but we did want to leave you with this shot of the dash panel Hess installed for driver Will Kimmel. The main gauge is a Longacre Accutech data logging tach, and to the right is a super lightweight four-gauge panel. We like the clean installation without having to build a complex dash. ">
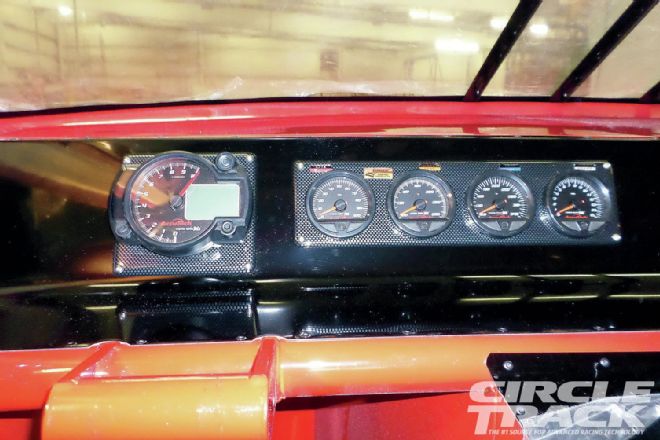 <strong>31</strong>. This, obviously, doesn’t have much to do with body hanging, but we did want to leave you with this shot of the dash panel Hess installed for driver Will Kimmel. The main gauge is a Longacre Accutech data logging tach, and to the right is a super lightweight four-gauge panel. We like the clean installation without having to build a complex dash.
Contacts
MetalMaster Custom Fabrication
704-737-3367