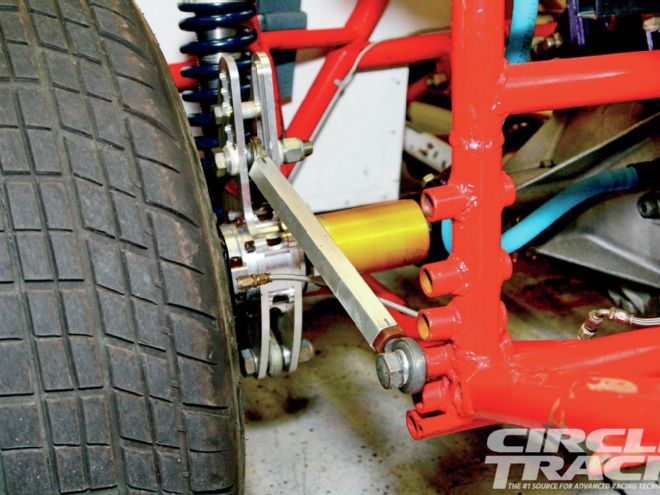
As promised, I'm embarking on a journey through the most basic, and most important, race car setup steps. I'm doing this because we all need to refine our chassis setup knowledge, regardless of our place in the points standings. No matter how long (or short) you have been racing, I believe you will find something in this series that will help you better prepare your race car. And we will present the topics in a practical progression.
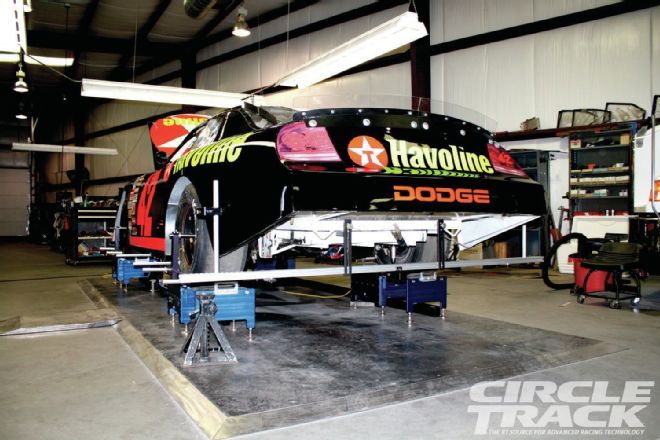 Measuring your chassis for alignment is the very first step in setting up the car. The use of a complete laser system with fixtures can make the job easier and more accurate. Or, you can use strings and plumb bob, but either way, the process must be done. Setup basics are just as important and necessary at the top levels of stock car racing as they are on the short tracks. But the equipment those teams use to accomplish those goals are a little more expensive.
Yes, I have previously covered most, if not all, of the subjects you will find in this series. But what I will now do is add important information that I have acquired from very smart racers over the years. And I'm going to present the information in a more complete way with better explanations as to why we need to do each step.
This way, we can all learn and move forward with a better program. So, I encourage each and every one of you to pour over these articles and find those bits of information you might have missed, not known about, or maybe not fully understood before, like I did.
If you are new to the classes of racing where you can make widespread adjustments and are confused as to what you need to do to be competitive, this is it. The guys who are spanking you week in and week out know this stuff well. Make no mistake, you need to follow these basic steps in order to be in a position to be successful.
In past articles that are available online at www.circletrack.com, each of the routines we mention is explained in more detail than we have room for here. I encourage you to go to our website and read those articles. There are also many books available to explain how to do bumpsteer and more. So, let's get started.
Chassis Alignment
There are several scenarios that create the need to check and adjust our race car's alignment. It's critical to know which way all four wheels are pointed at every point on the racetrack. As the car goes through a range of motion from accelerating down the straights through negotiating the turns, all four wheels are in some transition from their static location at normal ride height, and the direction they point can and does change.
If you have taken delivery of a new chassis, acquired a used chassis, had a major crash, or are just trying to find out why your car does not work well, you need to go through a complete chassis alignment routine. So, here is what you do, step by step.
Step 1—Establish, or reestablish your chassis ride height. This can be anything you desire, but once you determine what works for you, stick to it from now on. Be sure not to cut the minimums too close. At many tracks, there remains a minimum ride height that must be in place at the end of the race or you are disqualified.
Most car manufacturers and car builders have already determined the correct ride heights and the car was built to those specifications. You'll be closer to your destination if you follow their guidelines from the start. If in doubt, just give them a call. I will say here that setting up a car to 4-inch ride heights when it was designed for 5-inch heights will cause all kinds of problems and you have a lot of work to do.
If you are running on bumps, that puts the front end 3 or more inches lower than normal ride height, it won't hurt you to add a quarter inch to the lowest static ride height to avoid possible complications later on with the tech crew.
Step 2—You need to now set your static caster and camber amounts, as well as the static toe settings for the wheels. This is important because it helps to establish the control arm angles and the tie rod angles for future work.
Center your steering before setting toe. With the steering centered, I usually point the right front wheel straight ahead and toe the left front out the required amount. Or, you can split the difference between the two front wheels, whichever you choose.
While you're at it with the toe plates, check the rear wheels for toe. The rear wheels need to be exactly parallel to each other. If not, have the rearend straightened before you get started.
 1. Some teams choose to remove the wheels and tires when setting the car at ride height and setting the caster and camber settings. This way makes it much easier to get to the chassis points and take the measurements. The links also come in handy for taking other measurements such as height and widths of chassis pickup points.
 2. We started out setting the car at our desired ride heights. To gain room for moving under the car to get access to some of the attachments, we added 10 inches to the desired normal ride heights and set the car on jackstands. Wherever you place the car, make sure the ride heights are going to work for you and that they have a little wiggle room for getting through tech.
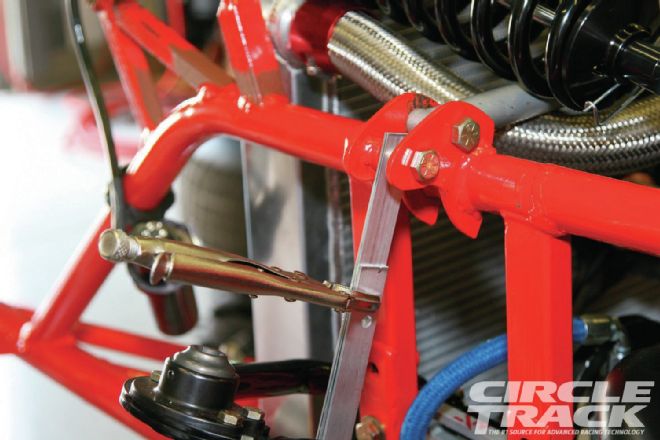
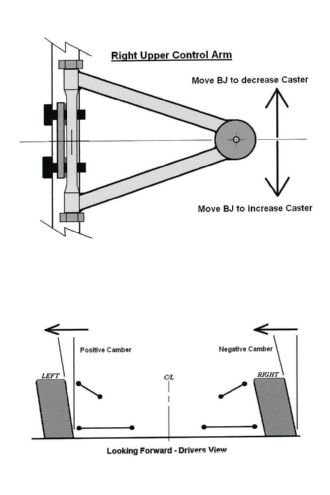 3. We need to set our desired caster and camber settings before we get too far along with measuring alignment. This helps establish the tie rod angles which will affect the toe-out. It also can affect our bumpsteer that we will be checking later on.
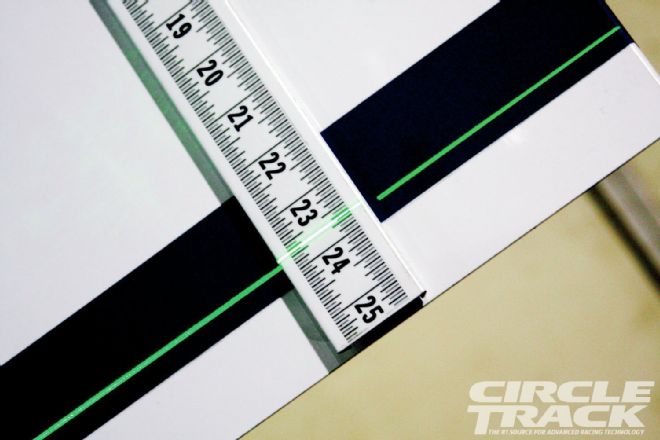 4. Using a laser system can produce some very accurate measurements in many phases of chassis alignment. There is a process and procedure to follow when using lasers and the manufacturer can assist you with those. I have used these many times and once you learn the routine, it can be a very quick and error free way to check your car.
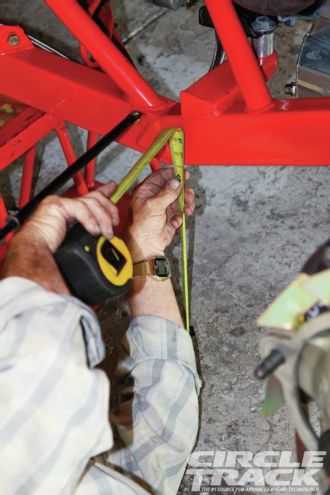
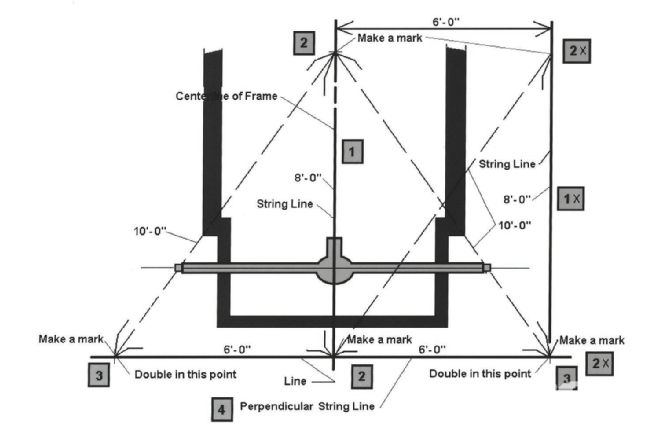 5. This is basically the layout for either stringing or doing a laser line check of the alignment of the four wheels. Note that the rear line is setup to be at 90 degrees to the centerline as well as the offset line along the right side. From that line, we measure rearend alignment as well as rear steer as we move the rear hub heights to simulate the motions on a typical lap.
If you are new to this type of car, you might not know exactly what casters, cambers, and toe-out you need. You can ask a fellow competitor what they use and follow that advice for now. These are not considered setup secrets. You might need to refine those amounts in the future, but you probably won't need to change much.
Step 3—Use strings, lasers, or a fixture to establish the static alignment of all four wheels. What this means is; the rear wheels are pointed straight forward perpendicular to your datum line and not to the right or left. The right rear wheel is inline (or some offset left or right to your liking) with the right front wheel. We usually measure this at the tire contact patch or very close to it.
To establish the datum line, many teams use the centerline of the car, mostly representing the mid-point of the front and rear clips. For an offset chassis, other methods work to establish a line of reference like using the straight rail. Once you establish your reference line, mark it on the chassis so that you can go back to it for future alignment checks.
Take your time through this process. Make very accurate measurements at each phase. This may take some time, but it is critical to every other component that this be done correctly. You'll need a few other hands to help with this and it's a good way to get the team together and help them really understand the car.
Step 4—Next check your right and left front wheel motions for bumpsteer. That means that when the wheels travel up and down, there should be very little steering motion and they should stay pointed in a common direction. The acceptable amounts vary among experts, but less than 0.020-inch of toe change is desirable in the distance the wheel will travel on the track.
With the movement to softer setups for both dirt and asphalt cars, the range of this motion has necessarily changed. We now see more compressed movement, or bump, with both front wheels, whereas in the past, the left front wheel did not move very much vertically through the entire lap.
So, it might be more correct to measure bumpsteer at three to four inches of bump rather than at normal ride height. If you go from normal ride height all the way to full bump, we need to know if the wheels are steering in that amount of travel.
What we might find is that we can't achieve near zero bumpsteer, but we can mitigate it, meaning we can utilize its motion to get what we want. Basically, we want the front wheels direction in relation to each other to be the same at mid-turn bump attitude as it was at normal ride height, even if it moves off of that in between static and full bump. If your car runs on bumps, this will be correct for that application.
If each wheel steers say twelve degrees either in or out in four inches of bump, if you adjust your tie rod angles so that the right front steers out, and the left front steers in toward centerline, then all the driver needs to do is steer that little bit more to compensate and it is a natural motion that he won't realize he needed to do. And, the two wheels will be pointed so that the toe-out won't change.
A more correct way to check for bumpsteer is to turn the wheels in the direction and amount they will be pointed at mid-turn and do your bumpsteer check there. This is where we need to know how much bumpsteer we will be experiencing. Remember that the geometry of the parts (arm angles, tie rod angles, and so on) all change when the chassis dives and rolls in the turns.
Step 5—Ackermann check. We need to know if both front wheels are pointed in a more parallel direction when we steer the car. On asphalt, we are mostly concerned with left turns, but on dirt, we will be turning both right and left most of the time.
We have proven that for short tracks of from a quarter mile to a half mile in length, we need tenths of degrees of Ackermann, not whole degrees. If your front wheels gain a degree of toe at normal steering input, that produces an additional half inch of toe. We certainly don't need that.
You can use strings or lasers to check for Ackermann. Turn plates, because of how the tires will move laterally when they are turned, might not produce the required accuracy that would show how much Ackermann you have. You can do both (stringing and turn plates) and if they agree, then you can continue to use the turn plates.
To adjust your Ackermann, you can adjust the steering arm lengths for asphalt applications (remember we are only concerned with turning left), but for dirt, we need to adjust the drag link position fore and aft, or the rack-and-pinion fore and aft until we get near zero Ackermann. That will reduce Ackermann in both steering directions.
When you get done with the Ackermann check, reset your toe-out, it will have changed. It also gives your team practice in doing the toe check. Use the same two people, if possible, for each check. Use one tape, or compare two tapes to each other if you use two, to make sure they agree.
Step 6—Once the front end is aligned, we need to go to the rear and check for rear steer. We have already aligned the rearend in the static position, but that is not necessarily where it will be pointed while going through the turns. And modern setups have changed as to the amount of motion of the rear of the car in many cases and that affects the rear steer.
With the move toward stiffer right rear springs for both asphalt cars and dirt cars, the amount of RR movement has been reduced. If, back in the day, you ran a 175 lb/in spring in the RR, and you are now running a 350 lb/in spring, the shock travel would be half of what it used to be. Therefore, the fore and aft movement of the rear wheels created by the trailing arm angles will be different. How much different and in what direction is what you need to find out.
With the chassis on jack stands, and the springs removed, move the rearend through a simulated travel that will represent its position and movement on the racetrack from straightaway configuration to mid-turn compression. If you install just the shocks, you can mimic the shock movement that the indicators show after running the car.
Measure accurately the movement of each rear wheel in the fore and aft direction using whatever method you choose. With the wheels removed, you can string down to the floor off the front or back of the axle hubs, the center of the hubs, or you can string along the tire to a point well away from the axle centerline.
I usually will hook a tape onto the rear of each wheel rim and run the tape to the front, parallel to the ground to a mark on a tape near the front wheel well. Take a measurement at each point of travel. Whatever method you use, there should be very little steering of the rear axle through the normal travel range.
For most rear suspensions, there will be some amount of steering. The goal is to end up at mid-turn travel with the same alignment as you had at static ride height position, or whatever steer you choose to create. For teams who have studied this and have refined their rear steer requirements, the goals might be different than what I have stated.
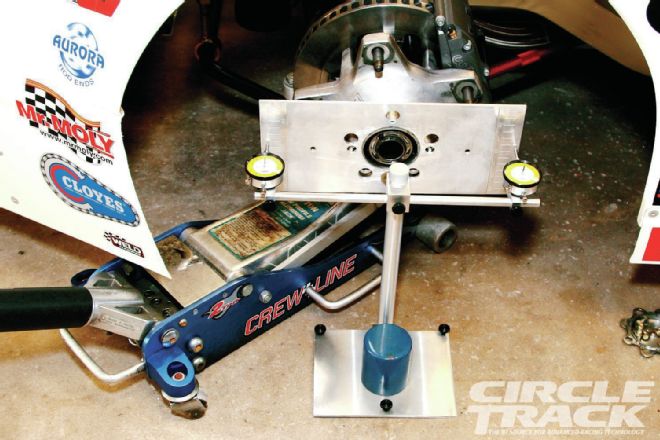 6. Excessive bumpsteer can affect how the car steers through the turns. There are basically two analog fixtures in addition to the laser mounted systems. One uses two dial indicators and you record both readings as you travel through a range of motion. The other uses a roller on one side and a dial indicator on the other. Each will do the job, but I find that the single dial model is quicker and easier to read and show direction of bump.
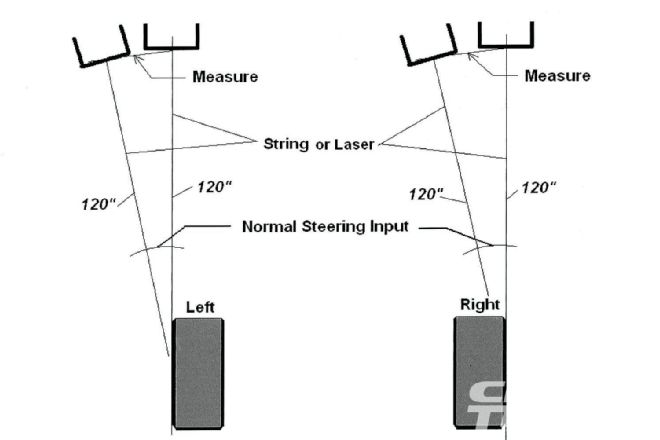 7. Ackermann has been discussed a lot in the pages of CT, but for a very good reason. It is critical to how your car will turn the corner. Excess Ackermann can cause a push that can’t be corrected with the usual setup changes. This shows how you can use a string pulled alongside the sidewalls of your tires and extending out ten feet from the hub to measure Ackermann. It is quick to do and accurate, not to mention cheap.
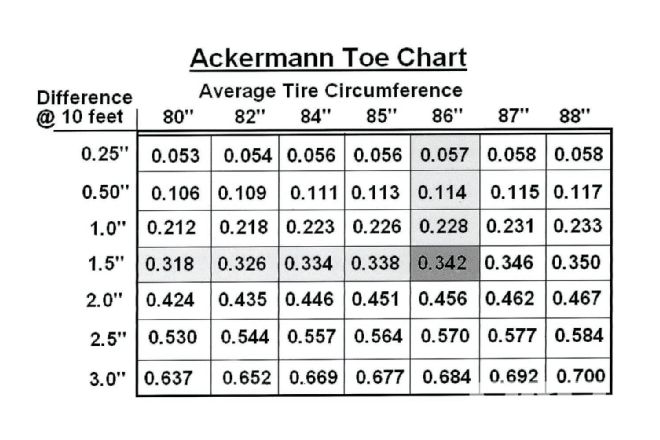 8. This chart shows how much added toe is represented by differential measurements between the right and left wheel using the above referenced string method. For each increment of inch measurement out at ten feet, the chart shows how much added toe-out that represents.
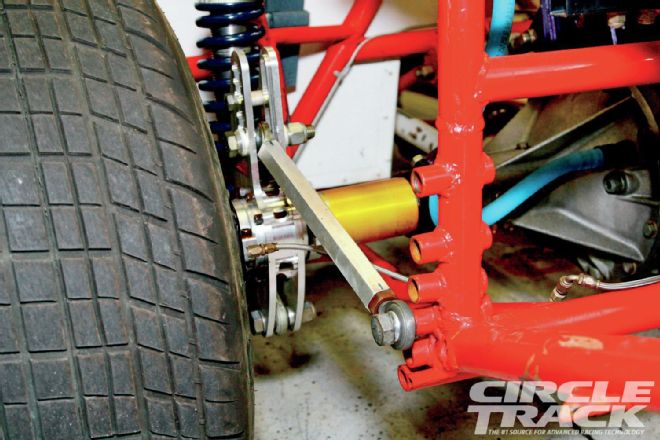 9. When we measure rear steer, we make changes in the direction and amounts by changing the trailing arm or four link angles from a side view. On some cars, such as this Late Model with a Z-link four-link which has multiple mounting holes in the front and rear.
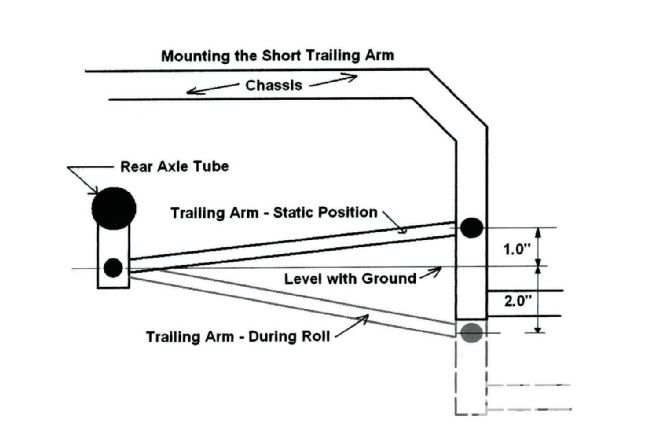 10. Typically for a three-link rear suspension, the front mount for the trailing arms on both sides have slots or multiple holes so you can adjust the amount and direction of rear steer. The common method is to divide the total travel amount for each side and divide by three. Then raise the front mounting bolt center by that amount from horizontal. In this case, the travel is three inches, so we raise the front mount 1 inch above the rear mount as measured from the ground plane.
Conclusion
Again, there are specific steps to follow with each of the above stated routines. Follow your manufactures suggestions for each product used to measure each area of the car, or go to our website and read the many articles that deal in detail with each step.
So, we have set all of our caster and camber, wheel toe, aligned the front and rear wheels, checked for front and rear bumpsteer and made corrections to simulate the wheel travel we will experience on the racetrack.
This part is the first presented because, before you even think about springs, shocks, and sway bars or load distribution, you needed to check and refine your alignment. Many top teams will go through all of this periodically, even if nothing seems to have happened to the car to change it.
If you have specific questions about your particular application related to alignment, write to me or ask your fellow competitor or a tech representative who works with racers in your division. The manufacturers of the equipment used for these measurements have printed or online instructions and procedures that you can refer to.
Remember that the geometry of the parts (arm angles, tie rod angles, and so on) all change when the chassis dives and rolls in the turns