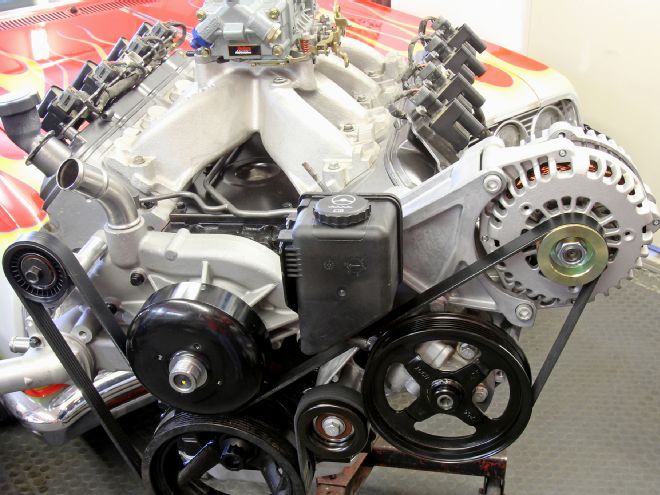
It’s astonishing to realize that by 2017, the LS engine will be 20 years old. This coming of age has also delivered an avalanche of new parts. Engine swaps have become a critical reason for the success of this engine, and among the many variables required to complete a successful engine swap is the accessory drive. In the early days of LS engine conversions into older muscle cars, the only option was the factory systems. But that’s changing now.
LS enthusiasts know the drill – there are three basic factory systems based on harmonic balancer length. The Corvette system is the shallowest, using the shortest balancer. The middle length is based on the early Gen III Camaro systems (among others) with a balancer depth slightly longer than the Corvette. The third, and most common, system is the truck-based accessory drive with its tallest harmonic balancer. There are other variations within these three family trees, but in simplified terms, this is how it all shakes out.
Typically, the most sought-after accessory drive is the Corvette version, but not just because it is the shallowest – allowing the most room to the front of the engine. The Vette drive also offers a narrow layout of the alternator and power steering pump, with the alternator perched above the pump. The Camaro/GTO orientation places the power steering pump above the alternator, making this configuration nearly as desirable as the Corvette layout. The final is the truck configuration with a decidedly vertical orientation that is the narrowest but much taller. The 2010 Camaro LS3/L99 system also uses the deep balancer but with a different orientation, with the alternator located low on the left side.
The challenge for engine swappers is that the most desirous accessory drives are also the most expensive. This leaves the truck drives that many enthusiasts consider either too clunky or too tall to clear a low hood line. Here’s where Holley offers an excellent alternative. Let’s say that you have invested in a nice 6.0L truck engine, but you’ve dumped the stock truck accessory drive in favor of something more compact. The aftermarket is replete with expensive polished systems, but most of these command prices well north of $2,000 for a complete system that often use unique components not easily replaced at the local auto parts store.
Holley’s plan was to build a factory-like system but make it adaptable. Holley’s basic bracket kit can accommodate all three balancer configurations with the simple addition of spacers. Holley bases its system on the Corvette balancer. With an engine using an F-car or the truck engine balancer, the only requirement is the appropriate spacer. It’s a really simple solution that eliminates purchasing an expensive balancer.
As an example, we recently upgraded our well-used 5.3L truck engine with a stronger COMP hydraulic roller cam and West Coast Racing Cylinder Heads CNC porting job on the stock cathedral heads, and we were looking for something better than the original truck system. The Holley brackets mount to the cylinder head for the alternator and power steering pump, while the factory-style tensioner mounts to the water pump. This eliminates issues with iron-block engines that exclude two block accessory drive bolt holes present in aluminum-block engines. We ordered our system without A/C, but if you want conditioned air, there’s a separate bracket that conveniently mounts the A/C pump up high on the passenger side.
Holley offers a tremendous variety of kits, ranging from complete systems with all the parts down to just the bare brackets and spacers that will require filling in all the myriad small parts. We ordered PN 20-143 to mount an alternator and power steering pump and added the spacer kit (21-3) for our truck balancer. With just those two part numbers we had all the major pieces we needed. We’ve included an application chart that breaks down all the different applications, including the different A/C pump options. We especially like that Holley engineers designed this kit to work with factory alternators, water pumps, power steering pumps, pulleys, and tensioners. As an example, they configured all the kits to use a truck/early F-body alternator, which is both plentiful and the least expensive of the LS chargers.
There are numerous options when it comes to selecting the correct water pump in order to match it to the balancer. As an example, if you choose to run the shortest Corvette style balancer, this requires a Corvette water pump with the correct pulley depth so the belt will line up. To help you with this decision, Holley has included one of the best instruction sheets in the industry. The 14 pages cover every step and list exactly which water pump and belt tensioner is required for each application. There are multiple variations within this area, and if you do not already have a balancer, it would be to your benefit to familiarize yourself with all the variables by reading the instruction sheet before selecting the kit. The instructions are available online at holley.com.
As mentioned, we were upgrading our iron LM7 5.3L truck engine, so we retained the stock truck balancer. Our engine did not come with a water pump, and the Holley instructions indicated we had a choice of either an LS3/L99 pump with a low-mounted water outlet or the standard truck-style pump that has an upward-angled water outlet. The LS3’s lower pump outlet is the best choice if you are considering using a low-profile LS1/LS2/LS6-style EFI manifold since the truck’s outlet will interfere with air inlet to the throttle body.
Holley also makes specific recommendations for belt tensioners that must be used based on the style of water pump. Our search led us to obtaining most of these production-based parts from Summit Racing. We found several examples where prices of a quality water pump or a belt tensioner was far less expensive than new GM parts.
We’ve included a list of parts we used to complete our package, plus other options, but there are too many variations to list them all. Remember that if you opt for just the Holley brackets, you have to obtain items like a power steering pump and pulley, an alternator, a tensioner, an idler pulley, a belt, and an alternator pigtail to complete this system. Of course, you can go the other way and buy the complete kit. When piecing the system together, the little parts can add up, but you’re still saving money since you don’t have to buy a balancer. The basic non-A/C kit 20-143 we ordered includes the alternator, power steering pump, pump pulley, and alternator pigtail. We still had a few parts to purchase like a water pump, a tensioner, and a belt, but the overall cost was still attractive. If you are starting with an engine with nothing except a balancer, the 20-143 kit and all the additional parts for a truck engine will run a little less than $1,000. This is purchasing everything new from Summit Racing. If you are willing to use junkyard or previously owned parts, you could cut this price by at least $300, which would assemble an entire accessory drive system for roughly $700. You can’t get a much better deal than that.
Application Guide
This chart lists the specific applications for the part numbers listed on the far left.
PN Brackets A/C Notes Harmonic Balancer Length Std. Short (e.g., Corvette) Middle (e.g., F-body/GTO) Long (e.g., truck, ’10-up Camaro) 20-131* Dr. & Pass side Alt., P/S, A/C R4 Compressor 21-1 21-2 21-3 20-132* Dr. & Pass side Alt., P/S, A/C Sanden SD508 or SD7 21-1 21-2 21-3 20-133* Pass side A/C only R4 21-1 21-2 21-3 20-134* Pass side A/C only Sanden SD508 or SD7 21-1 21-2 21-3 20-135* Driver side Alt., P/S N/A N/A 21-2 21-3
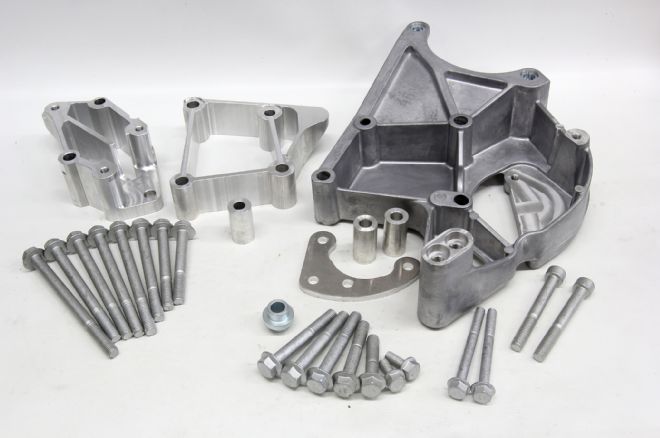 The Holley bracket kit uses the Corvette balancer for the base kit, employing spacers to accommodate longer F-car or truck engine balancers. This way, you can have a Corvette-like accessory drive without purchasing a new balancer. This is the bracket kit that mounts the alternator and power steering pump. The castings are extremely nice. If you wanted to give the package a different look, it would be easy to powdercoat the brackets.
Parts List Description Summit Racing PN Complete system, Alt., A/C, P/S, 20-136 Complete Holley kit, Alt, P.S. 20-143 Holley bracket kit Alt, P/S, A/C 20-131 Holley bracket kit Alt, P/S, A/C 20-132 Holley bracket kit, A/C 20-133 Holley bracket kit Alt, P/S, A/C 20-134 Holley bracket kit Alt, P/S 20-135 Holley spacer kit 21-1 Holley spacer kit 21-2 Holley spacer kit 21-3 Holley alternator 197-301 Holley alternator wiring pigtail 197-400 Holley P/S pump 198-100 Holley P/S reservoir 198-200 Holley P/S pump pulley 97-152 Holley tensioner 97-151 Holley idler pulley 97-150 Holley R4 A/C pigtail 199-200 Truepart ’98-’00 Camaro alternator 8272N ACDelco truck water pump 19195104 Hayden tensioner w/ truck pump 5563 Truepart serpentine belt – 2,040mm 6PK2040
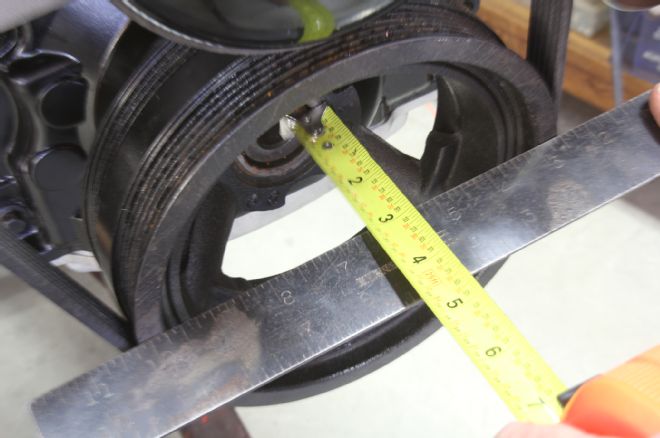
01. The first step is to determine the balancer depth. Take the measurement from the forward face of the pulley to the crank bolt flange surface. In our case, this truck balancer measured 3 inches. The F-car depth is 2.25 inches while the Corvette balancer is only 1.5 inches.
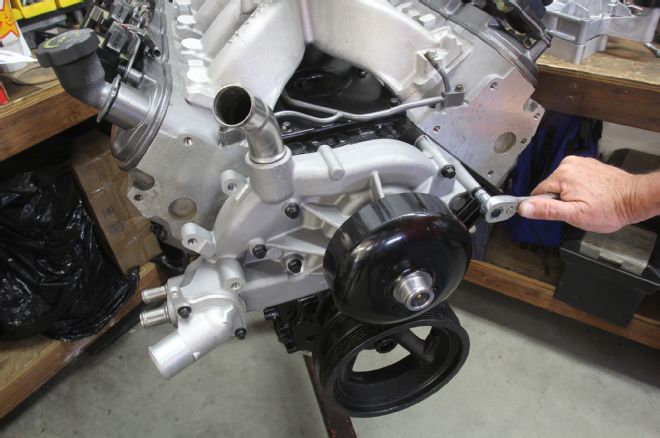
02. The instructions list water pump options for each of the three balancer depth configurations. We opted for a truck pump with its upward pointing water outlet because it was less expensive. We found a good price on the water pump and other stock replacement pieces at Summit Racing.
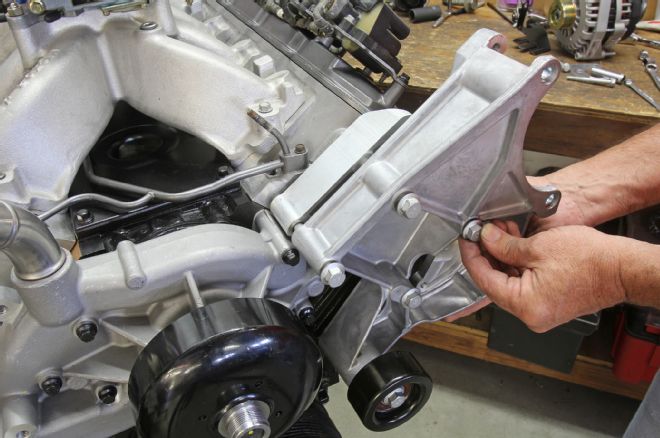
03. The Holley system bolts to the cylinder heads and not the block, which means it will work on any LS iron- or aluminum-block engine. Iron-block engines delete two block mounting holes on the driver side of the block face that are present on aluminum engines. We have already mounted the idler pulley to the bracket. The bracket includes two different positions for the idler that adjusts belt length.
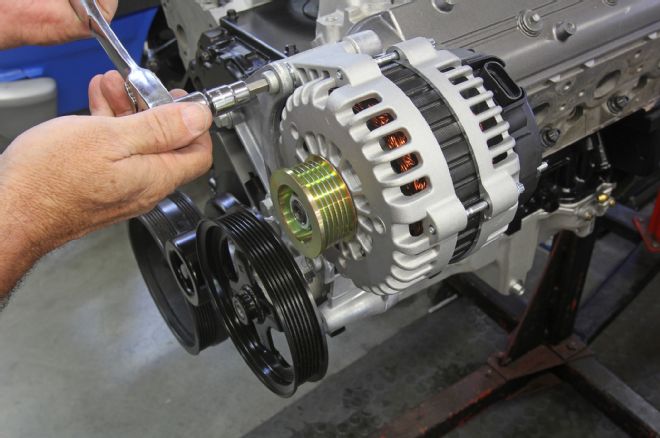
04. We give a gold star to the Holley designers for using the truck/early F-car alternator, which is less expensive compared to the Corvette alternator. This is the Holley PN 197-301 130-amp alternator included in the 20-143 kit.
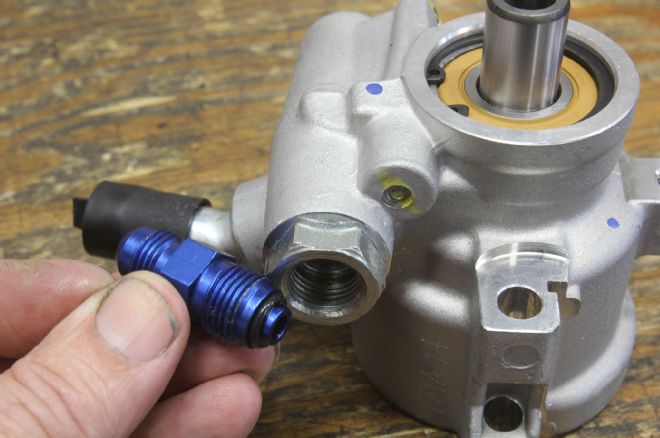
05. We discovered that a Saginaw style -6 AN fitting will hit the power steering pulley, which means you must use a dedicated high-pressure Saginaw fitting. This is a small point, but one worth noting if you were planning to use stainless braided hose.
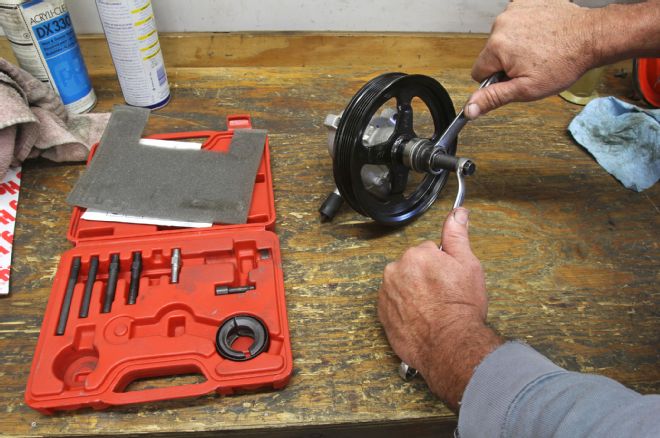
06. The power steering pump that comes in the 20-143 kit is a Corvette unit that uses a bearing, versus bushings used in standard Type II pumps. The windows in the pulley allow installing the pump to the bracket without removing the pulley. Solid-face pulleys require removal to access the pump mounting bolts. The P.S. pulley tool can be rented or borrowed, but it’s a useful tool to own.
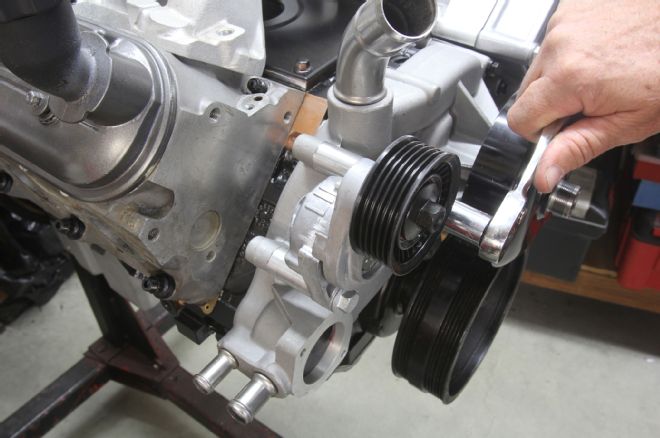
07. The Holley system also uses a factory tensioner placed on the passenger-side cylinder head. The specific tensioner is determined by the water pump selected. The instructions for your system will indicate which tensioner to use.
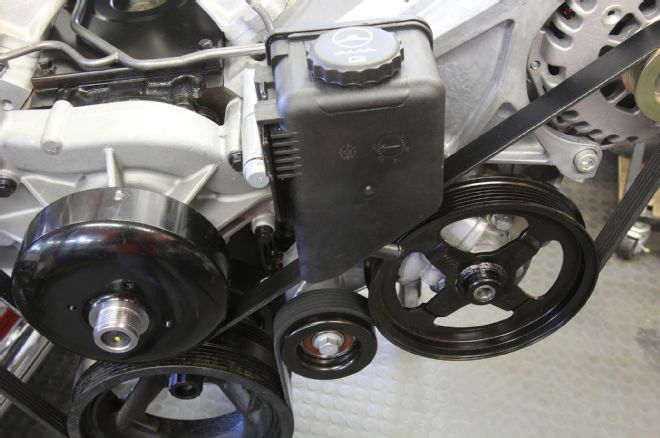
08. With the bracket torqued on the driver-side head, we mounted the power steering pump and the alternator in place. You have the option of remote mounting the power steering reservoir, but to keep things simple, we opted for Holley’s 198-200 kit, which includes a GM reservoir and cap, pump hose and clamps, and the reservoir bracket.
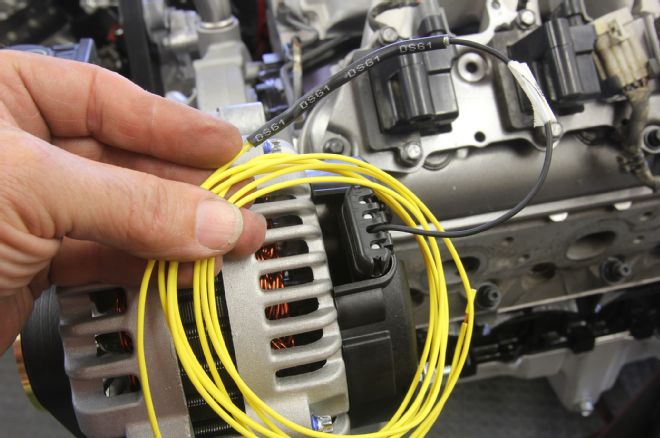
09. Holley also offers a specific pigtail (PN 197-400) that plugs into the alternator and is fitted with a built-in resistor so that you can connect this wire to any switched 12-volt wire connection. You can build your own harness if you connect the “L” terminal on the alternator to a charge indicator light or use a 560-ohm, 1/2-watt resistor (Radio Shack PN 271-1116).
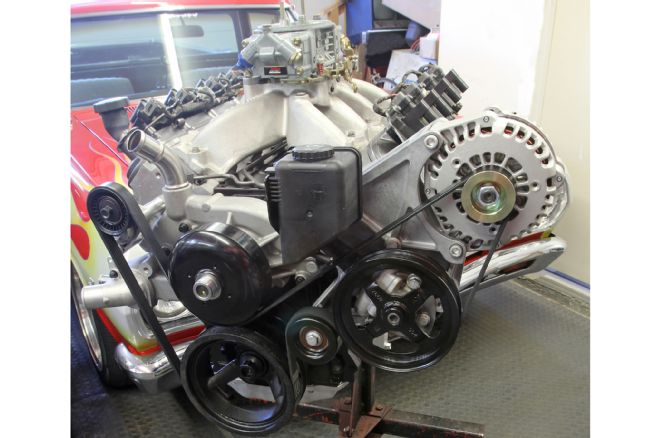
10. We followed Holley’s directions and measured our combination and found a 2,040mm serpentine belt from Summit worked for our application. To install the belt, slip it over all the pulleys, leaving the water pump for last, compress the tensioner and slip the belt in place. We now have a complete serpentine system with all-new parts and ready to hit the road.