
 Current discounted price at Westoaks Dodge (800 748-6118) at the time of this writing
Let's face it, production big-block cylinder heads aren't getting any younger. In 1978, the last Mopar big-block production engine was built, and that was almost 25 years ago. Moreover, the prized earlier #906 or #915 production cylinder-head castings are both well over thirty years old now. So, though designed as a performance upgrade in bracket or street performance applications in the 1980s, Mopar Performance's Stage V heads have been revised in recent years to double as a good service replacement head for the B/RB wedge.
The Stage V came into being, not surprisingly, as a replacement for the Stage IV performance head of the '70s. Unlike the radical Stage II and III Max Wedge production race cylinder heads, both the Stage IV and the Stage V were revised late-model passenger-car cylinder-head castings. The idea was to produce a performance head that could take all of the stock parts-valves, springs, and valvetrain-while working with the same intakes and headers as production heads.
Tech Tip: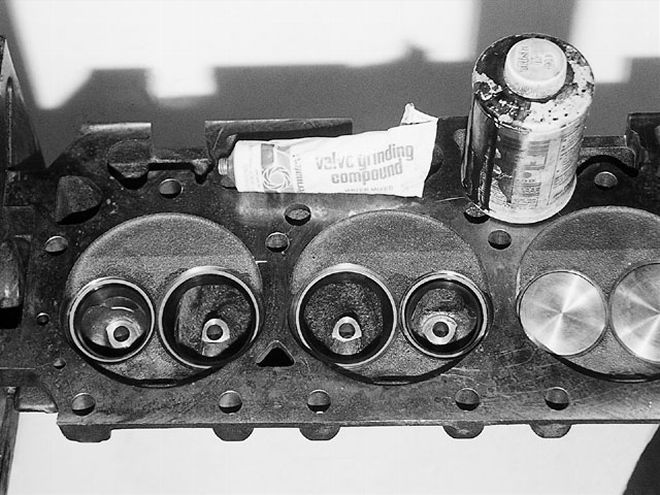 <strong>Tech Tip:</strong><br>Before porting, here's a tip gained from experience-paint the seats and the machined part of the bowl with layout dye, then lightly lap the valves. This clearly marks the seat position for reference.
These days, with more extensively redesigned heads such as Mopar Performance's Stage VI and Stage VI Max Wedge aluminum heads available, the Stage V has been targeted more towards the replacement market. After all, heads take a beating and wear out. Given decades of rebuilds and valve jobs, finding good used production head cores gets tougher every year. Also, a used set of original production heads typically need new guides, hardened exhaust seat inserts, a valve job, surfacing, and so on. The economics start to tip toward a fresh casting.
Indeed, priced at $375* each as bare castings, the Stage V may be the way to go from a cost standpoint alone. The bare casting, part # P4529993 (minus valves, springs, retainers and locks), is already finish machined with the seats cut for the popular oversize 2.14-inch intake, 1.81-inch exhaust-valve sizes. In addition, they include hardened exhaust seat inserts, a necessity in high load/heat applications with today's unleaded fuels. Between these two areas, there is a cost savings right off the top as compared to rebuilds. Assembled versions of these heads are also available.
Originally designed for the performance market, the earlier version of the Stage V came without an exhaust crossover. In keeping with the head's new role as a replacement piece, the crossover was put back into the current version. This allows the Stage V to be smog-legal in applications that use EGR, and also allows for the operation of the factory well-type automatic choke mechanism. In fact, the production-valve-sized (2.08-inch/1.74-inch) version of this head (P4529992) is an NHRA legal replacement for the original heads in Super Stock class racing. The Stage V's current role as a replacement head notwithstanding, it was originally drawn up as a performance piece, and these aspects of the head haven't been changed. The plan for this project was to get a baseline and port the heads for optimal street use.
A Heads-Up View
Compared to the production pieces, the differences in the intake port are subtle, starting with the more open port bowls of the Stage V. Farther down, the valveguide boss in the intake port is radically smaller than the long, intrusive boss found in the earlier '67-'70 #915 and #906 production castings. The later '71-'78 #346-#452 production castings also had a downsized guideboss in the intake, but they were still not as compact as the Stage V. As opposed to the flat roof and low shortside (the bottom radius of the port) found on the #346-#452 smog heads and Stage IV castings, the port roof and floor in the Stage V have been raised to the more desirable position of the #915 and #906 castings. The oil-feed hole to the rocker has been downsized from 7/32 inch to 5/32 inch, so the resulting bulge in the port wall has more meat in it for porting before hitting oil. Lastly, the port window at the pushrod "pinch" has been cast wider.
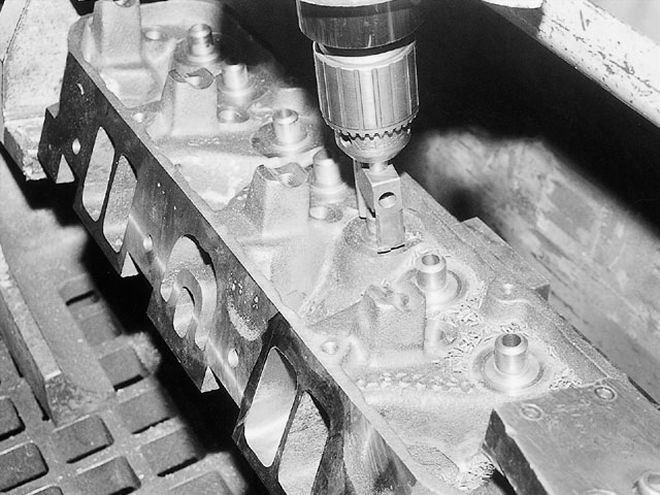
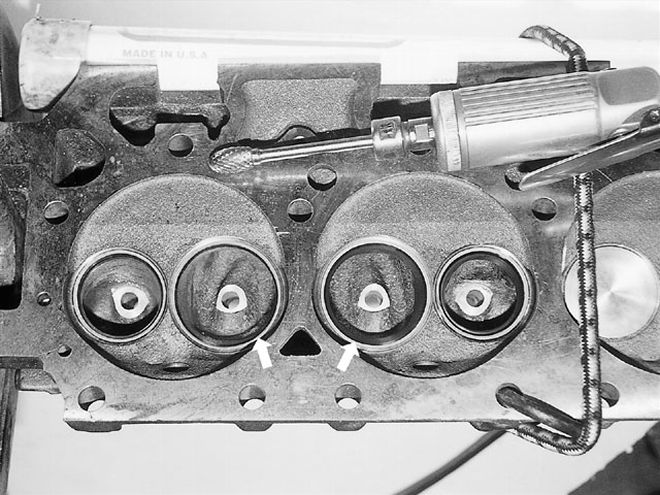 The first level of porting work is the bowl blend. The intake and exhaust ports on the left have been blended, using the carbide bit shown, smoothing the transition from the machined bottom cut into the cast bowl. We began about .100 inch from the seat, and extended only about 3/4-inch down. Notice the deshrouding plunge cut machined into the chamber adjacent to the intake valves (arrow). Flow was up substantially with this minimal prep (tables 1 and 2, columns 4 and 3).
Casting the port wider in the pushrod pinch originally allowed for the maximum port cross section in this area. The "pinch" is restricted by the width between the pushrods. In fact, left as-cast, the pushrod would be in the ports on the Stage V. The original idea was for the racer/porter to grind the outside of the pinch for the minimal pushrod clearance required, leaving more material to grind the port wider inside. However, to make the head an out-of-the-box bolt-on as a service replacement part, today the pushrod clearance is premachined into the sides of the intake ports with room to spare. The result is that the width at the port cannot be made any greater than with a stock head without breaking through the machined clearance. Too bad.
The exhaust side is where the changes are more noticeable. Although the port window and position at the exit is the same as in a production casting, the shortside radius and port floor to about mid-port have more material. This serves to fill in the hollow flat shortside found in the production port, an area critical to high flow. Though it's harder to spot, the long side of the port-the area from the seat leading to the port roof-has also been revised with more material. Although the material is there to create a very nice, near ideal port shape, the out-of-the-box flow in our tests did not show an advantage.
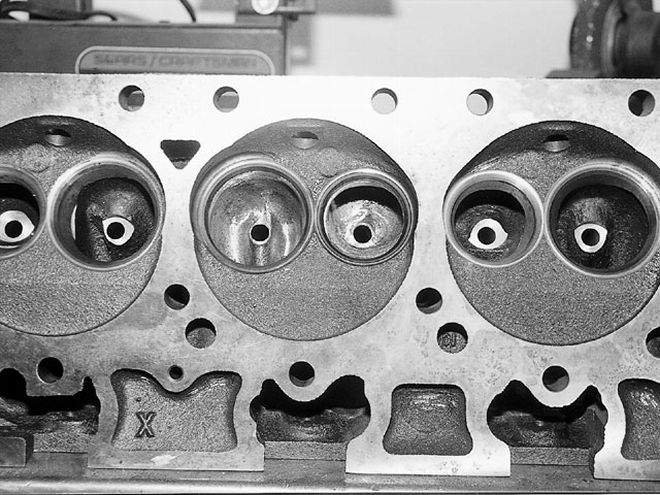 Next, the guideboss was narrowed and profiled, extending the work farther down the bowl. The rework was fairly intensive. The web of the intake was rolled into the roof channels creating a wedged form, while the exhaust guideboss was rolled at the back to flow smoothly into the channels on either side of the guide. Compare the modified guidebosses in the center chamber to the as-cast ports to the left and right. Flow is shown in tables 1 and 2, columns 5 and 4.
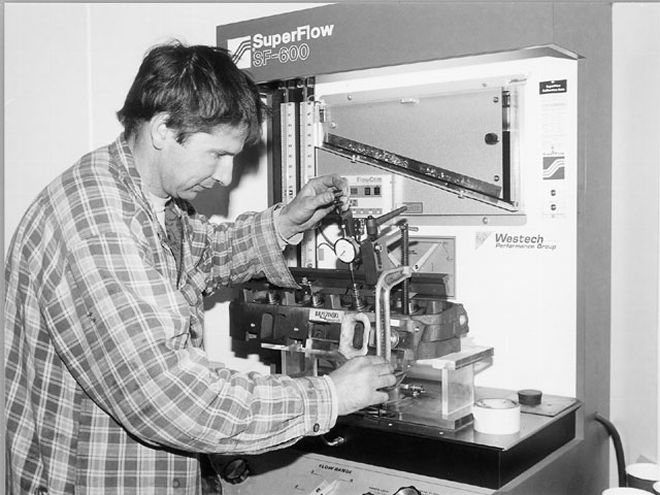
To begin, we took a new Stage V casting to Westech Performance Group and baselined it at 28-inches pressure drop on their FlowCom-equipped Superflow 600 flowbench. The Stage V head was flowed in out-of-the-box form versus a stock (original factory valve job) #906 casting port, with the #906 results shown in both tables 1 and 2, column 1, and the Stage V shown in column 2. Port flow proved better on the intake, and surprisingly, slightly worse on the exhaust than the #906. Our targeted street/strip area, low lift flow, was up significantly over the stock head on a percentage basis. This can be attributed to the increased curtain area with the larger valves of the Stage V (2.14-inches/1.81-inches versus 2.08-inches/1.74-inches intake and exhaust, respectively). Higher in the lift range, the difference, in percentage terms, narrowed. Contrary to popular myth, just cutting for and installing larger valves is not a sure-fire route to high-lift airflow. The flow of the Stage V serves well in its application as a replacement head, but with the recent changes made to the casting, it seemed a more suited piece to start as a porter's head.
A quick survey of the combustion chamber revealed that there was considerable shrouding on the intake side of the Stage V. Shrouding, as the term implies, is the encroachment of some part of the cylinder-head casting upon the flowpath, in this case the incoming air-fuel charge. With an inline wedge head, such as the big-block Mopar, the valves are always encumbered by some degree of shrouding, and larger valves in that same space are even more shrouded. The critical area is the side of the chamber next to the intake valve as it opens; basically, a portion of the valve opens next to a wall-the side of the chamber in this case. To minimize shrouding, the chamber can be plunge cut on a seat machine, using the gasket line as the limit. Oddly, as delivered, the exhaust side of our Stage V was plunge cut to near the gasket line, while on the intake side there was a significant amount of material between the valve and the limit of the gasket line. So the first mod to the Stage V casting was to set it up on a Serdi seat machine and plunge cut the chamber wall to within .040 inch of the gasket line. Back on the bench, this mod alone generated the flow numbers in table 1, column 3. Higher lift flow, as expected, was noticeably better.
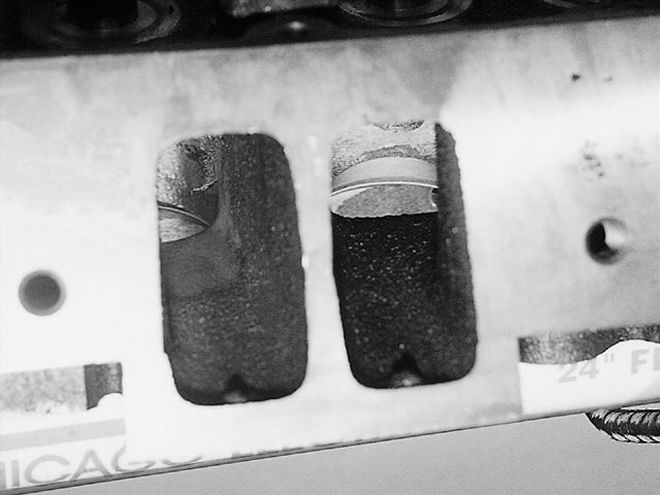 The manifold side of the intakes shows how the form of the short turn of the floor was changed from the flat upright form of the as-cast port, to the rolling laid back form of the modified port.
Doing The Grind
From here, the modifications moved into the port. These changes were all done with a coarse carbide cutter, and the subsequent tests were done in this raw form. At any level, some additional blending using a grinding stone or cartridge roll would have likely resulted in a flow improvement at each phase of modification. For these tests, the final finishing was reserved until the port was cut to its final fully-modified form.
The first step in porting any head is to blend the machined bottom cut of the valve seat to the as-cast surface in the bowl. This is commonly referred to as a bowl blend. The machining operation typically leaves a sharp edge where the machining ends and the bowl begins, due to the difference in angle and position between the bottom cut and the as-cast bowl. Bowl blending the intake upped the ante on the intake port flow solidly, as shown in table 1, column 4. On the exhaust side (table 2, column 3), this same mod unleashed an amazing 25 cfm. That's an improvement of 16 percent in peak flow on the exhaust with a single simple mod. Also note how much more quickly the flow built up in the midrange, particularly in the exhaust. More flow across the lift range usable even with the most modest street cams.
Next came modifications to the guideboss areas on both the intake and exhaust posts. The intake guideboss on the Stage V is considerably smaller than in the old production #906-type ports, yet considerable material can be trimmed off. Full-porting the old #906 required massive metal removal to produce a nice guideform. This can be done with a fraction of the effort in the Stage V by narrowing the boss on both sides, reducing the profile of the lead-in down the port, and the most difficult part, cutting back the web between the guide and the long side of the bowl so it rolls smoothly from the roof channels.
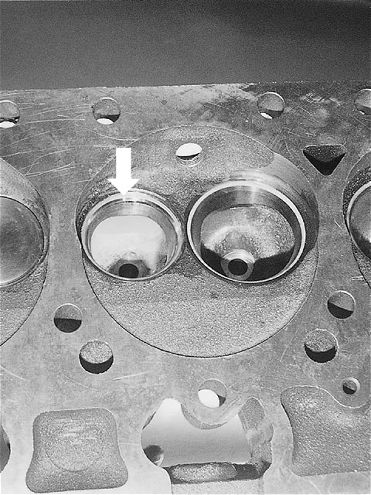 Similarly, the exhaust short turn was modified to a rolled form. Compared to the production heads, the extra material in the Stage V provided the basis for an effective shape. A stock port is shown in photo A, while the modified shortside form is illustrated in photo B. Flow is given in table 2, column 5.
The web can be rolled from the roof channels into a wedge shape (see photo 2), taking care not to grind too deep here and striking water. Cut in tight to the guide, where there's plenty of solid iron. Even more effective, roll the web almost completely out from behind the guide, making a clean channel in the bowl behind the guide, connecting the roof channels at either side (see photo 3). This form is extremely difficult to achieve and greatly increases the chances of striking water compared to the rolled-wedge form described above. We went with the wedge form, with the results shown in table 1, column 5. Flow was up solidly from the upper midrange through to high lifts.
Meanwhile, on the exhaust side, the guideboss is very similar to that found in production castings. As with the intake, narrow the guide and blend the area between the guide and long side of the bowl, knocking out the obtrusive material in the web. The ideal form creates a smoothly rolled transition around the back of the guide in the web areas and into the roof channel on either side of the guide. Be warned that there is also water here. The flow at higher lifts was up with this mod, as shown in table 2, column 4. Though at this level the gains on the exhaust side with the guideboss work may seem modest on paper, it is an important step to having the exhaust bust out with big flow numbers with complementary mods later.
Shortstop
At this point, both the intake and exhaust ports seem to "back-up" at higher lifts, with the flow increasing, but only in small steps. This is particularly evident in the exhaust, with port flow gaining only 5 cfm from .400-.700-inch lift. Generally, this happens as the increase with each subsequent change fattens up the numbers in the midrange lifts until they almost match the numbers farther up the scale. The solution can almost always be found in the shortside turn. Getting an effective short-turn radius is one of the trickiest, but most effective, changes to any of the Mopar big-block heads. With a worked short turn, the high-lift numbers move up to the next level, and the midrange flow also fattens up, a better head for either race or street.
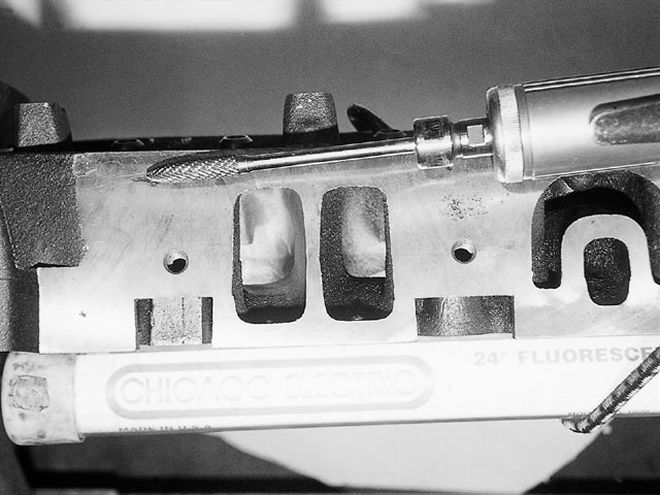 The straightside wall was worked to smooth the bulges from the oil passage to the rockers and the common headbolt hole, using the long flat carbide cutter. Compare the as-cast port (right) to the modified port (left). The mod allowed added cfm (table 1, column 8).
The Stage V intake has the high shortside similar to the production #915 or #906 castings. This is a better starting point than the low shortside of the later production castings, which lack the material to achieve a desirable form. In stock form, neither the early production 440 nor the Stage V have the shortside form of a race head, but both can be improved considerably through porting. Research indicates that a rolled, rounded, laid-back short turn is much more effective than the as-cast, flat, abrupt turn found in the OE castings. Since taking the short-turn changes to the limits requires careful progress checks on a flowbench, for this test, the short turn was conservatively cut to the rounded laid-back form shown (see photo 5). The flow improvements are tabulated in table 1, column 6: From .300-inch lift onward, the flow spiked significantly.
On the exhaust side, the added material of the Stage V is a blessing, since none of the production heads had the material in the short turn to achieve the most effective form. Sure, the production castings can be ported for excellent exhaust flow, but the Stage V with its added material can be made even better. With similar changes as on the intake side, the exhaust flow was up solidly over .300-inch lift (table 2, column 5). In fact, exhaust flow was up nearly 12 percent at .500-inch lift, and peak flow was already up in the range of a fully ported production head.
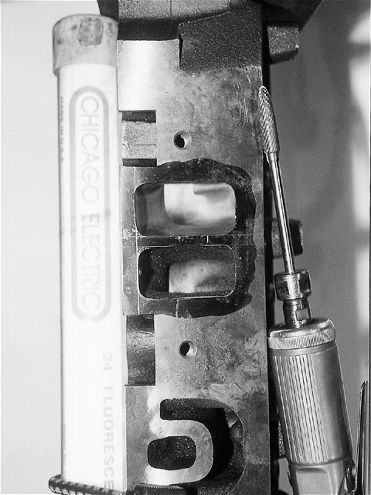 Work in the intake port was completed by marking the gasket line and cutting the rest of the port. The floor and the manifold side of the roof received minimal metal removal, but the pushrod side ("pinch") was enlarged as much as practical. The dogleg wall was well blended from the bowl, around the pushrod bulge, to the manifold face. The port was cast as large as the gasket, or bigger, along most of the opening. Flow ended up as tabulated in table 1, column 9.
Port Of Call: Intake
The next mods pertained only to the intake port. The roof channels on either side of the guideboss were enlarged slightly and blended smoothly down the port and into the walls and bowl. Cleaning up this area bumped up the flow in the .400-/.500-/.600-inch lift range by a good 5 cfm (table 1, column 7). Next, the straightside wall was blended along its full length, from the port entrance all the way to the bowl, lessening the abruptness of the bulges for the oil-feed passage to the rockers and the headbolt bulge. Straighter and flatter is better. It cannot be made absolutely flat without cutting through the oil passage or bolt hole, but the bulges can be significantly reduced. The payoff for this mod is shown in table 1, column 8.
The final mod to the intake port was a full general porting. We opened the pushrod pinch area on the dogleg wall as wide as practical, maintaining a conservative thickness of at least .080 inch to the factory pushrod clearance machining (on the outside of the port). The port was enlarged from the as-delivered width of about 1 inch to 1.160 inches, while making the opening more square by cutting down to the corners (some of this increase in width came from the material removed from the opposite wall). The gasket size was outlined at the port entrance (the port was already to the gasket line or slightly beyond in most areas) and the remainder of the port was lightly blended, including the yet untouched floor and roof, to the marked port entrance. Flow was up as shown in table 1, column 9.
Port Of Call: Exhaust
Rounding out the exhaust changes, we moved from the bowl and finished off the port. The attention was primarily focused on the outside wall (as referenced to the cylinder bore), and roof. This is the fastest area of the port, and thus has the most active flow. The outside wall can be made into nearly a continuous smooth curve from the bowl out to the header flange. The inside wall is a less streamlined transition from the bowl out to the port exit, with a significant bulge between the bowl and port. This area was cut to blend the transition to a smoother form, though caution should be exercised not to remove too much metal, since water is underneath. The parting line depression left by the casting core is a useful guide for cutting adjacent areas only enough to clean up the as-cast surface in the parting line.
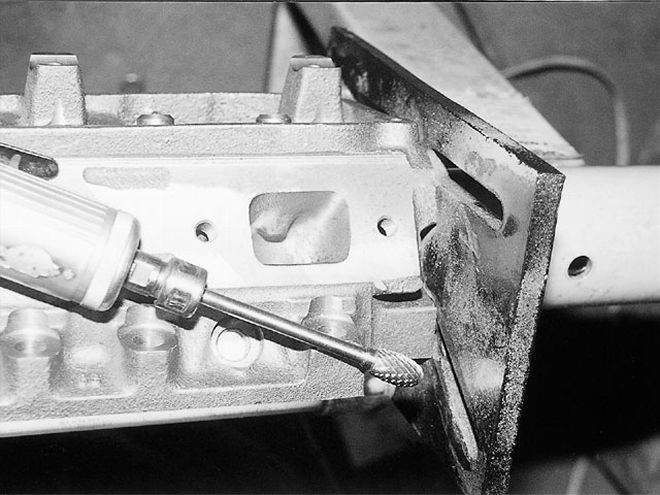 We finished the exhaust side by cutting the rest of the port. The idea wasn't to significantly enlarge the port, but rather to clean it up and make a smooth transition from the bowl out. Water jacketing was a critical concern. The roof and outside wall as shown here were most important. The finished port size at the exit was only minimally larger than as-cast. Flow went to the numbers shown in table 2, column 6.
The roof is fairly flat, and is conservatively cut to blend the guideboss and previously blended channels on either side of the guideboss out of the port. The floor of the port was simply given a minimal cut to clean up the rough as-cast surface, and blended into the previous shortside work closer to the valve. The port mods were worth a nice increase in flow at higher valve lifts, as shown in table 2, column 6.
Cleaning It Up
At this stage of modification, both the intake and exhaust were fully ported, but were in a rough-cut state as left by the coarse carbide cutter. Theory holds that the surface texture has little to do with port flow, given the physics of boundary layer airflow; but finishing the port to a smooth surface will increase airflow, sometimes significantly. It isn't that airflow in Mopar cylinder heads defies physics. Smoothing with grinding stones and/or cartridge rolls removes material, making the port larger, and more importantly, blending the minor lumps, ripples, and distortion in the port surface that are the inevitable result of the rough carbide cut.
The final port finishing is best done with a stone, followed by a #80 grit cartridge roll to smooth the surface. It's amazing how the distortions camouflaged by the rough carbide-cut surface show up in the final polishing process. To see how the port is cleaning up, paint the entire port with layout dye, which acts as a guidecoat. With this trick, the surface quality can be clearly seen, allowing a final cleanup with minimal metal removal.
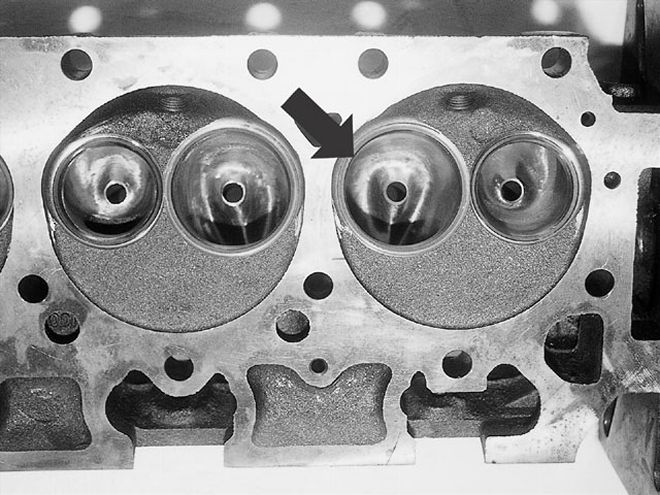 The ports were then polished. First we used a grinding stone to take out the rough carbide surface, and finished using #80 grit cartridge rolls. The peaks left in the chamber from the deshrouding cuts were cut out at this time (arrows). Finishing off the port made for a large flow gain (tables 1 and 2, columns 10 and 7).
Another detail is blending the point in the chamber wall where the deshrouding plunge cut leaves a distinct pointed peak in the chamber wall. Testing the finished port yielded the final flow figures shown in table 1, column 7, and table 2, column 10. The final finishing reaped big flow gain all around, mostly due to blending together the various port surfaces. Pay close attention to the shortside turn on both the intake and exhaust. The shortside should be a continuous, smooth curve from the seat into the port, with no perceptible distortion.
The ported Stage V gained an impressive 30 percent peak intake flow, and a staggering 44 percent on the exhaust. Peak flow was up to an impressive 291 cfm intake, 217 cfm exhaust, giving a near ideal flow balance of 75 percent. The intake port's flow curve was so much fatter that the modified port topped the stock port's max flow by just over .300-inch lift. On the exhaust side, the out-of-the-box peak flow of 150 cfm was already well exceeded by .300-inch lift. The bottom line is that the Stage V is as good as any of the stock heads out-of-the-box, and far outflows any of the regular production pieces with just some minor bowl work. If full porting is the plan, the Stage V makes a much better starting point than any of the stock castings, requires less metal removal, and delivers more final flow. It's impressive.
Intake Flow: Superflow {{{600}}} Flowbench At 28 Inches As Tested By Steve DulcichLift12345678910.05030.433343333.834.134.5343434.{{{100}}}{{{57}}}.26566.56566.766.566.766.566.867.{{{200}}}127135137138139139.5139140142142.{{{300}}}183188193198201203203204204204.400210213218226239246251249253254.500221223228236243255260263266268.600220225230237246262267266272280.700218225235{{{240}}}252270272272278285.800 282291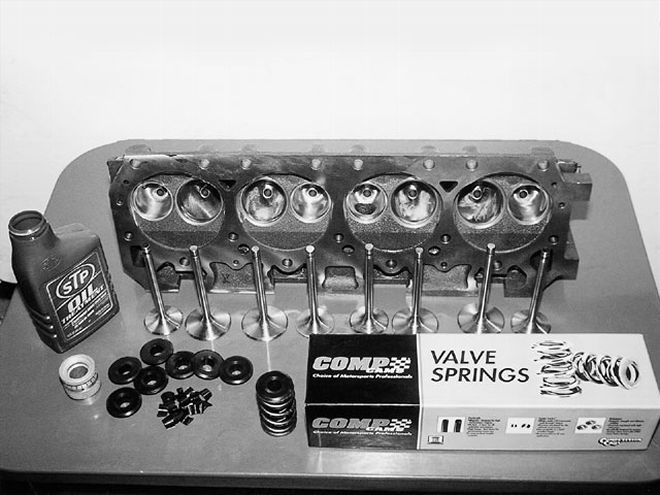 The #P4529993 Stage V cylinder heads come as a bare machined casting, cut for the common 2.14-inch/1.81-inch valve combo. To fill out the heads, we used a set of Milodon's high quality stainless steel street valves and hung them in with a new set of Competition Cams' #911 springs, Comp 10-degree steel retainers, and 10-degree SuperLocks. The Comp package placed the spring exactly at the recommended (for this spring) 1.900-inches installed height, as checked with a Powerhouse spring mic.
1. Stock 906 casting.
2. Stock Stage 5 casting.
3. Stage 5 with unshrouded combustion chamber.
4. Stage 5 as above with bowl blend.
5. Stage 5 as above with wedge-type guideboss changes.
6. Stage 5 as above with short turn roll changes.
7. Stage 5 as above with roof porting/blending.
8. Stage 5 as above with straightside porting.
9. Stage 5 as above with general additional porting.
10. Stage 5 as above with final smooth finish.
1. Stock 906 casting.
2. Stock Stage 5 casting.
3. Stage 5 with bowl blend.
4. Stage 5 as above with wedge-type guideboss changes.
5. Stage 5 as above with short turn roll changes.
6. Stage 5 as above with exhaust port blends and openings.
7. Stage 5 as above with final smooth finish.
 <strong>Tech Tip</strong><br>The Comp single spring for the big-block Mopar catches its short inner damper on the raised step of the springpad of stock Mopar heads, flaking cast iron while running. The cure is to run a spring cutter down the boss and machine it flat. This also allows the use of dual valvesprings if required.
Stage V On The Dyno: 500 Horsepower
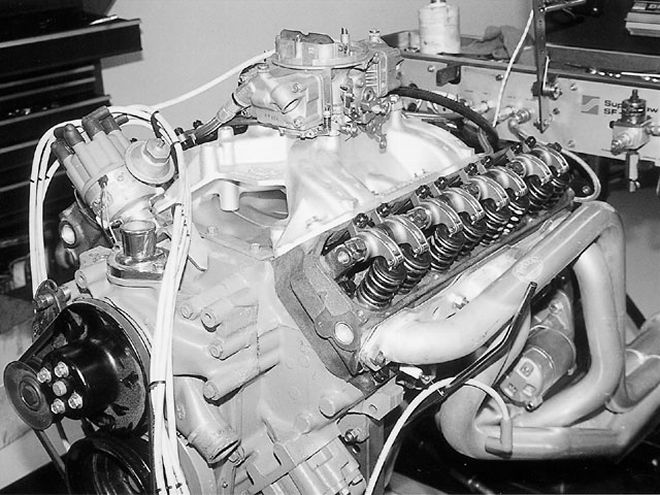
With the fully ported Stage Vs done, we had the flow numbers, but how would it translate to real world horsepower? We still had the stock-style rebuilt 440 dyno motor from our "440 Resto To Rad" engine build. In the April 2001 Mopar Muscle, it was modified on the dyno with the usual bolt-ons including an 850 cfm Holley carb, a Holley Street Dominator intake, Hooker 171/48-inch Headers, a Comp Xtreme Energy 274 degree cam, and a complete Comp valvetrain. With the stock-valved #906 heads, the engine produced 464 hp at 5400 rpm, and 523 ft-lbs at 3800 rpm. Very impressive numbers for any street 440.
The #906 castings seemed the ideal benchmark for comparison, since they are generally the favored O.E. casting in performance applications. There are countless 440s around the country running stock or near-stock 906s. These stock #906s weren't worn-out pretenders, they were totally rebuilt with new guides and competition valve seats cut on a Serdi seat machine. The valves and ports, however, were stock O.E. issue. Likewise, the cam was a street grind, delivering a moderate .488-inch intake/.491 exhaust lift.
How would this engine package respond to the ported Stage Vs? To find out, the Stage Vs were bolted on (using new ARP bolts) with no other changes, and the heads proved their worth. After readjusting the valves for minimal lifter preload with the Comp anti-pump-up hydraulic lifters, our "mild" 440 belted out 500 hp at 5400 rpm, with peak torque moving up to 538 ft-lbs. That's 500 streetable horsepower out of a basic rebuild-style 440, with no downside when compared to the previous combo. The ported heads made more torque right from the bottom of the test, with an increase of 37 ft-lbs at 3000 rpm. So much for the myth that ported heads hurt low-end torque!
One more note-while the gains found on this engine combination were impressive, with the mild street cam's lift, the valves only accessed the tip of the iceberg as far as the ported Stage V's flow advantage. On a .600-inch-plus lift big cam motor, the results would likely be magnified. We'll have to try that soon.
Dyno Numbers: Rebuilt 906 Vs. Ported Stage V Superflow 901 Engine Dyno; Tested At Westech Performance GroupRPMTQ 906TQ STG5hp 906hpSTG 53000473.4510.5270.4291.63200495.0508.1301.6309.63400{{{505}}}.5516.4327.2334.33600517.3526.3354.6360.73800523.0535.0378.4387.1{{{4000}}}521.7538.0397.3409.74200518.2538.1414.4430.34400509.5534.1426.8447.54600503.4531.3440.9465.34800496.2524.1453.5479.0{{{5000}}}482.2513.3459.0488.75200466.5500.8461.9495.85400451.9486.8464.6500.65600426.6465.9454.9496.75800404.1447.2446.3493.9