Can you feel the sense of accomplishment? If you've been following our 10-part series on bodywork and paint, and better yet, actually putting that information into practice, it's about time to sit back, crack open a cold one, and marvel at just how freaking great your car's new paint looks. Well, almost.
Now that the paint is on the car, what do you do to keep it in that like-new condition? The subject of paint care-cleaning, waxing, polishing, buffing-is a science in itself, with literally hundreds of bottles, cans, jars, jugs, towels, and pads to choose from. For crying out loud, our local parts house has an entire wall dedicated to car-care products. It seems like every company has its own super-secret, easy-to-apply formula, and every one of those companies promises a shine that's better than the other guy's. We're not about to get into the wax wars here. The best way to choose a particular brand of car-care products is to talk to your buddies, pick the brains of local detailers, and take the time to sample a few of the products out there.
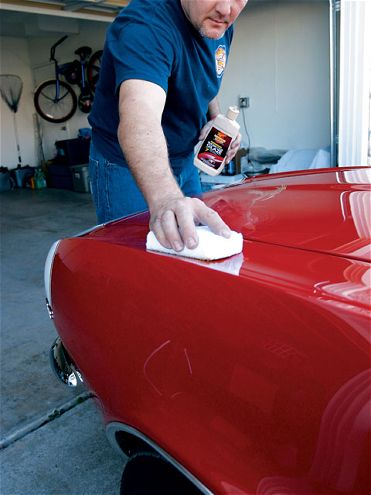
 To demonstrate polish techniques, we went back to Paint n Place's Michael Goacher and his newly coated '67 Camaro, which was featured in last month's story on trim replacement. Here, he's applying a coat of Meguiar's Show Car Glaze using an Even Coat applicator pad.
No, what we're talking about in this final installment of our Paint & Body series is how to take care of fresh paint, which is a different subject altogether. Fresh paint needs some special attention beyond the usual car-care steps.
Fresh vs. New
Mike Pennington, director of training at Meguiar's, pointed out the big difference between these two words when it comes to paint.
"Paint that has just come out of the spray booth is very different from paint on a new car," he said. "Fresh paint is still drying; the paint is still out-gassing, the solvents are still flashing." A new car with a factory paint job is a totally different animal. It's cured at temperatures of around 300 degrees versus ambient temperatures at some shops or maybe 140 degrees or so if a shop uses heat lamps to speed the cure. Plus, quite a bit of time passes from when a car leaves the factory until it arrives at a dealership, and ultimately, your garage. So a new car's paint is no longer out-gassing or flashing.
The difference is important because you don't want to put anything on fresh paint that's going to inhibit the drying, flashing, or out-gassing processes, Pennington said. The various paint companies have different recommendations as to the time it takes for their paints to completely cure, but Pennington said 60 days is a good rule of thumb. During that time, you shouldn't use wax or anything else that promises to seal or protect the paint, as those products will put down a barrier that inhibits the curing process.
Fresh paint is very susceptible to damage from just about anything. "Because you don't have a protective layer on the paint to slow down the effects of Mother Nature, it can get beat up right before your eyes," Pennington said. "Get bird poop off within five minutes. Don't let dew sit on it and get cooked in the sunlight or water spots will etch in no time. If bugs get on there, get them off quick." He told us one of Meguiar's project cars was gifted by a flying bird, and even though the goo sat on the fresh paint for just 10 minutes, it created an etch so deep it had to be buffed out with 2,500-grit sandpaper.
Should your fresh paint need this kind of TLC, be extra careful about what you use to treat it, Pennington warned. "You don't want to use traditional-style compounds on these finishes. You might take the defect out, but it will inflict hundreds more smaller defects. Use a harsh compound-what we call rocks in a bottle-with a rough terry cloth, and the scratch may be gone, but now you have a haze in the paint."
Wash and Polish
So, what is safe to use? First things first: Before applying anything to the paint, make sure it's absolutely clean, so you're not rubbing dirt, sanding dust, or any other gritty compound into the fresh surface. It's OK to wash the car using a dedicated automotive soap-not laundry detergent or household cleaner-since car-wash soap is formulated without abrasives or harsh detergents. Since the fresh paint is fragile, use a brand-new, high-quality car-wash mitt or some other new, soft towel, so you're not rubbing old dirt into the virgin paint.
The Meguiar's folks recommend a two-bucket washing process: Fill one bucket with water and the appropriate amount of soap, and fill the second with water only. Dip the mitt in the soapy water, wash off a part of the car, then rinse the mitt in the clear water before putting it back into the soapy water. That way, the second bucket catches the dirt coming out of the mitt so it won't get wiped back onto the car.
"Use lots of water when you're washing," Pennington said. "It's very easy to inflict a scratch or swirl on the new paint."
Speaking of swirl marks, you may be surprised to find some on your freshly painted car. Sometimes they're due to sloppy work by the paint shop, but keep in mind, too, that a high-quality paint job will reveal small flaws that would be invisible on other cars. "It's sort of a Catch-22," Pennington admitted. "The nicer the paint job, the more stuff you're going to see in it. There's less orange peel to mask or hide imperfections."
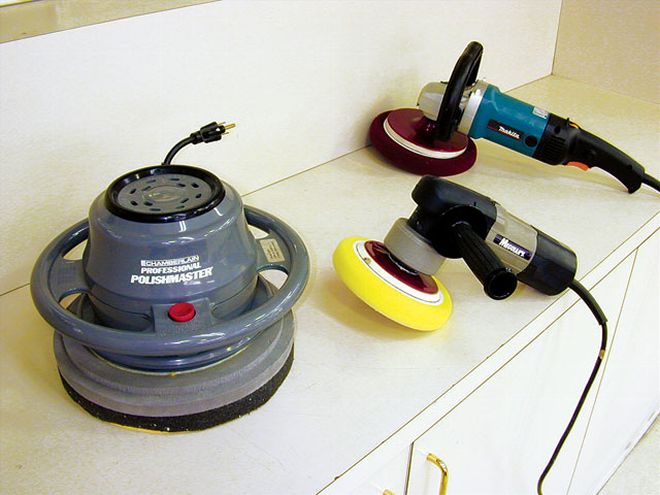
 Power tools that can be used to apply polish include (from left) an orbital buffer, a dual-action polisher, and a rotary buffer. Using power rather than old-fashioned elbow grease is easier, and you'll generally use less polish than you would when applying by hand. Care must be taken, though, not to scratch or burn through the paint. For this reason, the rotary buffer is probably the least ideal for the job, as it spins in one direction only. The orbital and DA buffers move in several directions at once, so the buffing action isn't concentrated in one area.
A good-quality swirl remover can be used to treat those marks, provided it doesn't contain harsh abrasive compounds. The job can be done by hand or with a power tool-an orbital buffer or even a DA will work. Just be sure to use a very soft hand applicator or soft foam pad on the machine-no wool-pad applicators.
When the surface is clean and free of marks, you can apply a polish or glaze to add gloss to the paint. "It's like putting lotion on your skin," Pennington said. "The polish will have conditioning agents, darkening agents, that will make the finish look dark, deep, and wet." Avoid any product labeled polish/wax or any sort of spray wax, though, to keep the paint free from barriers. "If the product is offering protection, you don't want to use it at this point," he said.
Like the swirl remover, polish can be applied by hand or machine using the same kinds of soft applicators recommended earlier. If you have a very dark-colored car-one that will show even the slightest imperfection -a final hand-wiping after using a machine may be a good idea to remove swirl marks, said John Sloane of the Eastwood Co. "Wiping the car in strokes that are linear and parallel to the ground rather than circular will minimize those light scratches."
Once the 60-day paint-curing window is closed, the surface can-and should-be treated with a protective coat of wax to keep Mother Nature's damaging effects at bay. "At that point, you can go into your regular maintenance schedule" of washes and waxes, Pennington said. How often is regular? That depends on so many things-your car's color; how and when it's used; whether it's garaged, covered, or parked outside; and so on. In general, dark cars need more frequent waxes to maintain their gloss than light-colored cars, and a car that's washed often will need waxing often, since washing degrades the wax coat over time. One trick we picked up along the way: Run your thumb over the car's paint. If it squeaks, it's time to wax.
Ten issues ago, when we started this series, we said it was our belief that many hot rodders would gladly take on just about any car-building chore-except paint. Our reasoning was that paint crossed the line from science, which most of you are comfortable with, into art, which many of you are not. We hope the information we provided took out some of the mystery of the painting process to the point where you are comfortable tackling some of these jobs yourself. Or, if you're still a little shy about handling a spray gun yourself, you're at least better prepared to talk to a paint shop when it comes time to shine up your hot rod.
What is Shine?
We know it when we see it, but what, exactly, is shine? In terms of automotive paint and paint maintenance, shine is the surface's ability to directly reflect light straight back into the viewer's eyes. Any imperfection, even polishing swirl marks, will absorb and diffuse light, making the surface look dull. In theory, fresh paint will have nothing in its surface to diffuse the light, and proper care of that painted surface is intended to keep it that way.