Gaining horsepower can be a game of hit and miss. Approaching the game from its many angles, a whole host of areas open themselves up for improvement. But where to start? Should you look at an upgrade like a cam or headers? Should the approach be electronic in the form of a tuner? Or maybe the factory intake or exhaust should be swapped? All these upgrades can do wonders for gaining some ponies, but have to be combined to really feel the effects and offer only mild increases. One component that offers a definite, measurable power increase is a supercharger.
You only need to look at the performance numbers of superchargers to know that they are an extremely reliable source of oomph as it acts on a vital area of the engine, the intake. By blasting cold, dense air into the engine a supercharger gives the intake cycle more oxygen, letting it burn more fuel, turning your ho-hum stocker into a rocket sled.
A supercharger will pump more air into your engine, no doubt about it, but in doing so the air being compressed will create heat, sapping the power that is created. To combat that, pairing your supercharger with an intercooler will help the cold air reach its final destination.
The mad scientists over at ProCharger have been designing supercharger systems out in Lenexa, Kansas, since 1993 and has since established itself as one of the leading developers of go-fast centrifugal units. Utilizing industry leading production and assembly techniques, billet impellers are manufactured from large diameter pieces of 7075 T-6 aluminum, which are cut to height, contoured, and then machined on a CNC mill. Their patented, self-contained, self-lubricated, geardriven centrifugal superchargers eliminate tapping into the oil pan, run cooler, and produce tons of power.
We went to the experts at ProCharger to get some valuable tips as they are the ones who developed the complete kit and their techs are well trained on how this kit is properly installed. ProCharger makes a variety of kits that fit all types of vehicles and are available through a network of nationwide dealers listed at www.procharger.com. Follow along as we install a ProCharger high-output, air-to-air intercooled system on a very capable 5.7L Hemi-powered '14 Ram 1500.
| 09 14 Dodge Ram Procharger Install Air Intake System Removal
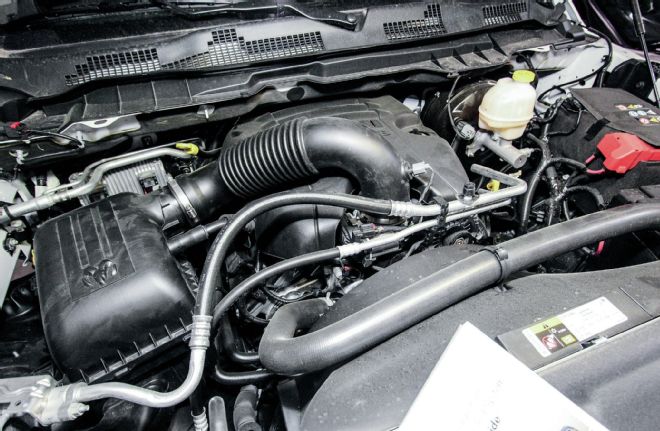
1. The air intake system had to be completely removed to install the supercharger. The tube, box assembly, and Intake air temp sensor all had to be taken off as well. Then, we pried off the serpentine belt.
| 09 14 Dodge Ram Procharger Install Fan Shroud And Fan Removal
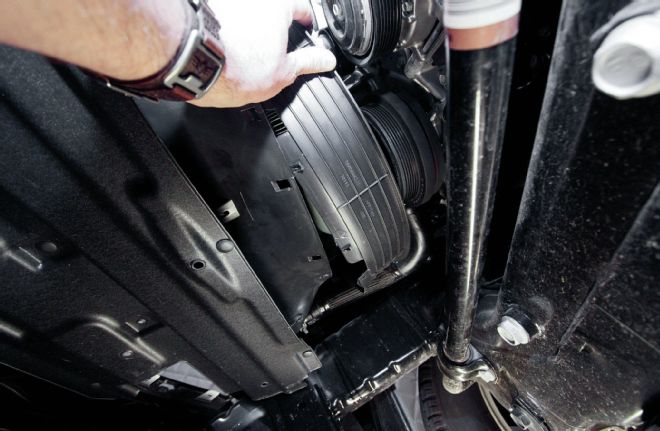
2. The fan shroud and fan also had to go, so we removed the four 10mm bolts holding in the fan shroud, fan and 21mm crank pulley.
| 09 14 Dodge Ram Procharger Install Crankshaft And Harmonic Balancer Drilling
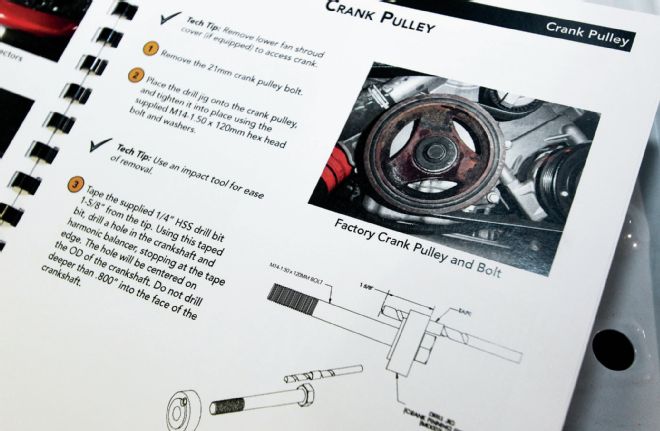
3. In order to stop the crank from moving, a hole had to be drilled so we could insert a pin. Using the supplied 1/4-inch bit, we put a piece of tape 1 and 5/8 inches from the tip and drilled the crankshaft and harmonic balancer, stopping at the tape. We drilled the hole centered on the outer diameter of the crank, not drilling deeper than .8 of an inch into the face of the crank.
| 09 14 Dodge Ram Procharger Install Crank Bolt Reinstall
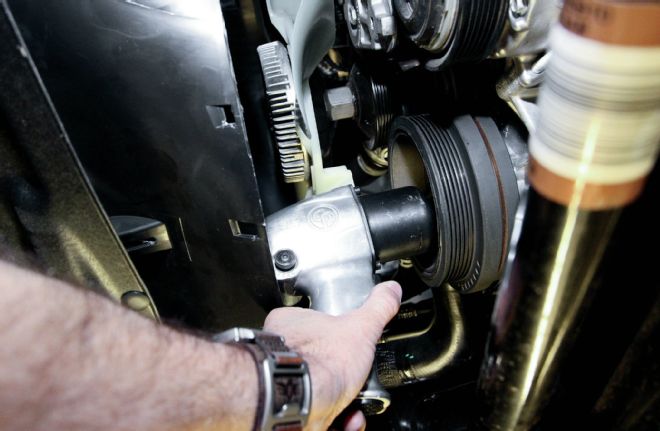
4. After we pinned the crank using the supplied 1/4-inch by .75-inch stainless steel pin, we reinstalled the crank bolt and torqued it to 129 ft-lb.
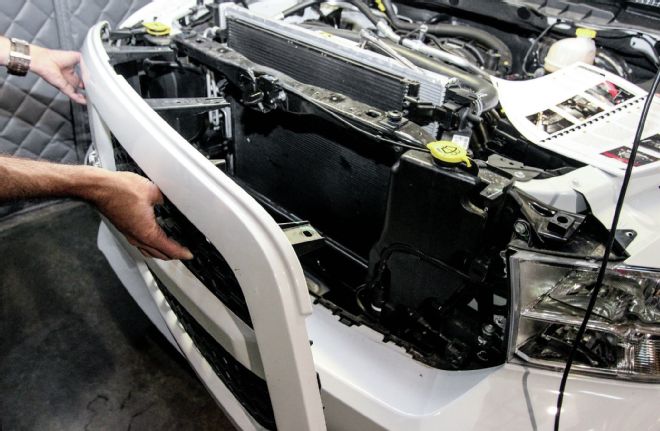
| 09 14 Dodge Ram Procharger Install Grille Removal
5. In order to access the coolant tank, we first removed the dust cover behind the grille, which is attached by push clips, then removed the grille by removing the four bolts up top, and gave it a firm tug to pop the two push clips, located on either side of the grille at about the centerline.
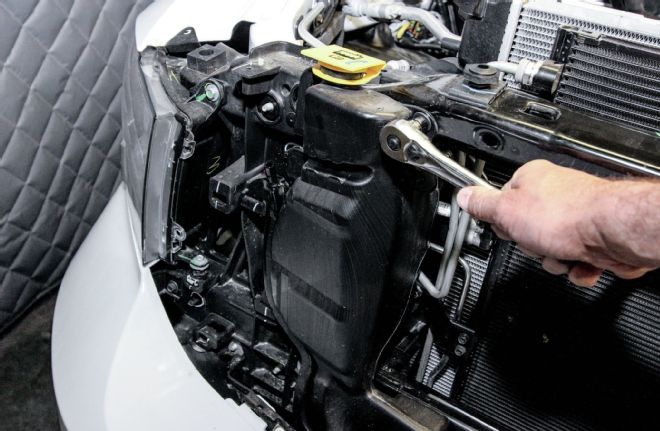
| 09 14 Dodge Ram Procharger Install Coolant Overflow Tank Removal
6. The coolant overflow tank was next to be removed, and the coolant had to be drained from it. We popped the plug and drained the coolant into a bucket, then removed the upper radiator hose. After that, we removed the coolant overflow jug and set it aside.
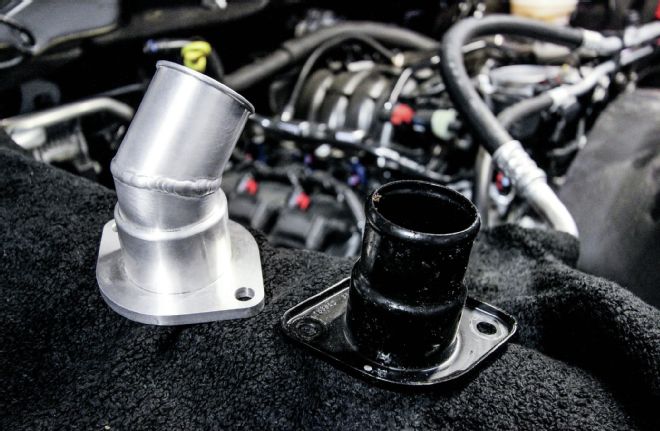
| 09 14 Dodge Ram Procharger Install Thermostat Housing Swap
7. Since a new thermostat housing was going in, the old one had to go. We removed the stock thermostat, removing the two 13mm bolts on the housing. Next, we installed the new 45-degree thermostat housing, reusing the factory bolts, and left off the hose to be reinstalled later.
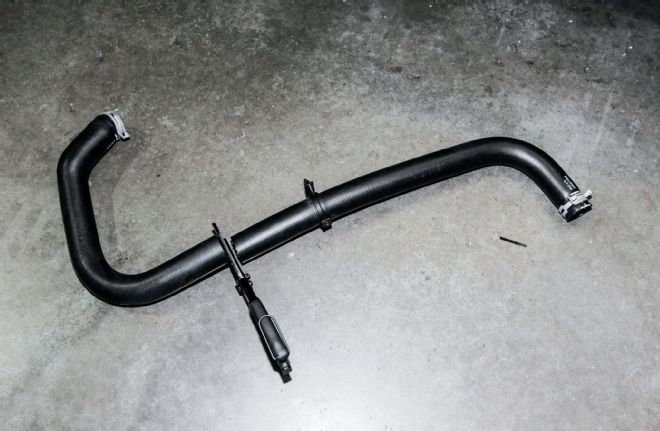
| 09 14 Dodge Ram Procharger Install Radiator Hose
8. The radiator hose had to be trimmed to fit, and we installed it back onto the radiator using the supplied coolant hose reducer and the supplied hose clamps.
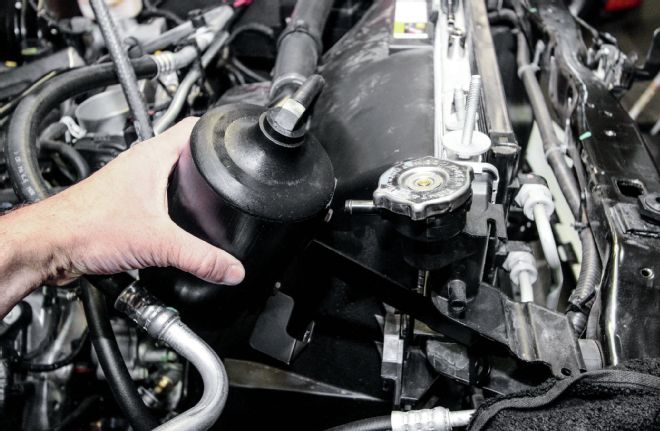
| 09 14 Dodge Ram Procharger Install Coolant Overflow Tank Install
9. We had to install the new coolant overflow tank by attaching the supplied brackets with the supplied bolts and washers. Next, we attached the 3/8-inch hose from the bottom of the bottle to the radiator overflow and routed the vent hose down.
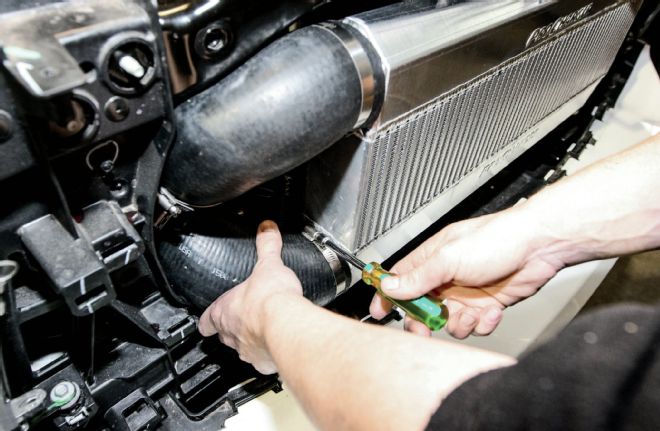
| 09 14 Dodge Ram Procharger Install Intercooler Brackets
10. Now it was time to address the intercooler and install brackets, leaving them loose to tighten later. We attached the 'cooler to the upper and lower brackets, and installed the supplied rubber 90-degree inlet elbow with the supplied hose clamps.
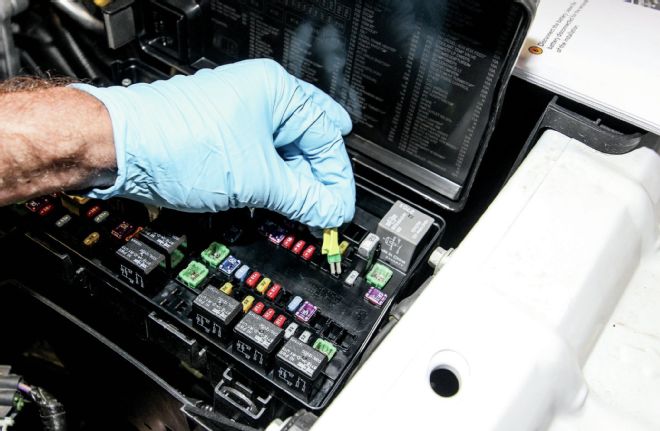
| 09 14 Dodge Ram Procharger Install Fuse Box
11. Moving over to the fuse box we had to discharge the pressure from the fuel pump by pulling out the fuse.
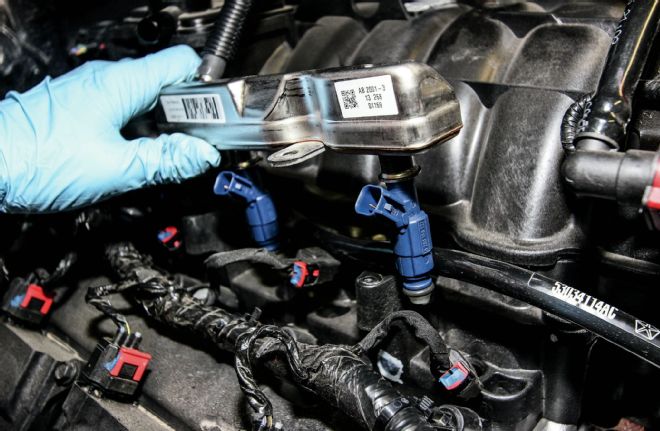
| 09 14 Dodge Ram Procharger Install Fuel Injector Swap
12. We discharged the fuel pump because we had to remove the stock fuel rails to add spacers and had to remove the fuel injectors to swap the injectors with the larger ones that came supplied in the kit.
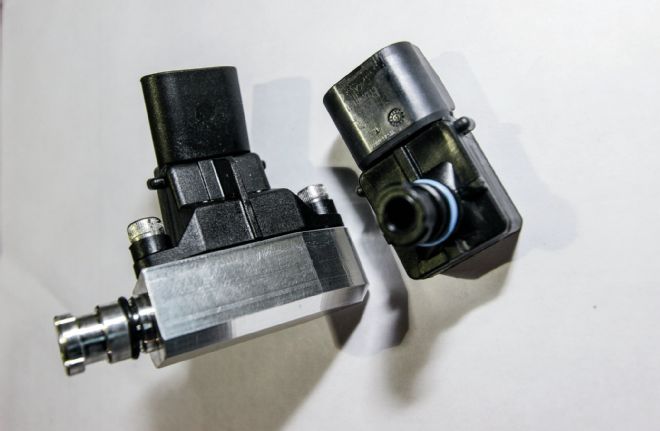
| 09 14 Dodge Ram Procharger Install Manifold Absolute Pressure Sensor
13. The Manifold Absolute Pressure (MAP) sensor was next on our list and we removed the stock sensor, slapped in the supplied 2-bar sensor and reconnected the electricals.
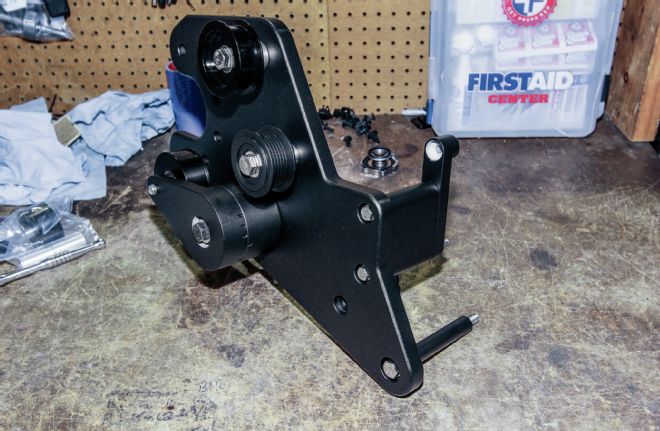
| 09 14 Dodge Ram Procharger Install Supercharger Head Unit Main Bracket
14. In order to attach the supercharger head unit we had to assemble the main bracket with its many bolts and spacers. The bracket sits between the heater hoses and connects to the engine block and to the cylinder head. We also had to swap the stock tensioner pulley with the supplied pulley.
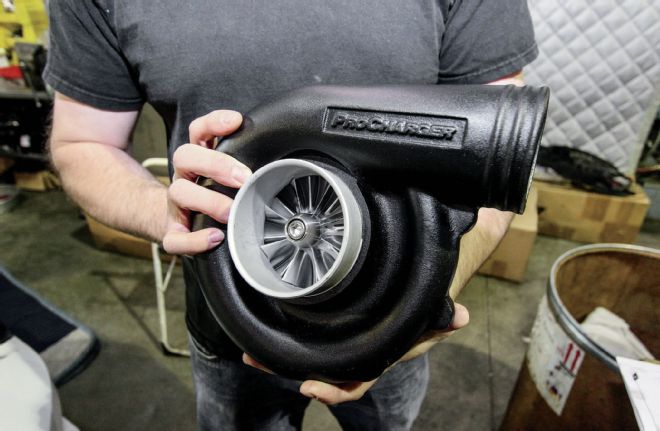
| 09 14 Dodge Ram Procharger Install Supercharger Head Unit
15. Now that the main bracket was in, we were able to ready the head unit to be installed by adding the supplied 6-ounce bottle of blower oil to it.
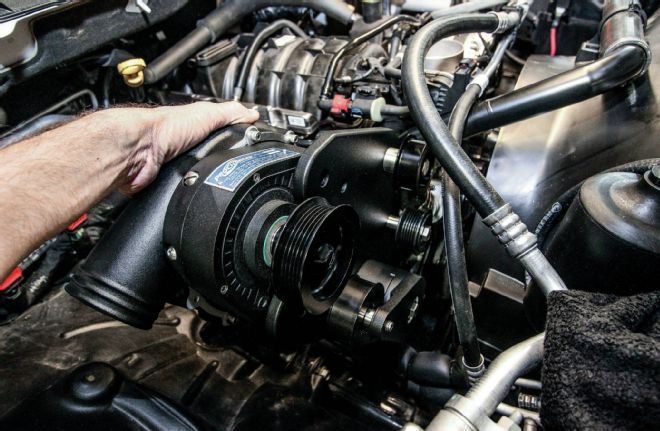
| 09 14 Dodge Ram Procharger Install Supercharger Head Unit Mounting
16. With the head unit filled with oil we mounted it onto the main bracket and tightened all the screws. With the ProCharger head unit in, we put the serpentine belt back on.
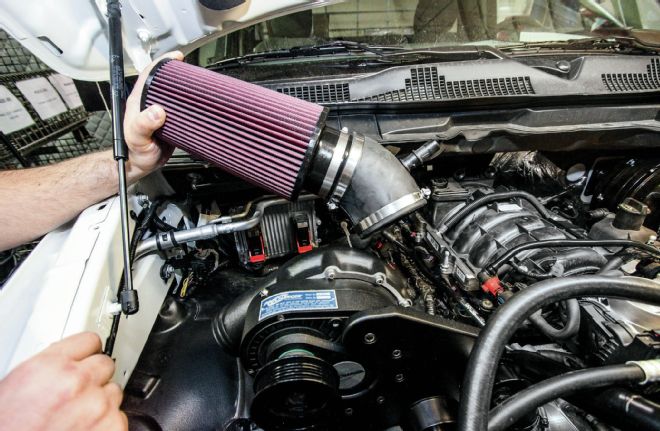
| 09 14 Dodge Ram Procharger Install Air Filter Assembly
17. Installing the air filter assembly onto the blower, we secured it with the supplied hose clamp and connected the PCV hose to the 3/4-inch connector on the air filter elbow.
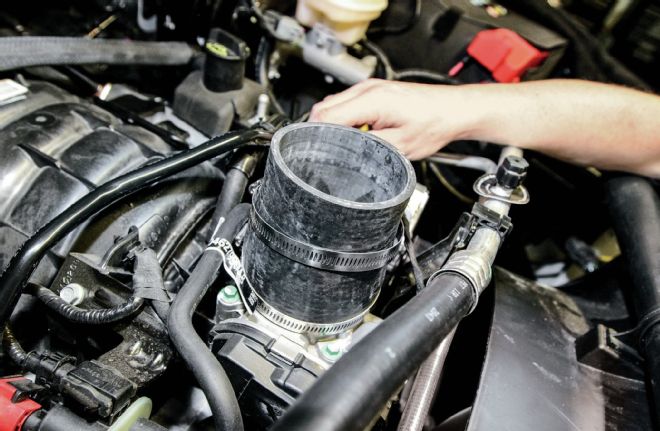
| 09 14 Dodge Ram Procharger Install Throttle Body
18. The throttle body has a 3.5- to 3-inch reducer that needed to be trimmed 1/2-inch with a hose cutter and then was installed using the supplied hose clamp.
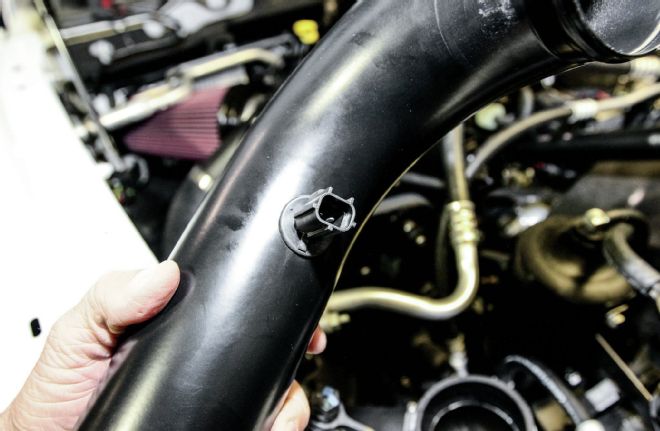
| 09 14 Dodge Ram Procharger Install Air Intake Temperature Sensor
19. The air intake temperature sensor slides onto the intake tube with a dab of silicon lubricant or spray lube. The sensor must be inserted, and then turned clockwise until the locking tabs slide over the notch. Then, we installed the intake tube connecting the throttle body to the intercooler tubing.
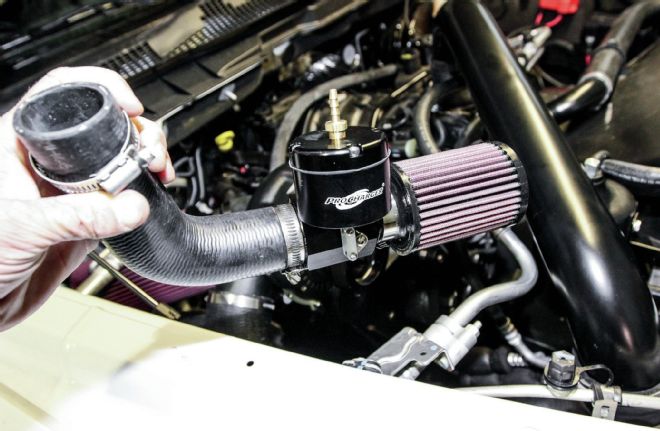
| 09 14 Dodge Ram Procharger Install Proflow Valve
20. To protect the engine when the throttle is closed, ProCharger's anti-surge system relieves the unneeded boost pressure through the use of a ProFlow valve connected to an air filter and to the surge hose.
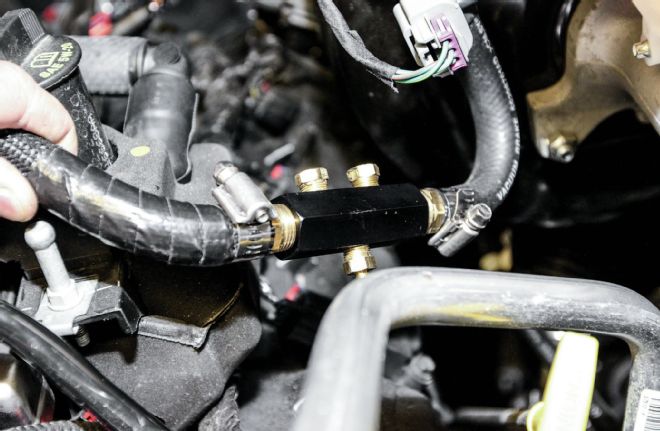
| 09 14 Dodge Ram Procharger Install Vacuum Manifold
21. Then, we assembled the vacuum manifold by screwing in the 3/16-inch barbs. Using a razor, we cut a 3-inch section from the brake booster vacuum hose and installed the section using the supplied hose clamps making sure that there were no vacuum leaks at the splices. The vacuum hose goes to one of the barb fittings and gets routed to the ProFlow valve.
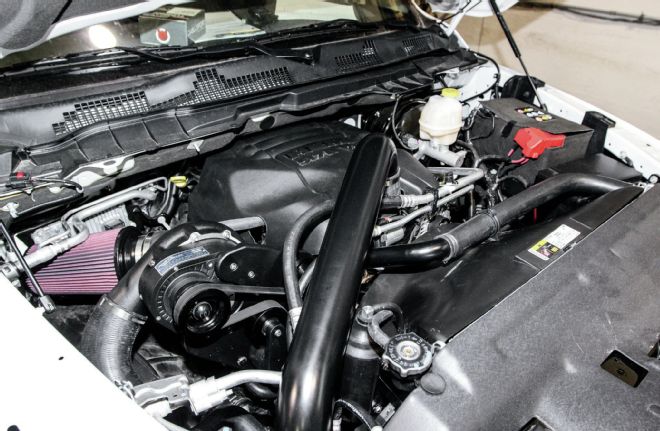
| 09 14 Dodge Ram Procharger Install
22. After all the ProCharger fittings, air supply lines and vacuum hoses were checked, we tightened up any remaining brackets, putting back all the engine covers, reinstalled the grille, and removed the inner air deflectors for maximum airflow.

| 09 14 Dodge Ram Procharger Install Diablosport Intune Boost Controller
23. Once the engine bay was buttoned up, we used the supplied DiabloSport inTune tuner and connected it to the OBD-II port under the steering column. We followed the super easy instructions, and we on our way to dislodging asphalt in large chunks.
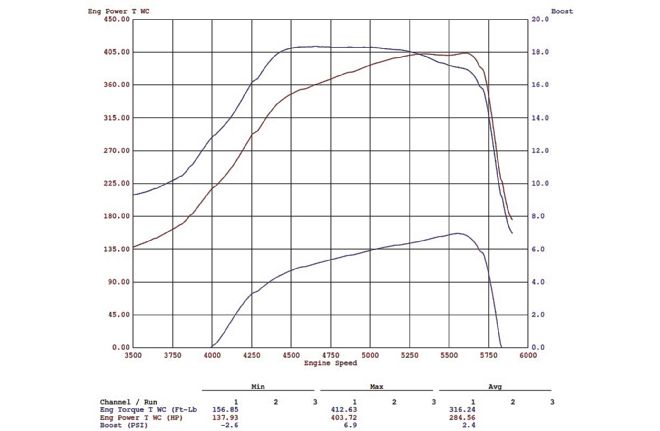
| 09 14 Dodge Ram Procharger Install Dynograph
24. With a max boost of 6.9 psi, horsepower jumped up to 403 and we made 412 ft-lb of torque! Compared with the stock numbers of 284 hp and 297 ft-lb of torque we were quite happy with the gains we made, and it was definitely going to make our '14 Ram that much quicker!
With a gain of 119 hp and 115 ft-lb of torque our efforts were well worth it; an overall power increase was achieved with a nice even powerband. The complete system from ProCharger did its job quite well and had all the necessary parts to make this install a breeze.
 | 09 14 Dodge Ram Procharger Install Air Intake System Removal
1. The air intake system had to be completely removed to install the supercharger. The tube, box assembly, and Intake air temp sensor all had to be taken off as well. Then, we pried off the serpentine belt.
 | 09 14 Dodge Ram Procharger Install Fan Shroud And Fan Removal
2. The fan shroud and fan also had to go, so we removed the four 10mm bolts holding in the fan shroud, fan and 21mm crank pulley.
 | 09 14 Dodge Ram Procharger Install Crankshaft And Harmonic Balancer Drilling
3. In order to stop the crank from moving, a hole had to be drilled so we could insert a pin. Using the supplied 1/4-inch bit, we put a piece of tape 1 and 5/8 inches from the tip and drilled the crankshaft and harmonic balancer, stopping at the tape. We drilled the hole centered on the outer diameter of the crank, not drilling deeper than .8 of an inch into the face of the crank.
 | 09 14 Dodge Ram Procharger Install Crank Bolt Reinstall
4. After we pinned the crank using the supplied 1/4-inch by .75-inch stainless steel pin, we reinstalled the crank bolt and torqued it to 129 ft-lb.
 | 09 14 Dodge Ram Procharger Install Grille Removal
5. In order to access the coolant tank, we first removed the dust cover behind the grille, which is attached by push clips, then removed the grille by removing the four bolts up top, and gave it a firm tug to pop the two push clips, located on either side of the grille at about the centerline.
 | 09 14 Dodge Ram Procharger Install Coolant Overflow Tank Removal
6. The coolant overflow tank was next to be removed, and the coolant had to be drained from it. We popped the plug and drained the coolant into a bucket, then removed the upper radiator hose. After that, we removed the coolant overflow jug and set it aside.
 | 09 14 Dodge Ram Procharger Install Thermostat Housing Swap
7. Since a new thermostat housing was going in, the old one had to go. We removed the stock thermostat, removing the two 13mm bolts on the housing. Next, we installed the new 45-degree thermostat housing, reusing the factory bolts, and left off the hose to be reinstalled later.
 | 09 14 Dodge Ram Procharger Install Radiator Hose
8. The radiator hose had to be trimmed to fit, and we installed it back onto the radiator using the supplied coolant hose reducer and the supplied hose clamps.
 | 09 14 Dodge Ram Procharger Install Coolant Overflow Tank Install
9. We had to install the new coolant overflow tank by attaching the supplied brackets with the supplied bolts and washers. Next, we attached the 3/8-inch hose from the bottom of the bottle to the radiator overflow and routed the vent hose down.
 | 09 14 Dodge Ram Procharger Install Intercooler Brackets
10. Now it was time to address the intercooler and install brackets, leaving them loose to tighten later. We attached the 'cooler to the upper and lower brackets, and installed the supplied rubber 90-degree inlet elbow with the supplied hose clamps.
 | 09 14 Dodge Ram Procharger Install Fuse Box
11. Moving over to the fuse box we had to discharge the pressure from the fuel pump by pulling out the fuse.
 | 09 14 Dodge Ram Procharger Install Fuel Injector Swap
12. We discharged the fuel pump because we had to remove the stock fuel rails to add spacers and had to remove the fuel injectors to swap the injectors with the larger ones that came supplied in the kit.
 | 09 14 Dodge Ram Procharger Install Manifold Absolute Pressure Sensor
13. The Manifold Absolute Pressure (MAP) sensor was next on our list and we removed the stock sensor, slapped in the supplied 2-bar sensor and reconnected the electricals.
 | 09 14 Dodge Ram Procharger Install Supercharger Head Unit Main Bracket
14. In order to attach the supercharger head unit we had to assemble the main bracket with its many bolts and spacers. The bracket sits between the heater hoses and connects to the engine block and to the cylinder head. We also had to swap the stock tensioner pulley with the supplied pulley.
 | 09 14 Dodge Ram Procharger Install Supercharger Head Unit
15. Now that the main bracket was in, we were able to ready the head unit to be installed by adding the supplied 6-ounce bottle of blower oil to it.
 | 09 14 Dodge Ram Procharger Install Supercharger Head Unit Mounting
16. With the head unit filled with oil we mounted it onto the main bracket and tightened all the screws. With the ProCharger head unit in, we put the serpentine belt back on.
 | 09 14 Dodge Ram Procharger Install Air Filter Assembly
17. Installing the air filter assembly onto the blower, we secured it with the supplied hose clamp and connected the PCV hose to the 3/4-inch connector on the air filter elbow.
 | 09 14 Dodge Ram Procharger Install Throttle Body
18. The throttle body has a 3.5- to 3-inch reducer that needed to be trimmed 1/2-inch with a hose cutter and then was installed using the supplied hose clamp.
 | 09 14 Dodge Ram Procharger Install Air Intake Temperature Sensor
19. The air intake temperature sensor slides onto the intake tube with a dab of silicon lubricant or spray lube. The sensor must be inserted, and then turned clockwise until the locking tabs slide over the notch. Then, we installed the intake tube connecting the throttle body to the intercooler tubing.
 | 09 14 Dodge Ram Procharger Install Proflow Valve
20. To protect the engine when the throttle is closed, ProCharger's anti-surge system relieves the unneeded boost pressure through the use of a ProFlow valve connected to an air filter and to the surge hose.
 | 09 14 Dodge Ram Procharger Install Vacuum Manifold
21. Then, we assembled the vacuum manifold by screwing in the 3/16-inch barbs. Using a razor, we cut a 3-inch section from the brake booster vacuum hose and installed the section using the supplied hose clamps making sure that there were no vacuum leaks at the splices. The vacuum hose goes to one of the barb fittings and gets routed to the ProFlow valve.
 | 09 14 Dodge Ram Procharger Install
22. After all the ProCharger fittings, air supply lines and vacuum hoses were checked, we tightened up any remaining brackets, putting back all the engine covers, reinstalled the grille, and removed the inner air deflectors for maximum airflow.
 | 09 14 Dodge Ram Procharger Install Diablosport Intune Boost Controller
23. Once the engine bay was buttoned up, we used the supplied DiabloSport inTune tuner and connected it to the OBD-II port under the steering column. We followed the super easy instructions, and we on our way to dislodging asphalt in large chunks.
 | 09 14 Dodge Ram Procharger Install Dynograph
24. With a max boost of 6.9 psi, horsepower jumped up to 403 and we made 412 ft-lb of torque! Compared with the stock numbers of 284 hp and 297 ft-lb of torque we were quite happy with the gains we made, and it was definitely going to make our '14 Ram that much quicker!
With a gain of 119 hp and 115 ft-lb of torque our efforts were well worth it; an overall power increase was achieved with a nice even powerband. The complete system from ProCharger did its job quite well and had all the necessary parts to make this install a breeze.