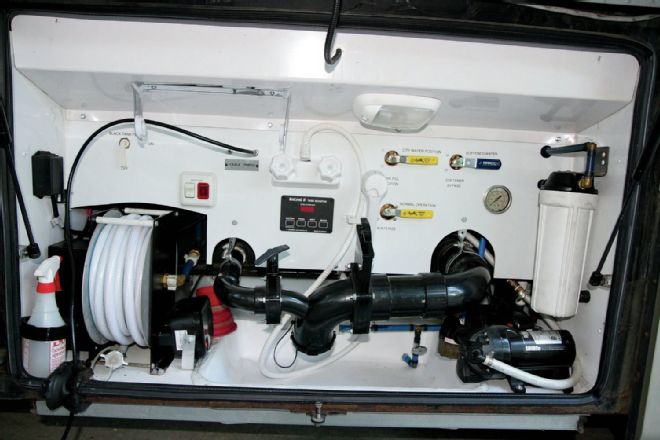
RV owners have to deal with a number of issues that pertain to changing locations while traveling. Water quality is one of them. Connecting your RV to a campground water supply is always a guessing game. You never know what your water quality will be. Each location’s water supply may have unique properties, such as high levels of hardness, chlorine, silt, bacteria, iron, or sulfur content. These issues can be corrected but just hanging a water filter on the water line isn’t the answer to every situation. Each issue requires a unique approach to properly treat that particular water supply.
Filters
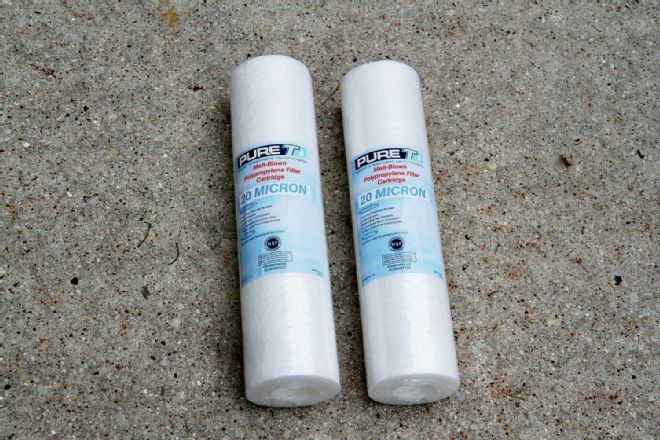
Water filters can be canister units mounted inside your RV’s utility bay or they may be smaller units that you connect to your garden hose prior to entering your RV. Your most basic water filter is a sand filter. These pleated paper filters will remove sand, silt, rust, or other particles larger than 20 microns. That’s good for keeping those solids from building up in your fresh-water tank or sink strainers, but that’s about as far as they go. To remove taste or odor issues, you’ll need to go with a carbon filter, which uses a bed of activated carbon to remove chlorine, limescale, VOCs, or hydrogen sulfide. The downside to basic carbon filters is that they form a bed in which bacteria can grow. Upgrading to a bacteriostatic carbon filter prevents this. However, none of these common filters adequately address removal of iron or sulfur, nor do they take care of hard water. For those issues, you need to add a second and third stage of water treatment.
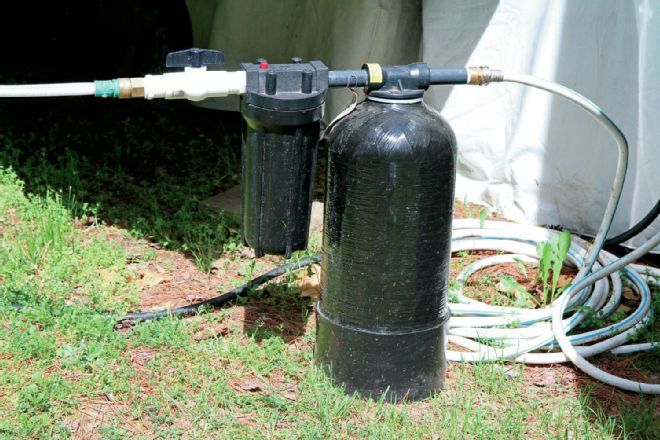
| Most water softeners can be placed next to the RV by the campground water supply.
Hard Water
Extremely hard water is prevalent in Arizona, New Mexico, Texas, Kansas, and the southern portion of California. The Pacific Northwest and New England states have the softest water, while the Great Lakes states have moderately hard water. Hard water contains a high level of minerals and isn’t generally harmful to drink. It may add a bad taste, but hard water has negative effects in other areas. Minerals like calcium carbonate can cause limescale buildup in your water system, inhibit soap sud formation, and leave soap scum when washing clothes, dishes, or yourself. The ions in hard water can also lead to galvanic corrosion when two dissimilar metals come in contact with each other.
Minerals are removed from hard water by passing it through a water softener, which uses an ion-exchange process to treat it. A salt bath reacts to a polymer resin by coating the media with sodium ions. When the hard water passes through the media, it exchanges any calcium and magnesium ions for sodium ions. Eventually, the resin media becomes saturated with hard minerals, and the system must be regenerated. Regeneration consists of running salt brine through the softener to reverse the process and recoat the resin with sodium ions. The hard mineral content is then flushed out the drain and the softener is ready for use again.
Iron and Sulfur
Water softeners take care of minerals, such as calcium and magnesium, but they are not effective on iron or sulfur. In your body, iron is vital to transporting oxygen through your blood, but in your plumbing fixtures, it can cause reddish-brown stains, and eventually, clog the systems. Iron filters are specifically designed to remove iron from your water, using one of two methods.
One method uses a greensand media to oxidize the iron and removes up to 15ppm of iron. This media is regenerated via a potassium permanganate wash, so it’s not a good match for an RV application. The second method is better suited for an RV and uses a packed bed of fine mesh resin, which is back-flushed by plain water and removes up to 10ppm of iron. You can use iron filters in tandem with a water softener, placing them ahead of the softener for best results.
Our Needs
Our motorhome came with a basic water filter installed in the utility bay. The residential refrigerator also contained a filter for the ice maker and water dispenser. I originally had replaced the basic filter with a Hydrolife C2063 bacteriostatic water filter element. But when we travelled, we encountered water quality that ran the gamut. I knew we needed something more, but didn’t know quite where to start.
I first met Mark Shumaker at an FMCA convention. His company, A-1 Water Conditioning, was exhibiting a number of water softeners and filters designed for RV owners. Mark had been involved in municipal water treatment for 30 years before forming A-1 Water Conditioning. He was also a motorhome owner and understands the needs of RV owners. He designs systems for all kinds of RVs and was a treasure trove of information. His equipment was all top of the line. After spending time with him and seeing the systems available, we picked up a water softener and iron/sulfur filter and set off with a game plan for our RV.
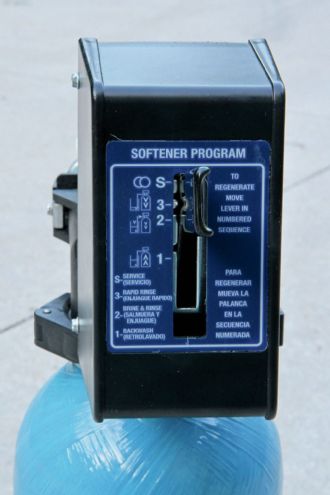
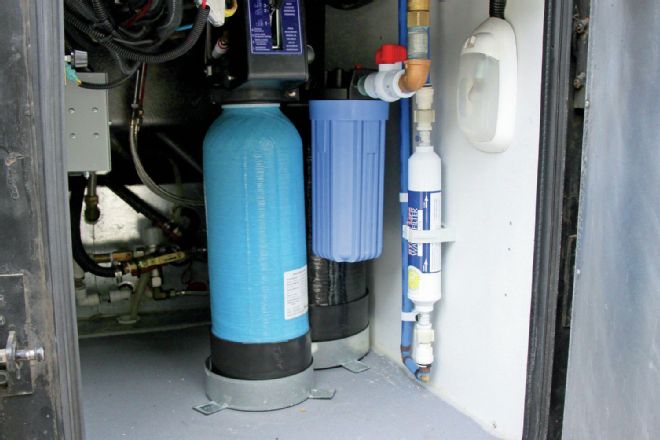
| The iron and sulfur filter is equipped with a reusable element that does not require replacement. The unit is fitted with a control valve module to allow you to select between normal use and the regeneration modes.
Operation
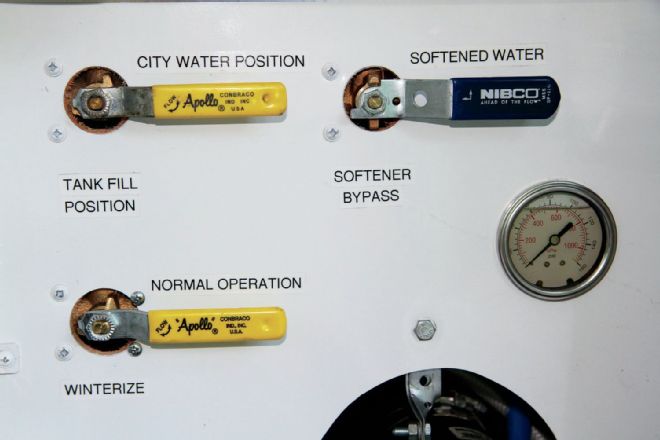
The system is easy to operate. Initial water flow passes through the main bacteriostatic filter, the iron filter, and then reaches the bypass valve, which either sends the water to the softener or bypasses it. Use test strips on the incoming water and to determine when the softener needs to be regenerated.
To recharge the softener, spin off the softener’s pre-filter and discard the element. Insert the distributer pick-up tube into the filter head and fill the housing about three quarters with salt. Then open the gray tank dump valve to allow the water to drain to the sewer connection and a run a stream of water about the size of a pencil through a faucet inside the RV. This allows the water to come in, dissolve the salt, and come up through the distributer tube to be equally distributed throughout the resin. Once the salty taste in the faucet water is gone, the system has been regenerated and you can remove the tube, replace the pre-filter element, and you are good to go.
The iron and sulfur filter is easily regenerated and requires no salt. You simply move the valve lever to the backwash position and run the water for 10 minutes to backwash the filter media. A drain hose is attached to the filter, and the water is safe, allowing it to be run on the ground or used for watering plants. The next step is to move the valve lever to the second position, which is brine and rinse. This will draw atmospheric air into the tank for 10 to 12 minutes to put air bubbles into the tank. Moving the valve lever to the service position traps those bubbles in the top of the tank to help oxidize the iron and sulfur.
The results are great water quality wherever we go. If we encounter excellent water where we are, the bypass valve removes the softener from the system to preserve its use for the next stop. The soft water eliminates the limescale on dishes and soap scum when cleaning or bathing. The drinking water is filtered, but not softened, and the system is easy to winterize. In short we are pleased and happy with the results.
 | Most water softeners can be placed next to the RV by the campground water supply.
Hard Water
Extremely hard water is prevalent in Arizona, New Mexico, Texas, Kansas, and the southern portion of California. The Pacific Northwest and New England states have the softest water, while the Great Lakes states have moderately hard water. Hard water contains a high level of minerals and isn’t generally harmful to drink. It may add a bad taste, but hard water has negative effects in other areas. Minerals like calcium carbonate can cause limescale buildup in your water system, inhibit soap sud formation, and leave soap scum when washing clothes, dishes, or yourself. The ions in hard water can also lead to galvanic corrosion when two dissimilar metals come in contact with each other.
Minerals are removed from hard water by passing it through a water softener, which uses an ion-exchange process to treat it. A salt bath reacts to a polymer resin by coating the media with sodium ions. When the hard water passes through the media, it exchanges any calcium and magnesium ions for sodium ions. Eventually, the resin media becomes saturated with hard minerals, and the system must be regenerated. Regeneration consists of running salt brine through the softener to reverse the process and recoat the resin with sodium ions. The hard mineral content is then flushed out the drain and the softener is ready for use again.
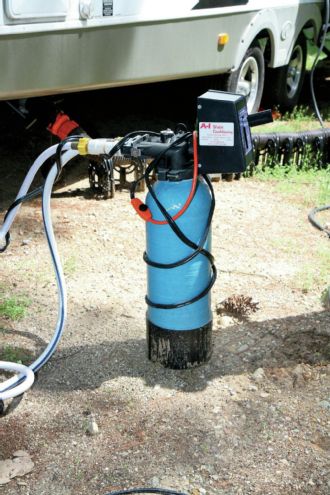
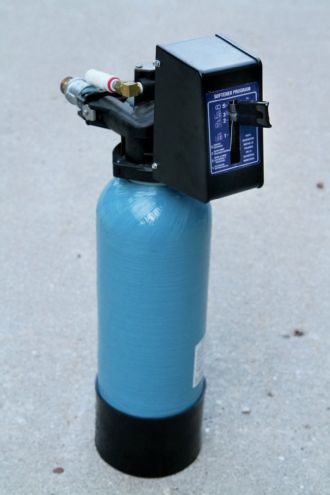

 | The iron and sulfur filter is equipped with a reusable element that does not require replacement. The unit is fitted with a control valve module to allow you to select between normal use and the regeneration modes.
Operation
The system is easy to operate. Initial water flow passes through the main bacteriostatic filter, the iron filter, and then reaches the bypass valve, which either sends the water to the softener or bypasses it. Use test strips on the incoming water and to determine when the softener needs to be regenerated.
To recharge the softener, spin off the softener’s pre-filter and discard the element. Insert the distributer pick-up tube into the filter head and fill the housing about three quarters with salt. Then open the gray tank dump valve to allow the water to drain to the sewer connection and a run a stream of water about the size of a pencil through a faucet inside the RV. This allows the water to come in, dissolve the salt, and come up through the distributer tube to be equally distributed throughout the resin. Once the salty taste in the faucet water is gone, the system has been regenerated and you can remove the tube, replace the pre-filter element, and you are good to go.
The iron and sulfur filter is easily regenerated and requires no salt. You simply move the valve lever to the backwash position and run the water for 10 minutes to backwash the filter media. A drain hose is attached to the filter, and the water is safe, allowing it to be run on the ground or used for watering plants. The next step is to move the valve lever to the second position, which is brine and rinse. This will draw atmospheric air into the tank for 10 to 12 minutes to put air bubbles into the tank. Moving the valve lever to the service position traps those bubbles in the top of the tank to help oxidize the iron and sulfur.
The results are great water quality wherever we go. If we encounter excellent water where we are, the bypass valve removes the softener from the system to preserve its use for the next stop. The soft water eliminates the limescale on dishes and soap scum when cleaning or bathing. The drinking water is filtered, but not softened, and the system is easy to winterize. In short we are pleased and happy with the results.
