Since adding a set of Unlimited Diesel Performance’s Stage 4 300/200 hybrid injectors to our 1997 Ford F-350 in Part 1 of “Keepin’ Up With the Jonses” (Dec. ’13), several weak links surfaced. 1) The S300 turbocharger became a considerable airflow restriction, 2) we weren’t maintaining enough high-pressure oil, and 3) fuel pressure supplied to the injectors was falling off considerably. We were able to remedy the first two problems last time (Part 2, March ’14) by switching to a billet S468 turbo from Fleece Performance and an SRP1.1 high-pressure oil pump from Stealth Pumps. However, our fuel supply issue remained. If you’ve spent any time cranking up the power on a diesel, you know fuel pressure is everything. If it’s inadequate, the injectors can be starved for fuel, and you will always be down on horsepower.
This month, we’re reworking the old-body-style Ford’s entire fuel system -- from the tank(s) to the engine. We turned to Flynn’s Shop in Alexander, Illinois, for help in not only piecing together a competition-ready system, but also bolting all of it onto the truck. There are literally dozens of ways you can build a fuel system, but follow along to see the way we did ours. We tried to stay on a reasonable budget yet get the best lift pump we could (an Aeromotive A1000), keep things as simple as possible, and drop some weight off the old Ford in the process. Once installed, the truck returned to the dyno and dragstrip. Read on to see our new power numbers, quicker timeslip, and a complete parts list so you can build your own track-ready fuel system.
Next, Flynn tightened up the fittings on the filter bases supplied by Unlimited Diesel Performance. Oil was applied to the ORB (O-ringed boss) fittings, and the system was mocked up on a workbench before being fastened to the truck’s frame.
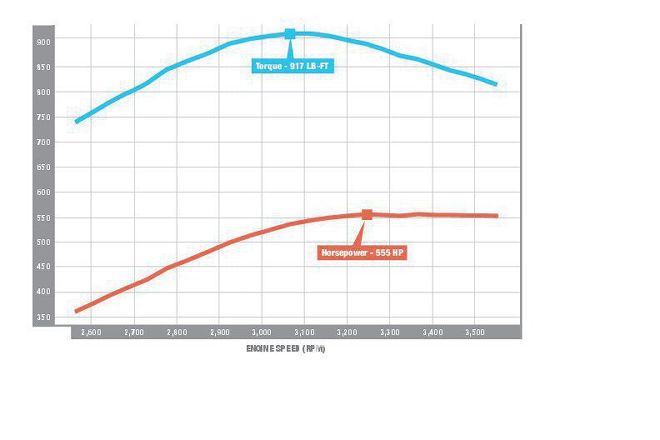
For our final dyno run, the sixth position (a 2.9-millisecond tune) could finally be utilized, and the result was 555 hp and 917 lb-ft of torque. Maintaining fuel pressure proved to be worth an extra 17 hp at the wheels and got us past our goal of 550 hp. With the SRP1.1 high-pressure oil pump maintaining injection control pressure (ICP), the Fleece Performance billet S468 flowing all the air we needed, and the new fuel system holding a consistent 65 to 68 psi, it was time to see how much quicker the old Ford was in the eighth-mile.
| 01.
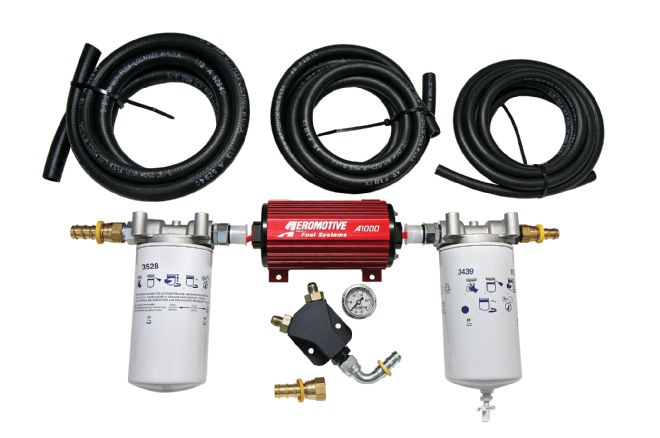
01. At the heart of our DIY competition fuel system is an Aeromotive A1000 electric fuel pump, supplied by Summit Racing. Aeromotive recently started rating the A1000 as diesel fuel compatible, which reinforced our decision to use it. The plan of attack included 5⁄8-inch fuel hose feeding the A1000, 1/2-inch hose continuing toward the engine, and two 3⁄8-inch hoses feeding both heads. Keep in mind: While much of this fuel system is brand-new, we did retain some components from the previous system installed on the truck -- a CPR kit from DieselSite.
| 02.
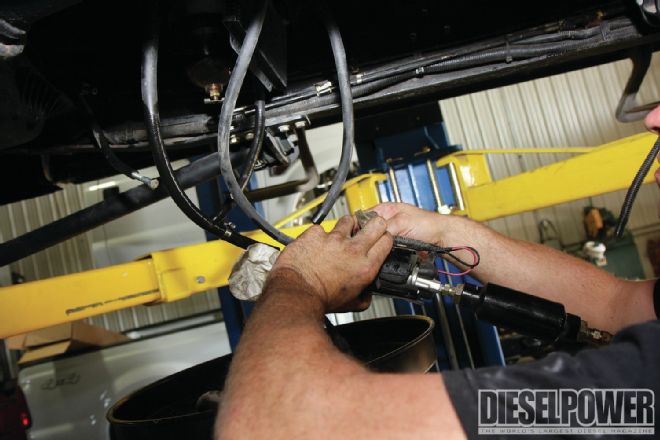
02. Unfortunately, overhauling the entire fuel system meant we had to part ways with most of the old CPR system, so Flynn started by removing most of it. If you ask us, the CPR kit is an all-inclusive, rock-solid reliable fuel system for 7.3L Power Strokes, which easily supported 500 hp in our case (in conjunction with a Walbro GSL392 lift pump).
| 03.
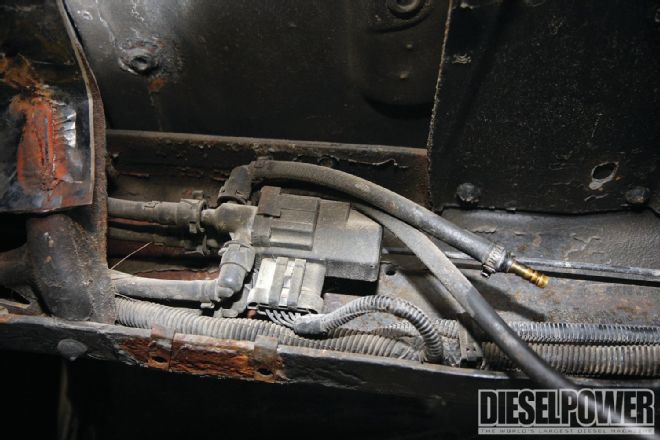
03. Believing the factory selector valve (which allows you to switch between the front and rear fuel tanks on OBS Fords) was restricting horsepower, we had to do away with sending fuel through it. Internally, the selector valve’s ports are just 5⁄16 inches in diameter, so it’s pretty amazing we were able to squeeze 538 hp out of the old fuel system in Part 2 (March ’14). However, in order for the fuel gauge to still function, the selector valve had to remain plugged in, so we left it mounted along the framerail and worked around it.
| 04
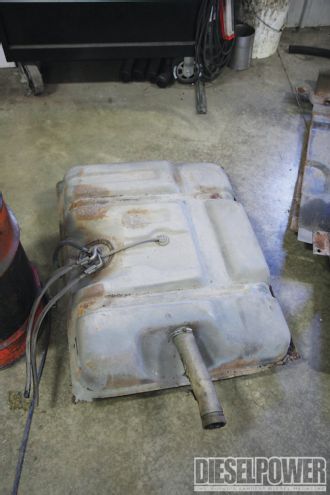
04. With the selector valve out of the equation, we weighed our options regarding whether or not to keep both factory fuel tanks or do away with them and mount a 38-gallon Bronco tank (from the same era) in the rear. In the end, we sided with the age-old hot-rodder method of dropping weight to go faster and decided to solely use the front 19-gallon tank. As it turns out, we pulled the rear tank (shown) just in time… It was starting to rust out and leak fuel onto the skidplate beneath it.
| 05.
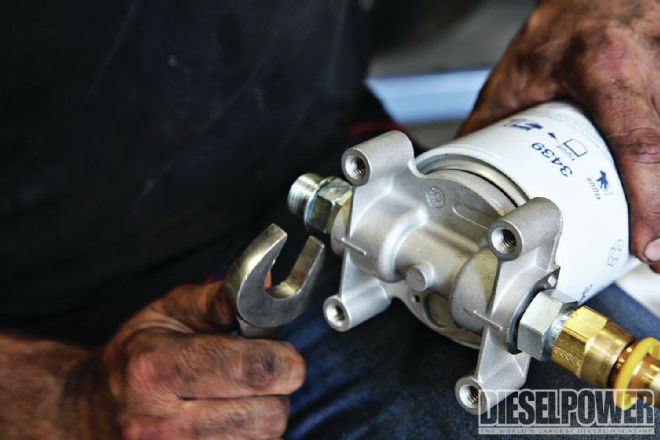
05. Next, Flynn tightened up the fittings on the filter bases supplied by Unlimited Diesel Performance. Oil was applied to the ORB (O-ringed boss) fittings, and the system was mocked up on a workbench before being fastened to the truck’s frame.
| 06.
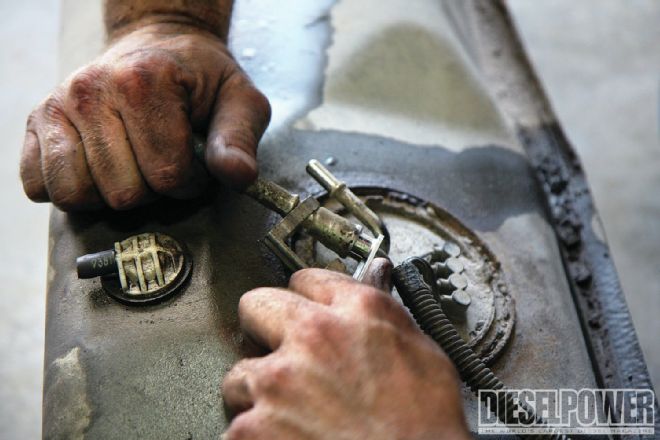
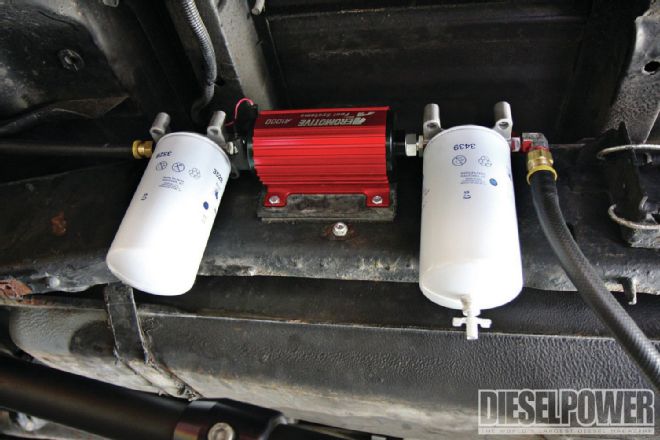
06. [-10 AN ORB Straight x -8 AN JIC][-10 AN ORB Straight x -10 AN ORB union][-10 AN ORB Straight x -10 AN ORB union][-10 AN x 90-degree -10 AN ORB (to clear E-brake cable bracket)]Choosing to mount the pump and filters along the highest point of the frame (forward of the rear axle) meant we had to remove the E-brake cable, but placing everything here keeps the filters in a safe spot and the lift pump close to the tank (something Aeromotive is very adamant about). After drilling four holes in the frame and cutting 1/4-inch-thick rubber isolator strips (to damp vibration), the A1000 was attached to the frame via double-nutted, 1/4-inch x 1 1/2-inch bolts. Labeled here are the fittings we used from the water separator inlet to the fuel filter outlet.
| 07.
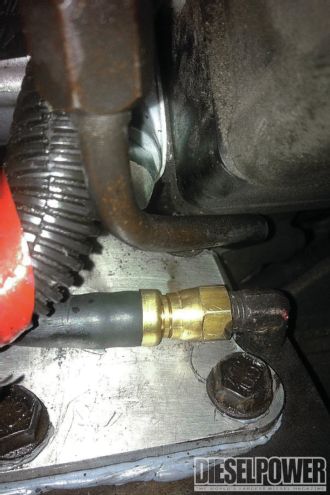
07. Fuel tank sumps have become all the rage lately, and we’re not surprised. They rule out any quarter-tank issues found in fuel systems utilizing draw straws and allow fuel to gravity feed toward your lift pump. For our project, we chose to use XDP’s fuel sump kit, which comes with a black anodized fuel sump, internal billet-aluminum horseshoe ring, pre-formed rubber Buna gasket, stainless steel hardware, nylon washers, and a barbed fuel line fitting.
| 08.
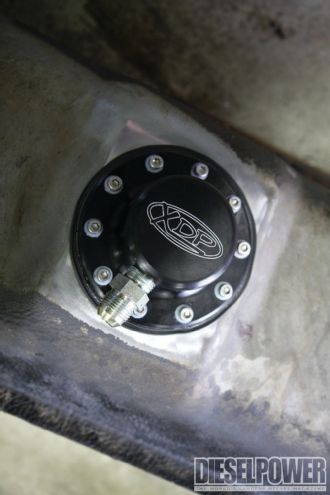
08. Although XDP’s sump kit could’ve been installed without removing the fuel tank, we dropped ours to make sure it was completely empty (in order to get the best possible seal). Dropping the tank also allowed us access to rework the tank’s return line. After Flynn took a 3-inch hole saw to the bottom of the tank, the edges were de-burred, the metal shavings were removed, and the sump was mounted. Installing the sump at the lowest point -- and at the rear of the tank -- should work out well at the dragstrip (where fuel is forced to the back of the tank on each launch).

| 09.
09. One key item diesel enthusiasts often overlook when designing their own fuel system is the return line from the engine. If it’s too small, abnormally high line pressure could exist -- especially at idle (when most fuel sent to the engine is routed back to the tank). We bypassed our factory 5⁄16-inch return line with a 10-foot section of -6 AN (3⁄8-inch) Parker fuel hose, and thanks to running a fuel tank sump, we were able to hook the new return line to the old supply fitting on top of the tank (the old return fitting was capped off).
| 10.
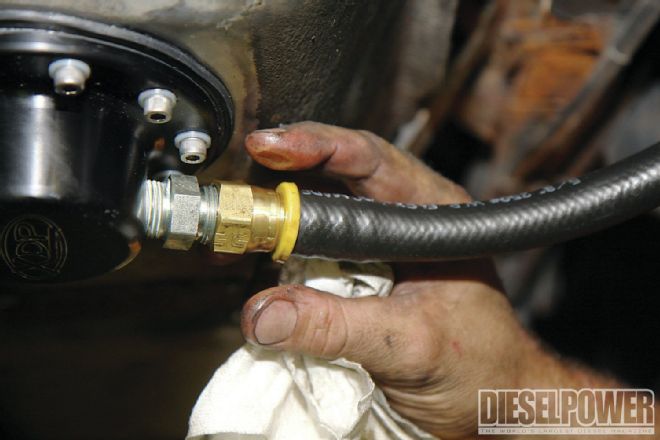
10. With the fuel tank reinstalled, Flynn attached a short section of -10 AN (5⁄8-inch) fuel hose to the sump. To accommodate the -10 AN hose, the 1/2-inch NPT x 1/2-inch barb fitting supplied in the XDP sump kit was replaced with a larger, 1/2-inch NPT x -10 AN fitting, along with a -10 AN female swivel x 5⁄8-inch Barb-Lok fitting.
| 11.
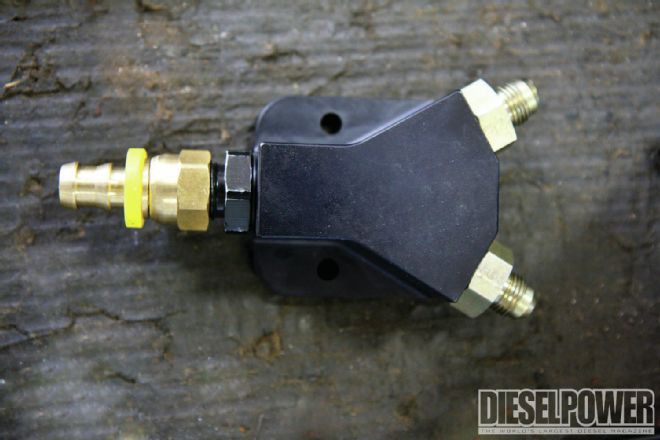
11. Up at the engine, the plan was to feed both cylinder heads from the rear, and this Y-block from Unlimited Diesel Performance was the key to making it happen. Fuel coming from the lift pump (and through ½-inch hose) enters the bottom, is then divided, and exits via two outlets utilizing 3⁄8-inch hose. The inlet of the Y-block (left) was shipped to us with a -8 AN NPT x -8 AN Barb-Lok fitting, and the outlets (right) were fitted with -8 AN NPT x -6 AN NPT fittings.
| 12.
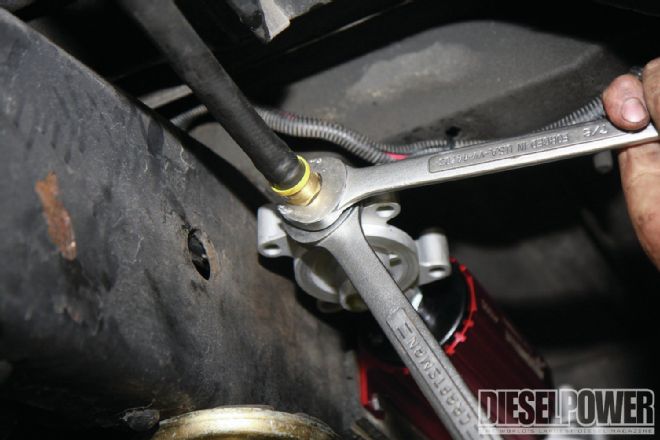
12. Hooking up the -8 AN (1/2-inch) fuel hose to the fuel filter base’s -10 AN x -8 AN JIC fitting called for the appropriate -8 AN female swivel x 1/2-inch Barb-Lok fitting. From there, it was a matter of tightening everything up and routing the 1/2-inch fuel hose toward the engine.
| 13.
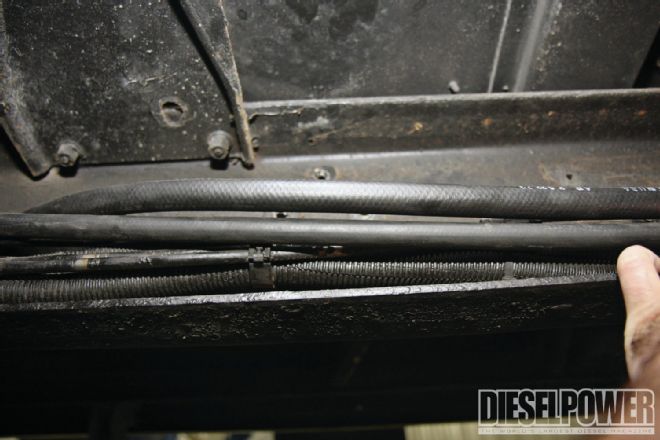
13. Here you can see both the 1/2-inch supply hose (yellow arrow) and the 3⁄8-inch return hose (red arrow) being run along the framerail. We actually used the old, steel factory lines (beneath them) as a way to anchor the new hoses to the frame.
| 14.
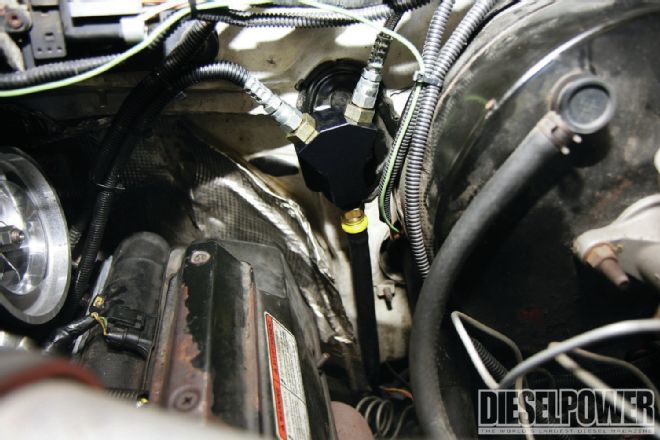
14. Flynn used the clutch master cylinder port in the firewall to securely mount the Y-block (obviously we weren’t using it, being that our OBS is an automatic). By installing the Y-block here we were able to reuse the two braided steel lines from the previous CPR system -- the main difference being that now we’re feeding both heads. And, as these two braided steel lines are the exact same length, in theory equal flow should make it to each head.
| 15.
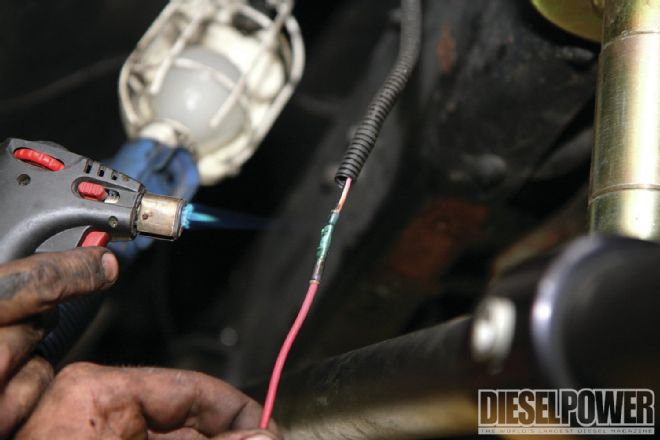
15. As far as wiring up the A1000 was concerned, we reused the power and ground wires from the previous CPR system. However, because the new fuel system was mounted farther back on the frame, Flynn had to add a few extra feet of wire to make everything reach. The pump was also wired up to run when the ignition is in the key-on position.

| 16.
16. Unused fuel exits the heads from the front. A -4 AN female NPT x -2 AN Barb-Lok (shown) was employed to hook to the 90-degree 1⁄8-inch NPT x -4 AN JIC fitting in the passenger-side head (supplied in the CPR system), and the same thing was used to fasten to the factory 1⁄8-inch NPT x -4 AN straight fitting in the driver-side head. Flynn’s sourced the heavy-duty Parker -4 AN (1/4-inch) fuel hose used in the engine compartment, which resists heat in engine bays and has a working pressure rating of 350 psi. Once installed, Flynn wrapped wire loom around the fuel hoses for vibration protection.
| 17.
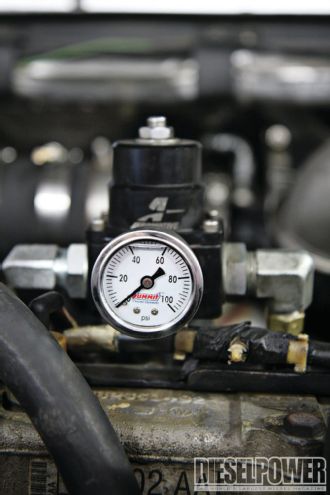
17. Also retained from the CPR system was our Aeromotive regulator, although now we’re utilizing both ports. In order to connect the new 3⁄8-inch return hose to the regulator, a -6 AN x -10 AN ORB adapter union from Lawson Products was used. The remaining factory steel fuel lines in the lifter valley were removed, all new fuel lines were secured in the engine compartment (and along the framerail), and all fittings were checked for tightness before moving on. Our last order of business was installing this 0-to-100-psi, liquid-filled fuel pressure gauge from Summit Racing.
| 18.
18. With everything installed, we pulled the water separator (Napa PN 3439) and fuel filter (Napa PN 3528), filled them full of diesel, and tightened them back up. Then we topped off the tank and cycled the A1000. Once we felt the system was primed, we started the truck and adjusted fuel pressure at the regulator to 68 psi.
| 19.
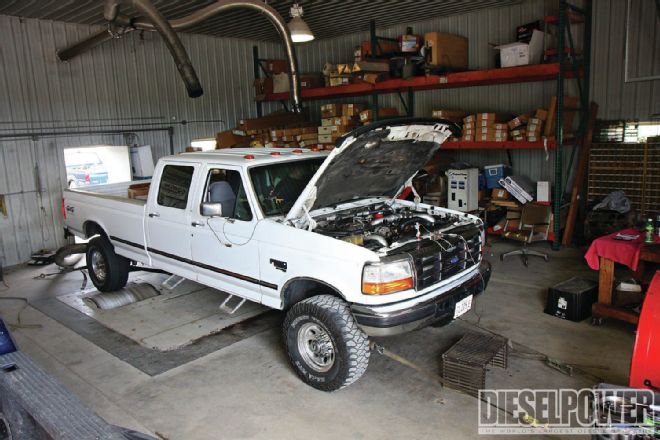
19. Back on the dyno at Randall’s Performance, we were pretty confident supply pressure would hold steady -- and we weren’t disappointed. For a back-to-back dyno comparison, our first dyno pull was made in the fourth position on our six-position TS Performance chip -- a tune calling for just 2.4 milliseconds worth of pulse width (injector on time). The result was 547 hp and 896 lb-ft of torque, which was a 9hp gain over our best dyno pull in Part 2 (538 hp, 890 lb-ft). The next click up on the chip (a 2.7-millisecond tune) yielded 550 hp and 923 lb-ft.
| 20.
20. For our final dyno run, the sixth position (a 2.9-millisecond tune) could finally be utilized, and the result was 555 hp and 917 lb-ft of torque. Maintaining fuel pressure proved to be worth an extra 17 hp at the wheels and got us past our goal of 550 hp. With the SRP1.1 high-pressure oil pump maintaining injection control pressure (ICP), the Fleece Performance billet S468 flowing all the air we needed, and the new fuel system holding a consistent 65 to 68 psi, it was time to see how much quicker the old Ford was in the eighth-mile. Boost: 43 psi (46 psi to 49 psi on the street) ICP: 3,000 to 3,200 psi Fuel Pressure (WOT): 65 to 68 psi *SuperFlow dyno correction factor *35 percent load applied *Third gear (1:1), torque converter locked *2.9-millisecond pulse width tune
| 21.
Boost: 43 psi (46 psi to 49 psi on the street)
ICP: 3,000 to 3,200 psi
Fuel Pressure (WOT): 65 to 68 psi
*SuperFlow dyno correction factor
*35 percent load applied
*Third gear (1:1), torque converter locked
*2.9-millisecond pulse width tune
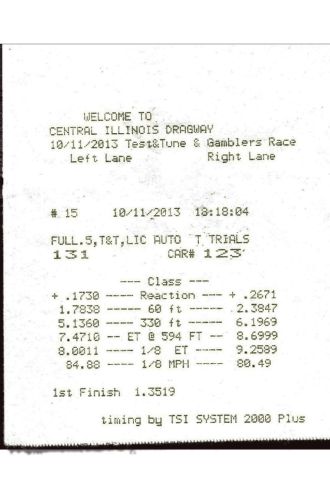
21. Back at the track, the truck’s midrange and top end performance improved considerably. We shaved nearly three tenths off our previous 8.26-second eighth-mile sprint and picked up more than 3 mph this time. According to the NHRA’s quarter-mile conversion, our 8.00 translates into a 12.56-second quarter (trap speed will check in near the 107-mph mark). We’ll definitely be in the hunt for 7.90s this summer.
PARTS LIST
Item: Vendor: Details: Price:
A1000 lift pump Summit Racing Aeromotive A1000 electric lift pump, diesel fuel rated (AEI-11101) $347.97
Fuel tank sump XDP Allows fuel to be drawn from the bottom of the tank $164.95
-10 AN fuel hose Summit Racing 10 feet of -10 AN (5⁄8-inch) rubber fuel hose, rated for 250 psi (SUM-220789-B) $32.97
-8 AN fuel hose Summit Racing 10 feet of -8 AN (½-inch) rubber fuel hose, rated for 250 psi, two 10 feet sections just to be safe (SUM-220786-B)$55.94 (cost of two)
-6 AN fuel hose Global Industrial 15 feet of -6 AN (3⁄8-inch) Parker Push-Lok Plus fuel hose used for upgraded return line to tank, heat-resistant and rated for 350 psi (PN 801-6-BLK) $28.50
-4 AN fuel hose Global Industrial 5 feet of -4 AN (¼-inch) Parker Push-Lok Plus fuel hose used for return flow leaving heads, heat-resistant and rated for 350 psi (PN 801-4-BLK) $7.60
-10 AN to ½-inch NPT Summit Racing Adapter fitting replaced fitting supplied in XDP sump kit to allow for -10 AN supply line to feed A1000 (SUM-220047-B) $4.75
-10 AN female swivel x 5⁄8-inch Barb-Lok fitting Unlimited Diesel Performance Connects fuel sump outlet fitting to -10 AN fuel hose and -10 AN fuel hose to water separator inlet fitting $33.25 (cost of two)
-10 AN x 90-degree -10 AN ORB Lawson Products Connects to Barb-Lok fitting above, and water separator base (PN 12352) $71.42* (pack of two)
Fuel/water separator base Unlimited Diesel Performance Standalone filter bases: one for water separator (pre-pump) and one for fuel filter (post pump) $69.80 (cost of 2)
Water separator Unlimited Diesel Performance 14-micron (NAPA 3439) $25.12
-10 AN ORB x -10 AN ORB union Unlimited Diesel PerformanceUnion fittings on both inlet and outlet side of A1000 $26.00 (cost of two)
Fuel filter Unlimited Diesel Performance 2-micron (NAPA 3528) $15.70
-10 AN ORB x -8 AN Unlimited Diesel Performance Connects fuel filter base to ½-inch Barb-Lok fitting (to run -8 AN fuel hose toward engine) $7.05 (cost of two)
-8 AN female swivel x ½-inch Barb-Lok fitting Unlimited Diesel Performance Connects -8 AN fuel hose to fuel filter base outlet fitting $9.19
-10 AN, 2 -8AN Billet Y-block Unlimited Diesel Performance Y-type fuel distribution block to split fuel supply to both cylinder heads (inlet and outlet fittings supplied) $49.99
-4 AN female NPT x -2 AN Barb-Lok Lawson Products Connects existing 90-degree 1⁄8-inch NPT x -4 AN JIC fitting in front passenger-side head (from CPR system), and factory 1⁄8-inch NPT x -4 AN straight fitting in front driver-side head to fuel pressure regulator (also retained from CPR system) (PN 97498) $30.60* (pack of five; two needed)
-6 AN x -10 AN ORB adapter union Lawson Products Regulator fitting that connects to -6 AN return hose (PN 64877) $41.00* (pack of five)
Fuel pressure gauge Summit Racing Liquid-filled, 0-to-100-psi gauge (SUM-800199) $19.97
Total... $1,041.77
* = When ordering through Lawson Products, a minimum quantity is required (your local fitting source may not require this, which will save you money).
Fast Specs
Engine Mods: Stock short-block 7.3L Power Stroke with ARP head studs, Comp Cams 910 valvesprings, and Hamilton Cams chromoly pushrods
Fuel: Unlimited Diesel Performance Stage 4 300/200 hybrid injectors, Stealth SRP1.1 high-pressure oil pump, DIY competition fuel system utilizing A1000 lift pump
Air: Fleece Performance billet S468; Irate Diesel Performance T4 mount, up-pipes, and stainless steel intercooler piping; Spearco intercooler
Tuning: TS Performance six-position chip programmed by Gearhead Automotive Performance
Transmission: John Wood Automotive Street Performance E4OD
Cost To Duplicate: $16,000 (labor not included)
 | 01.
01. At the heart of our DIY competition fuel system is an Aeromotive A1000 electric fuel pump, supplied by Summit Racing. Aeromotive recently started rating the A1000 as diesel fuel compatible, which reinforced our decision to use it. The plan of attack included 5⁄8-inch fuel hose feeding the A1000, 1/2-inch hose continuing toward the engine, and two 3⁄8-inch hoses feeding both heads. Keep in mind: While much of this fuel system is brand-new, we did retain some components from the previous system installed on the truck -- a CPR kit from DieselSite.
 | 02.
02. Unfortunately, overhauling the entire fuel system meant we had to part ways with most of the old CPR system, so Flynn started by removing most of it. If you ask us, the CPR kit is an all-inclusive, rock-solid reliable fuel system for 7.3L Power Strokes, which easily supported 500 hp in our case (in conjunction with a Walbro GSL392 lift pump).
 | 03.
03. Believing the factory selector valve (which allows you to switch between the front and rear fuel tanks on OBS Fords) was restricting horsepower, we had to do away with sending fuel through it. Internally, the selector valve’s ports are just 5⁄16 inches in diameter, so it’s pretty amazing we were able to squeeze 538 hp out of the old fuel system in Part 2 (March ’14). However, in order for the fuel gauge to still function, the selector valve had to remain plugged in, so we left it mounted along the framerail and worked around it.
 | 04
04. With the selector valve out of the equation, we weighed our options regarding whether or not to keep both factory fuel tanks or do away with them and mount a 38-gallon Bronco tank (from the same era) in the rear. In the end, we sided with the age-old hot-rodder method of dropping weight to go faster and decided to solely use the front 19-gallon tank. As it turns out, we pulled the rear tank (shown) just in time… It was starting to rust out and leak fuel onto the skidplate beneath it.
 | 05.
05. Next, Flynn tightened up the fittings on the filter bases supplied by Unlimited Diesel Performance. Oil was applied to the ORB (O-ringed boss) fittings, and the system was mocked up on a workbench before being fastened to the truck’s frame.
 | 06.
06. [-10 AN ORB Straight x -8 AN JIC][-10 AN ORB Straight x -10 AN ORB union][-10 AN ORB Straight x -10 AN ORB union][-10 AN x 90-degree -10 AN ORB (to clear E-brake cable bracket)]Choosing to mount the pump and filters along the highest point of the frame (forward of the rear axle) meant we had to remove the E-brake cable, but placing everything here keeps the filters in a safe spot and the lift pump close to the tank (something Aeromotive is very adamant about). After drilling four holes in the frame and cutting 1/4-inch-thick rubber isolator strips (to damp vibration), the A1000 was attached to the frame via double-nutted, 1/4-inch x 1 1/2-inch bolts. Labeled here are the fittings we used from the water separator inlet to the fuel filter outlet.
 | 07.
07. Fuel tank sumps have become all the rage lately, and we’re not surprised. They rule out any quarter-tank issues found in fuel systems utilizing draw straws and allow fuel to gravity feed toward your lift pump. For our project, we chose to use XDP’s fuel sump kit, which comes with a black anodized fuel sump, internal billet-aluminum horseshoe ring, pre-formed rubber Buna gasket, stainless steel hardware, nylon washers, and a barbed fuel line fitting.
 | 08.
08. Although XDP’s sump kit could’ve been installed without removing the fuel tank, we dropped ours to make sure it was completely empty (in order to get the best possible seal). Dropping the tank also allowed us access to rework the tank’s return line. After Flynn took a 3-inch hole saw to the bottom of the tank, the edges were de-burred, the metal shavings were removed, and the sump was mounted. Installing the sump at the lowest point -- and at the rear of the tank -- should work out well at the dragstrip (where fuel is forced to the back of the tank on each launch).
 | 09.
09. One key item diesel enthusiasts often overlook when designing their own fuel system is the return line from the engine. If it’s too small, abnormally high line pressure could exist -- especially at idle (when most fuel sent to the engine is routed back to the tank). We bypassed our factory 5⁄16-inch return line with a 10-foot section of -6 AN (3⁄8-inch) Parker fuel hose, and thanks to running a fuel tank sump, we were able to hook the new return line to the old supply fitting on top of the tank (the old return fitting was capped off).
 | 10.
10. With the fuel tank reinstalled, Flynn attached a short section of -10 AN (5⁄8-inch) fuel hose to the sump. To accommodate the -10 AN hose, the 1/2-inch NPT x 1/2-inch barb fitting supplied in the XDP sump kit was replaced with a larger, 1/2-inch NPT x -10 AN fitting, along with a -10 AN female swivel x 5⁄8-inch Barb-Lok fitting.
 | 11.
11. Up at the engine, the plan was to feed both cylinder heads from the rear, and this Y-block from Unlimited Diesel Performance was the key to making it happen. Fuel coming from the lift pump (and through ½-inch hose) enters the bottom, is then divided, and exits via two outlets utilizing 3⁄8-inch hose. The inlet of the Y-block (left) was shipped to us with a -8 AN NPT x -8 AN Barb-Lok fitting, and the outlets (right) were fitted with -8 AN NPT x -6 AN NPT fittings.
 | 12.
12. Hooking up the -8 AN (1/2-inch) fuel hose to the fuel filter base’s -10 AN x -8 AN JIC fitting called for the appropriate -8 AN female swivel x 1/2-inch Barb-Lok fitting. From there, it was a matter of tightening everything up and routing the 1/2-inch fuel hose toward the engine.
 | 13.
13. Here you can see both the 1/2-inch supply hose (yellow arrow) and the 3⁄8-inch return hose (red arrow) being run along the framerail. We actually used the old, steel factory lines (beneath them) as a way to anchor the new hoses to the frame.
 | 14.
14. Flynn used the clutch master cylinder port in the firewall to securely mount the Y-block (obviously we weren’t using it, being that our OBS is an automatic). By installing the Y-block here we were able to reuse the two braided steel lines from the previous CPR system -- the main difference being that now we’re feeding both heads. And, as these two braided steel lines are the exact same length, in theory equal flow should make it to each head.
 | 15.
15. As far as wiring up the A1000 was concerned, we reused the power and ground wires from the previous CPR system. However, because the new fuel system was mounted farther back on the frame, Flynn had to add a few extra feet of wire to make everything reach. The pump was also wired up to run when the ignition is in the key-on position.
 | 16.
16. Unused fuel exits the heads from the front. A -4 AN female NPT x -2 AN Barb-Lok (shown) was employed to hook to the 90-degree 1⁄8-inch NPT x -4 AN JIC fitting in the passenger-side head (supplied in the CPR system), and the same thing was used to fasten to the factory 1⁄8-inch NPT x -4 AN straight fitting in the driver-side head. Flynn’s sourced the heavy-duty Parker -4 AN (1/4-inch) fuel hose used in the engine compartment, which resists heat in engine bays and has a working pressure rating of 350 psi. Once installed, Flynn wrapped wire loom around the fuel hoses for vibration protection.
 | 17.
17. Also retained from the CPR system was our Aeromotive regulator, although now we’re utilizing both ports. In order to connect the new 3⁄8-inch return hose to the regulator, a -6 AN x -10 AN ORB adapter union from Lawson Products was used. The remaining factory steel fuel lines in the lifter valley were removed, all new fuel lines were secured in the engine compartment (and along the framerail), and all fittings were checked for tightness before moving on. Our last order of business was installing this 0-to-100-psi, liquid-filled fuel pressure gauge from Summit Racing.
 | 18.
18. With everything installed, we pulled the water separator (Napa PN 3439) and fuel filter (Napa PN 3528), filled them full of diesel, and tightened them back up. Then we topped off the tank and cycled the A1000. Once we felt the system was primed, we started the truck and adjusted fuel pressure at the regulator to 68 psi.
 | 19.
19. Back on the dyno at Randall’s Performance, we were pretty confident supply pressure would hold steady -- and we weren’t disappointed. For a back-to-back dyno comparison, our first dyno pull was made in the fourth position on our six-position TS Performance chip -- a tune calling for just 2.4 milliseconds worth of pulse width (injector on time). The result was 547 hp and 896 lb-ft of torque, which was a 9hp gain over our best dyno pull in Part 2 (538 hp, 890 lb-ft). The next click up on the chip (a 2.7-millisecond tune) yielded 550 hp and 923 lb-ft.
 | 20.
20. For our final dyno run, the sixth position (a 2.9-millisecond tune) could finally be utilized, and the result was 555 hp and 917 lb-ft of torque. Maintaining fuel pressure proved to be worth an extra 17 hp at the wheels and got us past our goal of 550 hp. With the SRP1.1 high-pressure oil pump maintaining injection control pressure (ICP), the Fleece Performance billet S468 flowing all the air we needed, and the new fuel system holding a consistent 65 to 68 psi, it was time to see how much quicker the old Ford was in the eighth-mile. Boost: 43 psi (46 psi to 49 psi on the street) ICP: 3,000 to 3,200 psi Fuel Pressure (WOT): 65 to 68 psi *SuperFlow dyno correction factor *35 percent load applied *Third gear (1:1), torque converter locked *2.9-millisecond pulse width tune
 | 21.
Boost: 43 psi (46 psi to 49 psi on the street)